
 Pin it
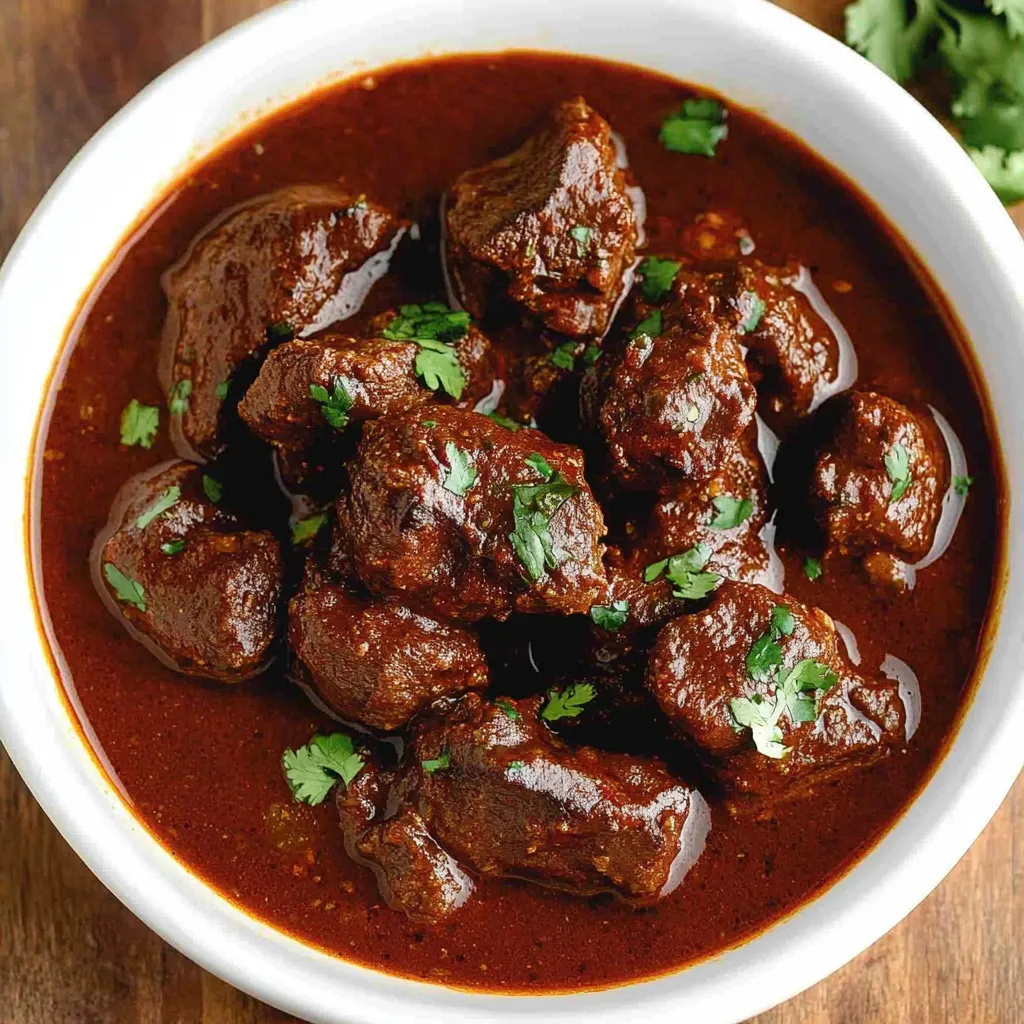
This chile colorado delivers the kind of deep, complex flavors that make you understand why certain Mexican dishes have been passed down through generations. Tender chunks of beef simmer slowly in a rich red chile sauce made from dried peppers until the meat practically falls apart at the touch of a fork, while the sauce thickens into something glossy and intensely flavorful. The dried chiles get toasted and blended into a smooth, velvety sauce that coats every piece of meat with layers of earthy, slightly smoky, subtly sweet flavor that's warming without being aggressively spicy. This isn't the kind of stew you throw together in 20 minutes—it requires patience and proper technique—but the result is restaurant-quality Mexican food that tastes completely authentic and makes your house smell absolutely incredible while it cooks.
I first tasted chile colorado at a small Mexican restaurant years ago and became immediately obsessed with recreating that incredibly tender beef swimming in thick, flavorful red sauce. My initial attempts using canned chile sauce were disappointing and tasted flat compared to what I remembered, so I finally committed to learning how to make it properly with dried chiles. The first time I toasted and blended my own chile sauce, the difference was so dramatic that I couldn't believe I'd been settling for inferior versions. The sauce had this incredible depth with subtle sweetness, earthy undertones, and just enough heat to be interesting without overwhelming. Now this recipe is something I make regularly, often doubling the batch so I can freeze portions for easy weeknight dinners. My oldest son declares it's better than the restaurant version that inspired it, which is the highest compliment I could receive.
Ingredients and What Makes Them Essential
- Dried chiles (3 to 4 ounces total, combination): These are the foundation of authentic chile colorado and provide the distinctive red color, earthy flavor, and subtle heat that defines this dish. Guajillo chiles are mild with fruity, tangy notes and beautiful red color, making them ideal as the base. Ancho chiles (dried poblanos) contribute sweet, raisin-like flavor with mild heat and deeper color. New Mexico chiles offer bright red color and moderate heat with earthy flavor. Chile de arbol adds genuine heat if you want spiciness, though it should be used sparingly since it's quite potent. You can use just one or two types if that's easier to source, or combine three or four for maximum complexity. Look for dried chiles that are pliable rather than brittle, with vibrant color rather than faded brown, which indicates freshness.
- Beef chuck stew meat (2 to 2½ pounds): Chuck roast cut into chunks is ideal because it has enough fat and connective tissue to stay moist and become tender during long cooking without drying out. The marbling throughout chuck means it can withstand hours of simmering and actually improves in texture, becoming silky and falling apart rather than tough. Buy pre-cut stew meat for convenience, or purchase a chuck roast and cut it yourself into 1-inch cubes, which gives you more control over size and allows you to trim excess fat. Avoid lean cuts like sirloin or round, which will become dry and stringy with extended cooking time.
- Beef or chicken broth (3 to 4 cups): This provides the liquid base for both blooming the dried chiles and simmering the stew, adding savory depth that enhances the meat and chile flavors. Chicken broth surprisingly works better than canned beef broth in many cases, since canned beef broth often tastes weak and artificial while chicken broth has genuine flavor. Homemade stock is ideal if you have it, but quality store-bought low-sodium broth works perfectly fine and gives you control over the salt level. The broth becomes part of the sauce as it reduces and concentrates during cooking.
- Tomatoes (2 medium, roasted): Roasted tomatoes add acidity, sweetness, and body to the chile sauce while providing natural thickening from their pectin content. Roasting the tomatoes before blending them into the sauce develops deeper, more complex flavor with subtle caramelization and smokiness. Fresh Roma or plum tomatoes work best since they have less water content and more flesh, though regular tomatoes are acceptable. In a pinch, canned fire-roasted tomatoes can substitute—use about 1 cup drained tomatoes, which saves time without dramatically affecting quality.
- Masa harina (3 tablespoons): This is finely ground corn flour used to make tortillas and tamales, and it serves as a thickening agent that adds authentic corn flavor to the sauce. Masa harina thickens differently than regular flour or cornstarch, creating a smoother, more velvety texture without any pasty taste. It's naturally gluten-free, which is beneficial for people with dietary restrictions. Look for it in the Latin foods aisle or near the flour and baking supplies—Maseca is the most common brand. If you can't find masa harina, you can substitute by finely chopping corn tortillas and simmering them in the stew until they dissolve.
- Yellow onion (1 large): Onion provides aromatic sweetness and savory depth that forms the flavor foundation along with the garlic. Yellow onions are ideal because they have the right balance of sweetness and sharpness, becoming mellow and almost caramelized during long cooking. Choose a heavy, firm onion without soft spots or sprouting, and dice it into pieces roughly the same size so everything cooks evenly.
- Garlic (4 to 5 cloves): Fresh garlic brings pungent, aromatic complexity that's essential to Mexican flavor profiles and complements the earthiness of the dried chiles beautifully. Mince the garlic finely so it distributes evenly throughout the sauce without leaving big chunks that might burn during the initial sautéing. Fresh garlic is dramatically better than pre-minced jarred garlic or garlic powder for this application where the flavor is so prominent.
- Ground cumin (1 tablespoon): Cumin provides warm, earthy, slightly bitter notes that are absolutely essential to Mexican cuisine and help tie all the other flavors together. Toasting whole cumin seeds and grinding them fresh would be ideal, but pre-ground cumin from a relatively fresh jar works perfectly well. Cumin can become bitter if it's very old, so replace your ground spices if they've been sitting in your cabinet for years without being used.
- Dried oregano (1 teaspoon, Mexican if possible): Mexican oregano tastes quite different from Mediterranean oregano—it's more robust, citrusy, and slightly floral. If you can find Mexican oregano at a Latin market or specialty store, it's worth seeking out for authentic flavor. Regular oregano works as a substitute, though the flavor profile will be slightly different. Crushing the dried oregano between your fingers as you add it releases aromatic oils trapped in the leaves.
- Ground allspice (¼ teaspoon): This warm spice adds subtle complexity and depth without being identifiable, providing hints of cinnamon, clove, and nutmeg all at once. It's used sparingly but makes a real difference in creating authentic flavor that tastes restaurant-quality. Don't skip it even though it seems like an unusual addition—it's part of what makes this taste genuinely Mexican rather than just generically spicy.
- Apple cider vinegar (1 tablespoon): A splash of vinegar at the end brightens all the other flavors and adds subtle acidity that balances the richness of the beef and the earthiness of the chiles. The vinegar also helps tenderize the meat slightly and cuts through any heaviness, making the stew taste more vibrant and less one-dimensional. Don't add it until the very end of cooking, or the acidity will cook off and lose its brightening effect.
Step-by-Step Instructions
- Prepare and toast the dried chiles:
- If you have sensitive skin, put on disposable gloves before handling the dried chiles since the capsaicin oils can irritate your hands and burn if you touch your eyes. Take each dried chile and pull off the stem by grasping it firmly and tugging—it should come off easily, often bringing some seeds with it. Use kitchen shears to cut open each chile lengthwise if needed, then scrape out all the seeds and any thick white ribs inside using a small spoon or your fingers. The seeds add bitterness and extra heat without flavor, so removing them is important. For tiny chiles like chile de arbol, you can skip cutting them open—just pull the stem and squeeze gently to push the seeds out through the opening. Arrange all your cleaned chiles on a microwave-safe plate in a single layer. Microwave them on high for 15 seconds, flip them over with tongs, then microwave for another 15 seconds. The chiles should smell toasted and aromatic, and they'll become more pliable and slightly darkened in color. This quick toasting develops their flavor significantly without requiring you to stand over a hot skillet.
- Rehydrate the toasted chiles:
- While the chiles are still warm from toasting, transfer them to a medium microwave-safe bowl. Heat about 2 cups of broth or water in the microwave until it's very hot but not necessarily boiling—about 2 to 3 minutes. Pour the hot liquid over the toasted chiles, making sure they're completely submerged. Cover the bowl with a plate or plastic wrap and microwave the whole thing for about 2 minutes, which helps the chiles soften fully and begin releasing their flavor into the liquid. Let the covered chiles sit and steep for at least 10 minutes, or up to 30 minutes if you have time, which allows them to rehydrate completely and become soft enough to blend smoothly. If you prefer not to use the microwave, you can toast the chiles in a dry skillet over medium heat for about 30 seconds per side, then transfer them to a bowl and cover with boiling water to soak for 30 minutes.
- Roast the tomatoes:
- While your chiles are soaking, prepare the tomatoes by cutting them in half through the equator. Place a dry skillet over medium-high heat and let it get quite hot, then add the tomato halves cut-side down. Let them roast without moving for about 5 to 8 minutes until the cut surfaces are deeply charred and blackened in spots. Flip them over and roast the skin side for another 3 to 4 minutes. The tomatoes should be softened and aromatic with visible char marks, which adds smoky depth to the sauce. If you're really pressed for time, you can skip this step and use a cup of drained fire-roasted canned tomatoes instead, though fresh roasted tomatoes taste noticeably better.
- Blend the chile sauce:
- Once your chiles have soaked and softened completely, transfer them to a blender along with all the soaking liquid and the roasted tomatoes. Blend on high speed for at least 2 full minutes until you have a completely smooth, velvety sauce with no visible chunks of chile skin or tomato remaining. The sauce should be thick and deep red, with a consistency somewhere between heavy cream and pancake batter. If your blender struggles or the mixture seems too thick to blend smoothly, add a splash more broth to help things move. Always start blending on the lowest speed and hold the lid down firmly with a kitchen towel to prevent hot liquid from exploding out, which can cause serious burns. Strain the sauce through a fine-mesh strainer if you want ultra-smooth texture, though this is optional—most people find the unstrained sauce perfectly acceptable.
- Brown the beef properly:
- Heat a large Dutch oven or heavy pot over medium-high heat and add about 2 tablespoons of oil. While the pot heats, pat your beef cubes completely dry with paper towels—wet meat won't brown properly and will steam instead. Season the beef generously with salt and pepper on all sides. Once the oil is shimmering hot and almost smoking, add the beef cubes in a single layer without crowding them. You'll probably need to work in two or three batches depending on your pot size—overcrowding drops the temperature dramatically and prevents proper browning. Let each batch sit undisturbed for about 2 to 3 minutes so the bottom can develop a deep brown crust, then turn the pieces and brown the other sides. The beef doesn't need to cook through at this stage—you're just developing flavor through the Maillard reaction that creates those delicious caramelized surfaces. Transfer each batch to a plate as it finishes and continue until all the meat is browned.
- Build the aromatic base:
- After removing all the beef, reduce the heat to medium and add your diced onion to the pot. Use a wooden spoon to scrape up all those browned bits stuck to the bottom—these are packed with flavor and will enrich your sauce. Cook the onions for about 5 minutes, stirring occasionally, until they soften and become translucent. Add the minced garlic and cook for another minute until fragrant, stirring constantly so it doesn't burn. Sprinkle in the cumin, oregano, and allspice, stirring them into the onions and garlic. Let the spices bloom in the residual oil for about 30 seconds, which develops their full aromatic potential and removes any raw, dusty taste. The mixture should smell incredible at this point—deeply savory with warm spice notes.
- Combine everything and simmer:
- Return all the browned beef and any accumulated juices from the plate back to the pot. Pour in your blended chile sauce, scraping the blender jar with a spatula to get every drop of that precious sauce. Add the remaining 1 to 2 cups of broth—the amount depends on how thick you want your final sauce and which cooking method you're using. For stovetop or oven, use less liquid since there's more evaporation; for slow cooker or Instant Pot, you might want slightly more. Stir everything together thoroughly, making sure all the beef is submerged in the sauce. If cooking on the stovetop, bring the mixture to a boil, then reduce to the lowest possible simmer, cover with a lid, and cook for 2 to 2½ hours, stirring occasionally. For oven cooking, bring to a boil on the stovetop, cover with a lid or foil, transfer to a 325°F oven, and cook for 2 to 2½ hours. For slow cooker, transfer everything to the crock pot and cook on low for 6 to 8 hours or high for 3 to 4 hours. For Instant Pot, seal the lid, cook on high pressure for 35 minutes, then allow natural pressure release for 15 minutes before quick-releasing any remaining pressure.
- Thicken the sauce and finish:
- Once the beef is fork-tender and falling apart easily, it's time to thicken the sauce if needed. Scoop out about half a cup of the hot cooking liquid from the pot into a small bowl. Add the masa harina to this liquid and whisk vigorously until you have a smooth slurry with no lumps remaining. Pour this masa slurry back into the pot along with the apple cider vinegar, stirring everything together well. Let the stew simmer uncovered for another 5 minutes, stirring occasionally, which allows the masa to activate and thicken the sauce while the vinegar brightens all the flavors. Taste the sauce and adjust the seasoning with more salt if needed—the flavor should be rich, complex, slightly sweet, earthy, and balanced without being too salty or too spicy. The sauce should coat the back of a spoon and cling to the beef pieces rather than being watery.
 Pin it
The ingredient that makes the most dramatic difference in this recipe is absolutely the quality and variety of dried chiles you use, and I learned this lesson after making several batches with whatever random dried chiles the grocery store had available. My first attempt used only dried ancho chiles because that's all I could find, and while the stew was good, it lacked complexity and tasted somewhat one-dimensional. When I finally tracked down guajillo chiles at a Mexican market and combined them with the anchos plus a couple chile de arbol for heat, the transformation was remarkable. The sauce had incredible depth with layers of flavor that unfolded as you ate—fruity notes, earthy undertones, subtle sweetness, and balanced heat that built gradually rather than hitting you immediately. My family noticed the difference without me saying anything, commenting that it tasted more authentic and restaurant-like. Now I always seek out good-quality dried chiles and use a combination of at least two or three varieties, even though it requires a special trip to the Latin market. The extra effort is completely worth it for the superior flavor, and I've learned that the chiles are what separate mediocre chile colorado from the outstanding version that makes people ask for seconds.
Understanding Chile Colorado's Flavor Profile
Chile colorado represents a specific category of Mexican cooking where dried chiles form the foundation of complex sauce that's more about depth and earthiness than raw heat. The process of toasting dried chiles before rehydrating and blending them develops flavors that simply don't exist in fresh chiles—subtle smokiness, concentrated fruitiness, and deep umami notes that create remarkable complexity. Different dried chile varieties contribute distinct characteristics: guajillos offer bright red color and mild tanginess, anchos provide sweet raisin notes, New Mexico chiles add earthy backbone, and chile de arbol brings genuine heat. Combining multiple varieties creates layered flavor that's impossible to achieve with just one type.
The long, slow braising process is essential for developing the stew's characteristic texture and allowing flavors to meld completely. As the beef simmers in the chile sauce, its connective tissues gradually break down into gelatin, which enriches the sauce with body and silky texture while the meat becomes increasingly tender. The collagen transformation happens slowly over hours, which is why you can't rush this recipe—pressure cooking speeds it up through intense heat and pressure, but traditional low-and-slow methods produce slightly different results with more developed flavors. During this extended cooking, the spices bloom and round out, the tomatoes break down completely, and the chile sauce concentrates and thickens naturally even before adding masa harina.
The masa harina thickener is traditional and authentic, contributing subtle corn flavor that ties the dish to its Mexican roots while creating silky texture that's distinctly different from flour-thickened sauces. Masa harina is corn that's been treated with lime (calcium hydroxide) in a process called nixtamalization, which makes nutrients more bioavailable and develops distinctive alkaline corn flavor. This treated corn tastes fundamentally different from regular cornmeal or cornstarch, with earthy, almost nutty notes that complement the chiles beautifully. The vinegar added at the very end provides crucial balance—after hours of cooking, flavors can become muted or muddy, and that splash of acidity brightens everything instantly, making individual flavors pop rather than tasting muddled.
Cooking Method Comparisons
Each cooking method for chile colorado offers distinct advantages and produces subtly different results, so understanding these differences helps you choose the best approach for your situation and preferences. Stovetop cooking gives you the most control since you can monitor and adjust throughout, and it produces excellent results with rich, concentrated flavors from steady low heat. The main disadvantage is requiring occasional attention to stir and ensure nothing sticks or burns on the bottom. Oven braising provides more even, gentle heat from all sides and requires less attention since there's no risk of bottom scorching, making it ideal if you're multitasking on other cooking projects.
Slow cooker cooking is the ultimate hands-off method that's perfect for working people who want to come home to finished dinner. The very low, steady heat over 6 to 8 hours creates incredibly tender meat and allows flavors to develop fully without any supervision. However, slow cookers don't allow much evaporation, so you'll end up with thinner sauce unless you either use less initial liquid or transfer everything to the stovetop at the end to reduce. The lack of high heat also means you should brown the beef separately in a pan first, since slow cookers can't achieve the temperatures needed for proper caramelization.
Instant Pot and pressure cooking dramatically reduce the cooking time to under an hour while still producing tender meat and well-developed flavors through intense pressure and heat. The sealed environment means no evaporation occurs, so the sauce stays quite liquidy—plan on simmering with the lid off after pressure cooking to reduce and concentrate it, or use slightly less initial liquid. Pressure cooking can't perfectly replicate the depth of flavor that develops over hours of traditional braising, but it comes remarkably close and is the clear winner when you need dinner ready fast. The sauté function on most electric pressure cookers allows you to brown the beef directly in the pot, eliminating extra pans and cleanup.
Versatility and Serving Options
Chile colorado functions beautifully both as a standalone stew and as an incredibly versatile filling for various Mexican dishes, which makes it practical for meal planning and using leftovers. Served traditionally as stew, it pairs perfectly with fluffy Mexican rice, warm tortillas for scooping, and refried beans or pinto beans cooked from scratch. The combination creates a complete, satisfying meal with balanced nutrition and complementary textures. Some people enjoy it over creamy mashed potatoes, which might not be traditional but tastes absolutely delicious as the potatoes soak up all that flavorful red sauce.
For tacos, simply shred the tender beef with two forks—it should fall apart easily if properly cooked—and serve it in warm corn or flour tortillas with your favorite toppings like diced onions, fresh cilantro, lime wedges, and crumbled queso fresco. The meat is so flavorful and saucy that it doesn't need much embellishment, though a spoonful of sour cream or some pickled jalapeños add nice contrasting elements. For burritos, spread some of the sauce on a large flour tortilla, add a generous portion of the shredded beef, then layer in Mexican rice, beans if desired, and cheese. Roll it tightly and you can either serve it immediately or place the burritos in a baking dish, top with more sauce and cheese, and bake them enchilada-style until bubbly and golden.
The chile colorado sauce itself is valuable beyond just this stew and deserves recognition as a standalone component. You can make extra sauce and freeze it for future use in enchiladas, as a braising liquid for other proteins like pork or chicken, or even as a base for chilaquiles or huevos rancheros. Tossing the sauce with cooked pasta creates a Mexican-Italian fusion that's surprisingly delicious, or you can use it as a pizza sauce base for unconventional but tasty results. The sauce keeps in the refrigerator for 4 to 5 days and freezes beautifully for up to 3 months, which makes it excellent for meal prep and having restaurant-quality flavor ready whenever you need it.
 Pin it
This chile colorado has become one of my signature dishes and something I make whenever I want to seriously impress guests or treat my family to restaurant-quality Mexican food at home. The recipe requires commitment and patience, particularly if you're making it properly with homemade chile sauce rather than taking shortcuts, but the results are so dramatically better than anything you can buy prepared that the effort feels completely justified. I often make double batches now because the stew freezes perfectly and having portions ready in the freezer means I can enjoy this incredible dish on busy weeknights when I definitely don't have time to start from scratch. The leftovers are actually better than freshly made since the flavors continue developing and melding overnight in the refrigerator, and I've found myself looking forward to leftovers almost as much as the original meal. Once you taste authentic chile colorado made with properly prepared chile sauce and tender, slow-cooked beef, you'll understand why this dish has remained popular for generations and why it's worth learning to make correctly rather than settling for inferior canned-sauce versions.
Frequently Asked Questions
- → What kind of beef works best for Chili Colorado?
- Chuck roast is ideal because it has enough fat and connective tissue to become tender during the long cooking process. You can also use pre-cut stew meat to save time.
- → Can I make this without dried chiles?
- Dried chiles are essential for authentic flavor, but you can substitute with chili powder in a pinch. Use about 3-4 tablespoons of quality chili powder mixed with the broth, though the taste won't be quite the same.
- → How do I store leftover Chili Colorado?
- Store it in an airtight container in the fridge for up to 4 days. It actually tastes better the next day as the flavors develop. You can also freeze it for up to 3 months.
- → What should I serve with Chili Colorado?
- This pairs perfectly with warm tortillas, rice, beans, or over creamy mashed potatoes. Add fresh cilantro, diced onions, and a squeeze of lime on top.
- → Can I make Chili Colorado spicier?
- Definitely! Add more Chile de Arbol peppers to the sauce, or stir in some cayenne pepper or hot sauce at the end. You can also leave some seeds in the peppers for extra heat.
- → What's the difference between Chili Colorado and regular chili?
- Chili Colorado is a Mexican stew made with large beef chunks in a smooth red chile sauce, while American chili is usually ground beef with beans in a thicker, chunkier sauce.
- → Do I have to sear the beef first?
- Searing creates a flavorful crust and adds depth to the stew, but if you're short on time, you can skip it. The stew will still be tasty, just not quite as rich.