
 Pin it
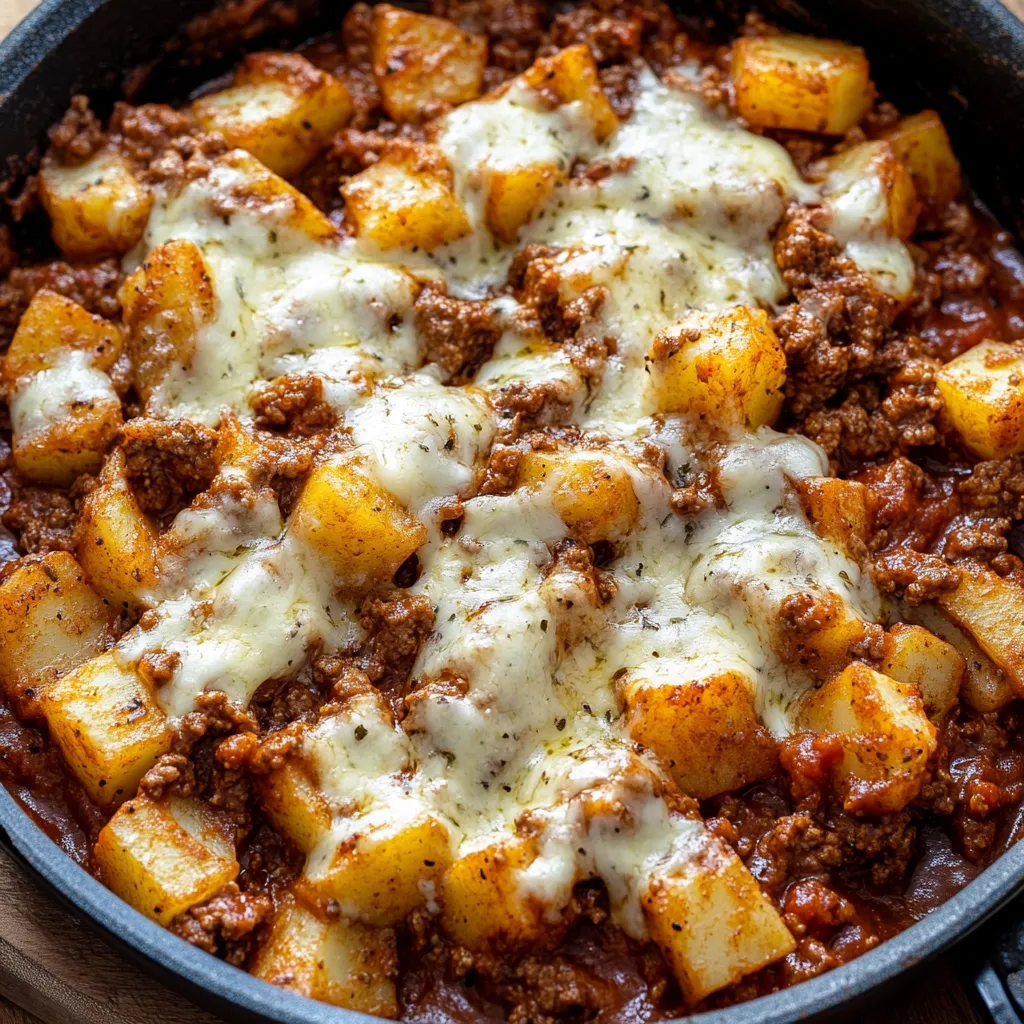
One-pan meals save my sanity on busy weeknights, and this potato skillet takes the concept to a whole new level of satisfying. You get all the messy, tangy comfort of sloppy joes combined with crispy roasted potatoes and not one, not two, but three types of cheese melted on top until everything gets gloriously gooey. The Boursin is what elevates this from regular weeknight dinner to something that feels a bit special - those little pockets of garlic and herb cheese melt into the sauce and create these amazing flavor bursts throughout. The beauty of this dish is that everything cooks in one skillet, which means less cleanup and more time sitting down to actually enjoy dinner with your family. The ground beef base gets simmered in that classic sweet and tangy sloppy joe sauce with Worcestershire, mustard, and a touch of maple syrup, while the potatoes roast until they're golden and crispy on the edges. When you pull this out of the oven with all that cheese bubbling on top, it looks impressive enough for company but easy enough for a Tuesday night when everyone's hungry and nobody wants to wait an hour for dinner.
I stumbled onto this recipe combination completely by accident when I had leftover roasted potatoes and was making sloppy joes for dinner. My daughter suggested just throwing the potatoes on top instead of serving them on the side, and when I added cheese because, well, cheese makes everything better, we ended up with something that became an instant family favorite. Now it shows up in our dinner rotation at least twice a month, and I've stopped bothering with traditional sloppy joe buns entirely because this version is so much more satisfying.
Ingredients and What Makes Them Essential
- Russet Potatoes (about 1 ½ pounds, cut into ¾-inch cubes): These starchy potatoes are ideal because they get crispy and golden on the outside while staying fluffy inside. Russets hold their shape well during roasting and absorb some of that sloppy joe sauce beautifully. When shopping, look for firm potatoes with no green spots or sprouts. You want to cut them into fairly uniform cubes so they cook evenly - too large and they won't cook through, too small and they'll get mushy.
- Extra Lean Ground Beef (1 pound, 5% fat or less): Using extra lean beef keeps the dish from getting greasy while still providing plenty of meaty flavor and texture. The lean meat absorbs all those bold sloppy joe seasonings without adding excess fat that would make the sauce oily. If you can only find regular ground beef, brown it thoroughly and drain off the fat before continuing with the recipe.
- Yellow Onion (1 medium, finely diced): Onions form the aromatic base of the sauce and add natural sweetness as they cook down. Yellow onions are perfect here because they're not as sharp as white onions but have more flavor than sweet onions. Dice them small so they melt into the sauce rather than staying in big chunks that some people might pick around.
- Garlic (3 cloves, minced): Fresh garlic adds pungent, savory depth that powdered garlic just can't match. Mince it finely so it distributes evenly throughout the sauce. If your garlic has a green sprout in the center, remove it because it tastes bitter.
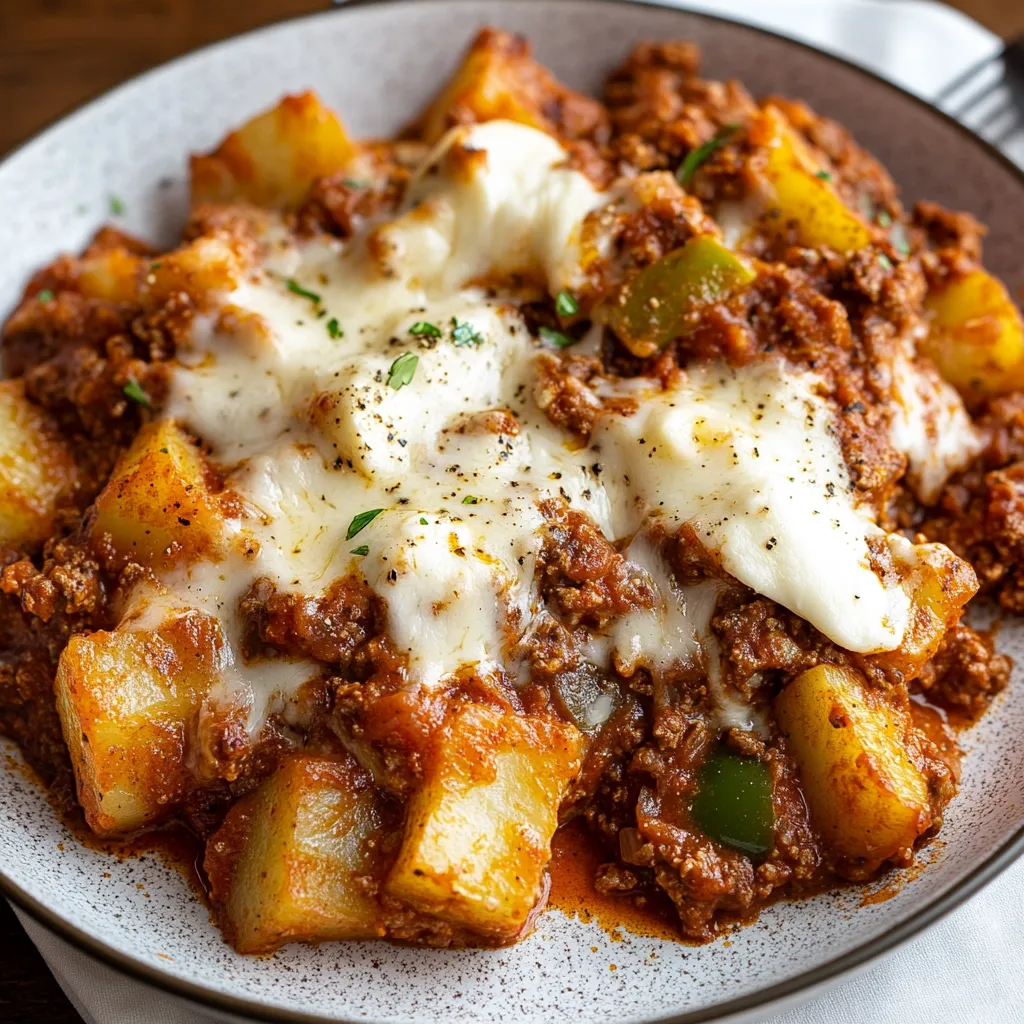
- Green Bell Pepper (1 medium, diced): This is classic in sloppy joe recipes, adding a slight crunch and subtle sweetness that balances the rich meat and tangy sauce. Green peppers are more traditional than red or yellow, which are sweeter. Dice them to roughly the same size as your onions for even cooking.
- Passata (1 ½ cups): This smooth, uncooked tomato puree provides the tomato base for your sauce without any chunks or seeds. It's thicker than crushed tomatoes but thinner than tomato paste, giving you the perfect consistency. You'll find it near the pasta sauces in most supermarkets. If you can't find passata, use crushed tomatoes that you've blended smooth.
- Tomato Paste (2 tablespoons): This concentrated tomato flavor adds depth and richness while thickening the sauce. It's much more intense than passata, so a little goes a long way. Look for tomato paste in tubes if you can find it because then you can use just what you need and store the rest in the fridge.
- Worcestershire Sauce (2 tablespoons): This fermented condiment adds umami, tang, and complexity that makes the sauce taste like it's been simmering for hours. The combination of vinegar, molasses, anchovies, and spices creates a savory depth you can't get from any other single ingredient. Standard Lea & Perrins is the classic choice.
- American Yellow Mustard (1 tablespoon): The bright tang and slight sharpness from mustard is essential to authentic sloppy joe flavor. American mustard is milder than Dijon and adds that classic taste everyone expects. Don't substitute fancy mustards here - the basic yellow stuff is what you want.
- Pure Maple Syrup (1 tablespoon): This balances all the tangy and savory elements with just enough sweetness. Real maple syrup tastes better than pancake syrup or corn syrup, though honey or brown sugar work in a pinch. The sweetness should be subtle, not candy-like.
- Beef Stock (½ cup): This adds meaty depth and keeps the sauce from getting too thick or pasty. Use good quality stock if possible because it makes a noticeable difference. Low-sodium stock gives you better control over the salt level. In a pinch, you can use water, but stock makes the sauce richer.
- Smoked Paprika (1 teaspoon): This adds subtle smokiness and a beautiful red color without any heat. Smoked paprika tastes completely different from regular paprika - it's worth seeking out. If you only have regular paprika, it'll work but won't have that depth.
- Onion Powder (1 teaspoon): This boosts the onion flavor throughout the sauce even after the fresh onions cook down. It's not a substitute for fresh onions but rather enhances them. Make sure yours isn't clumped or stale.
- Black Pepper (½ teaspoon, freshly ground): Fresh cracked pepper adds subtle heat and aromatic sharpness. Pre-ground pepper that's been sitting for months tastes dusty and flat by comparison.
- Salt (to taste): You'll need salt to season the meat and potatoes, but the exact amount depends on your stock and cheese saltiness, so taste as you go rather than dumping it all in at once.
- Boursin Garlic and Herb Cheese (5-ounce package, crumbled): This creamy, spreadable cheese packed with garlic and herbs is the star ingredient that makes this dish special. It melts into little pockets of rich, garlicky goodness throughout the skillet. Don't substitute regular cream cheese because it lacks all those herbs and garlic that make Boursin so flavorful.
- Shredded Cheddar Cheese (1 cup): Sharp cheddar adds a bold, tangy flavor and melts beautifully. Pre-shredded cheese is convenient but blocks of cheese you shred yourself melt smoother because they don't have anti-caking agents. Medium or mild cheddar works too if you prefer less sharpness.
- Shredded Mozzarella Cheese (1 cup): Low-moisture mozzarella creates that gorgeous stretchy, gooey cheese pull everyone loves. It's milder than cheddar, so using both gives you complexity. Part-skim or whole milk mozzarella both work fine here.
- Olive Oil (2 tablespoons): This coats the potatoes for roasting and helps them get crispy and golden. Extra virgin olive oil has more flavor but regular olive oil works fine too since you're cooking at high heat.
Step-by-Step Instructions
- Prepare and Roast the Potatoes:
- Start by preheating your oven to 425°F so it's properly hot when you're ready to roast the potatoes. While the oven heats, scrub your russet potatoes under running water with a vegetable brush to remove any dirt - you can peel them if you prefer, but I usually leave the skins on for extra texture and nutrition. Pat the potatoes completely dry with a clean kitchen towel because any moisture will prevent them from getting crispy. Cut the potatoes into roughly ¾-inch cubes, trying to keep them as uniform as possible so they all cook at the same rate. Place the potato cubes in a large bowl and drizzle with 2 tablespoons of olive oil. Add a generous pinch of salt and several grinds of black pepper. Toss everything together with your hands until every potato cube is coated with oil and seasoning. Spread the potatoes out on a large baking sheet in a single layer, making sure they're not crowded or touching too much - if they're piled on top of each other, they'll steam instead of roast. Slide the baking sheet into your preheated oven and roast for about 25 to 30 minutes, flipping them with a spatula halfway through. You want them golden brown on the edges and tender when pierced with a fork, but not completely soft because they'll finish cooking in the skillet later. Once done, remove them from the oven and set aside. Leave the oven on at 425°F because you'll need it again soon.
- Cook the Aromatics and Beef:
- While your potatoes roast, you can start on the sloppy joe base. Choose a large oven-safe skillet - cast iron works beautifully, or any skillet that can go from stovetop to oven. Make sure it's at least 12 inches wide so everything fits comfortably. Place the skillet over medium-high heat and let it get hot for about a minute. Add your pound of extra lean ground beef to the hot skillet, breaking it up with a wooden spoon or spatula. Let the meat cook undisturbed for about 2 minutes so it gets some nice browning on the bottom, then break it up into smaller crumbles and continue cooking. Keep breaking up any large chunks as you go - you want small, uniform crumbles rather than big clumps. Cook the beef for about 6 to 8 minutes total until it's completely browned with no pink remaining. If you see any liquid accumulating in the pan from the meat, let it cook off before proceeding. Once the beef is fully cooked, push it to the sides of the skillet, creating a well in the center. Add your finely diced onion and diced green bell pepper to that empty center space. Cook them for about 4 minutes, stirring occasionally, until the onion becomes translucent and soft. Add your minced garlic to the vegetables and cook for just 1 minute more, stirring constantly so the garlic doesn't burn - garlic burns quickly and becomes bitter, so watch it carefully. Now stir everything together, mixing the vegetables into the beef so it's all combined.
- Build the Sloppy Joe Sauce:
- With your beef and vegetables mixed together in the skillet, it's time to build that rich, tangy sauce. Add your 2 tablespoons of tomato paste directly to the skillet and stir it into the meat mixture, letting it cook for about 1 minute. This brief cooking toasts the tomato paste and removes any raw, tinny flavor. Now pour in your 1 ½ cups of passata, stirring to coat all the meat evenly. Add 2 tablespoons of Worcestershire sauce, 1 tablespoon of American mustard, and 1 tablespoon of maple syrup. Pour in the ½ cup of beef stock. Sprinkle in 1 teaspoon of smoked paprika, 1 teaspoon of onion powder, and ½ teaspoon of black pepper. Give everything a thorough stir, making sure all those seasonings are distributed throughout the sauce. Bring the mixture to a gentle simmer, then reduce the heat to medium-low. Let it simmer uncovered for about 8 to 10 minutes, stirring occasionally. You want the sauce to thicken and reduce slightly so it's rich and coating the meat well, not watery or soupy. As it simmers, the flavors will meld together beautifully. Taste the sauce and adjust the seasoning - add a pinch of salt if needed, a bit more maple syrup if it's too tangy, or another splash of Worcestershire if you want more depth. The sauce should taste bold and well-seasoned at this point.
- Assemble the Skillet:
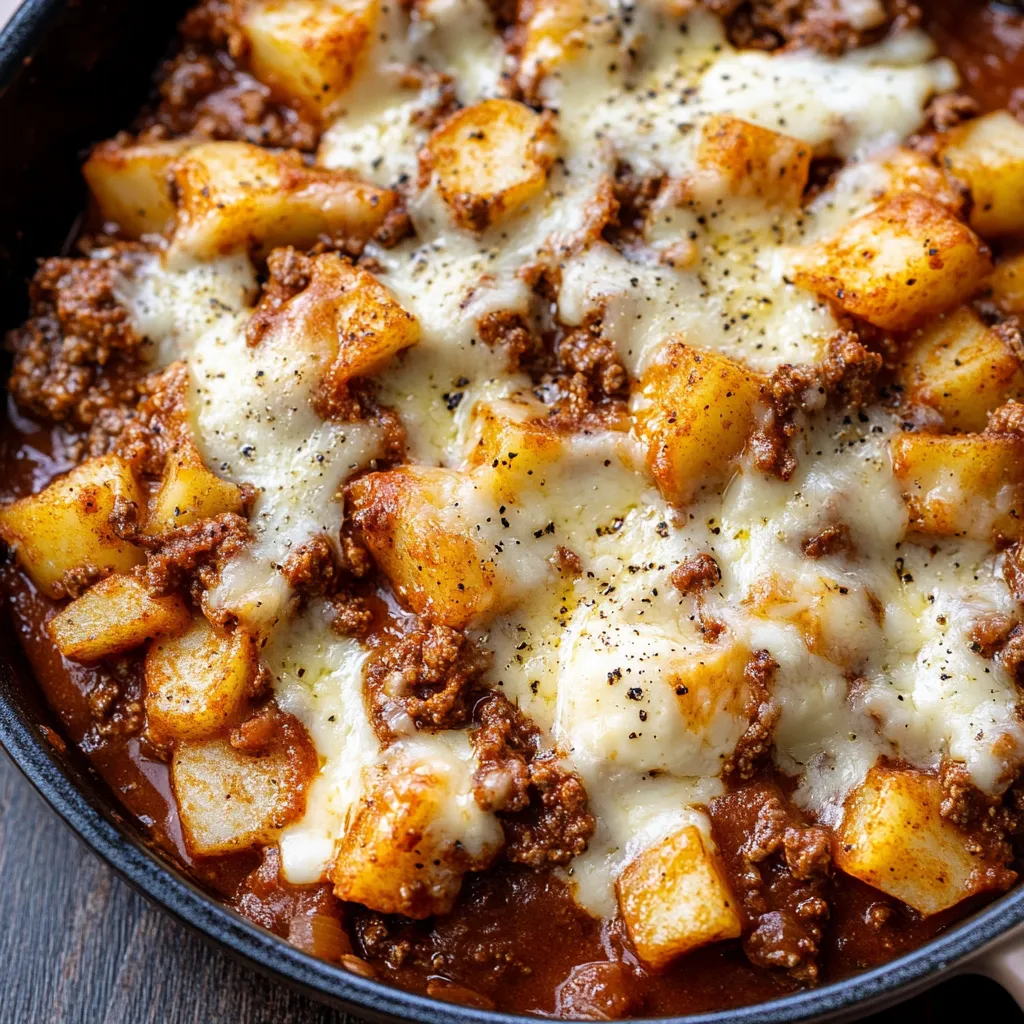
- Once your sauce has thickened to your liking and your roasted potatoes are ready, it's time to bring everything together. Spread the sloppy joe mixture evenly across the bottom of your skillet, smoothing it into an even layer with your spatula. Now take all those golden roasted potato cubes and arrange them in an even layer right on top of the meat sauce. Don't stir them in - you want them sitting on top so they stay crispy rather than getting soggy in the sauce. Press them down very gently so they're settled into the sauce but not completely submerged. Take your 5-ounce package of Boursin cheese and crumble it with your fingers, breaking it into small chunks and scattering those pieces evenly over the potatoes. Don't worry about distributing it perfectly - uneven distribution actually creates nice pockets of extra cheesy goodness. Now sprinkle your 1 cup of shredded cheddar cheese evenly over everything, followed by your 1 cup of shredded mozzarella. Make sure the cheese coverage goes all the way to the edges of the skillet for even melting.
- Bake Until Bubbly:
- Carefully transfer your assembled skillet to your preheated 425°F oven. The handle will get very hot, so use an oven mitt and be careful. Bake for 15 to 18 minutes, keeping an eye on it toward the end. You're watching for the cheese to melt completely and turn golden brown and bubbly on top. The sauce should be bubbling up around the edges of the skillet. If the cheese is melting but not browning and you want that golden color, you can turn on the broiler for the final 2 minutes - but watch it like a hawk because the broiler works fast and can go from perfect to burnt in seconds. Once the cheese is melted, bubbly, and golden in spots, remove the skillet from the oven. Remember that the skillet handle is extremely hot now, so immediately place a kitchen towel over it or wrap it in aluminum foil as a reminder not to grab it with your bare hand.
- Rest and Serve:
- Let the skillet rest for about 5 minutes before serving. This brief rest allows the cheese to set slightly so it's not liquid-hot and dangerous, and it lets the sauce thicken a bit more as it cools. During this time, the potatoes will absorb a bit more of that saucy goodness from the bottom while the top stays crispy. After 5 minutes, the skillet is ready to serve. You can either scoop portions directly from the skillet onto individual plates, or if you're feeling family-style, just put the whole skillet on a trivet in the center of the table with a serving spoon and let everyone help themselves. Make sure to dig all the way down to the bottom so each serving gets meat sauce, potatoes, and plenty of that melted cheese. Garnish with fresh chopped parsley or green onions if you want a pop of color and freshness, though it's absolutely delicious as is.
 Pin it
My son, who normally picks at dinner and claims he's not hungry, devoured two full servings of this the first time I made it and then asked if we could have it again the next night. My husband, who's usually the designated cook in our house, actually requested the recipe so he could make it himself, which never happens. Even my mother-in-law, who's notoriously picky and critical of anything that's not her own cooking, asked for seconds and admitted it was "surprisingly good" - which from her is basically a Michelin star review. This dish has become our go-to for nights when we're all tired, hungry, and need something that feels indulgent without requiring any real skill or energy.
Understanding Ground Beef Fat Percentages
The fat content in ground beef significantly impacts both the flavor and texture of your finished dish. Extra lean ground beef, which is 5% fat or less, provides protein without adding excessive grease to your sauce, but it can become dry if overcooked. Lean ground beef at 10% fat offers a bit more moisture and flavor while still being relatively healthy. Regular ground beef at 15-20% fat creates the juiciest, most flavorful meat but also releases considerable grease that you'll need to drain off. For this skillet recipe, extra lean works perfectly because the sauce, cheese, and Boursin add plenty of richness and moisture, so you don't need fat from the meat. If you do use regular ground beef, brown it thoroughly, then tip the skillet to let the grease pool in one corner and carefully spoon it out before adding your vegetables. The trade-off with leaner beef is that you sacrifice some of that rich, beefy flavor, but the strong seasonings in sloppy joe sauce more than make up for it.
The Art of Building Layered Flavors
Great comfort food doesn't happen by accident - it's built through layers of flavor that develop at different stages of cooking. Starting with properly browned meat creates those caramelized bits on the bottom of the pan called fond, which adds deep, savory notes. Cooking your aromatics separately before mixing them with the meat allows their sugars to caramelize and their flavors to concentrate rather than just steaming in meat juices. Toasting the tomato paste for a minute before adding liquids removes that raw, metallic taste and brings out its natural sweetness. Simmering the sauce lets all those individual ingredients meld together into something greater than the sum of their parts. Roasting the potatoes separately instead of just adding raw cubes means you get crispy, golden edges with fluffy interiors rather than mushy, waterlogged potatoes. Each of these steps might seem minor, but together they create depth and complexity that makes people wonder what your secret ingredient is when really it's just technique.
Why Boursin Transforms This Dish
Regular cream cheese would add richness to this skillet, but Boursin takes it to another level entirely because of what's already mixed into that soft, spreadable cheese. Boursin contains real garlic, not garlic powder, plus a blend of herbs like chives and parsley that infuse every bite with aromatic complexity. The cheese has a slightly tangy, cultured flavor from the cream and milk proteins that balances the sweetness in the sloppy joe sauce. When Boursin melts, it doesn't just become gooey like regular cheese - it creates little pockets of intensely flavored creaminess that surprise your palate. You'll take a bite expecting just meat and potatoes, then hit a spot where Boursin has melted into the sauce and suddenly experience this burst of garlic and herbs. This is what transforms a basic ground beef and potato dinner into something that tastes restaurant-quality. The Boursin is available in several flavors, and while garlic and herb is traditional and works beautifully here, you could experiment with the shallot and chive version or even the pepper variety if you want extra kick.
Oven-Safe Skillets and Why They Matter
Not all skillets can go from stovetop to oven, and using the wrong pan could result in melted handles, toxic fumes, or even a fire. Cast iron skillets are the gold standard for stovetop-to-oven cooking because they're entirely metal with no plastic or rubber components, they retain heat beautifully, and they distribute that heat evenly for consistent results. Stainless steel skillets with metal handles also work perfectly. Many non-stick skillets have plastic or silicone handles that will melt in a 425°F oven, so check your pan carefully before using it. Even some non-stick pans with metal handles aren't rated for high oven temperatures because the non-stick coating can break down and release fumes. Always check the manufacturer's specifications for your specific pan. If you're not sure whether your skillet is oven-safe, you can brown the meat and build the sauce in a regular skillet, then transfer everything to a casserole dish or baking dish before topping with potatoes and cheese and finishing in the oven. This creates an extra dish to wash but ensures safety. The advantage of keeping everything in one skillet is both convenience and presentation - there's something appealing about serving dinner straight from a cast iron skillet that makes even simple food feel special.
Making This Dish Ahead and Reheating
This skillet actually improves when made ahead because the potatoes absorb more of that saucy flavor as they sit, and all the seasonings have time to meld together. You can prepare the entire dish, including baking it with the cheese on top, then cool it completely, cover it tightly with aluminum foil, and refrigerate for up to three days. When you're ready to eat, let it come to room temperature for about thirty minutes, then reheat it covered in a 350°F oven for about 25 minutes until heated through. Remove the foil for the last 5 minutes to crisp up the cheese and potatoes again. You can also make just the meat sauce ahead and refrigerate it separately from the roasted potatoes, then assemble and bake everything fresh when you're ready to eat - this keeps the potatoes from getting too soft. For meal prep, divide the cooled skillet into individual portions in meal prep containers and refrigerate for up to four days. Reheat individual portions in the microwave for 2 to 3 minutes, though the potatoes won't be quite as crispy as oven reheating. This makes excellent leftovers that some people actually prefer to the fresh version because the flavors are so well developed.
Balancing a Calorie-Controlled Diet
At approximately 553 calories per serving, this skillet provides a substantial meal that fits into most calorie-controlled eating plans without requiring major modifications. For context, a typical adult following a 2000-calorie diet would have plenty of room for this as dinner along with a side salad and still stay within their daily target. The protein from the beef helps keep you satisfied longer than a carb-heavy meal would, reducing the temptation to snack later in the evening. If you're following a stricter calorie limit, you could reduce the portion size and serve it alongside steamed vegetables to increase volume without adding many calories. Swapping the extra lean beef for ground turkey would save about 50 calories per serving. Using reduced-fat cheese would cut another 50 to 70 calories per serving, though you'd sacrifice some of that gooey, melty texture. Increasing the ratio of vegetables to meat by adding more bell peppers, mushrooms, or zucchini to the sauce would bulk up the dish while adding minimal calories. Understanding these trade-offs allows you to customize the recipe to your specific needs without abandoning it entirely just because you're watching calories.
 Pin it
After making this skillet dozens of times over the past couple of years, I've learned that it's become one of those recipes I can make almost on autopilot when I'm tired and don't want to think. The ingredient list might look long when you read it, but most of it is pantry staples you probably already have, and the actual technique is straightforward - brown meat, build sauce, add potatoes, top with cheese, bake. There's no complicated knife work, no precise timing that requires you to stand over the stove, no delicate techniques that can go wrong if you're distracted. It's forgiving enough that even if you slightly overbrown the meat or let the sauce simmer a bit longer than planned, it still turns out delicious. The combination of tangy sloppy joe sauce, crispy potatoes, and that gooey cheese layer hits every comfort food note while being substantial enough that nobody leaves the table hungry. Whether you're feeding hungry teenagers, picky kids who need their food components visible and separate, or adults who appreciate a nostalgic twist on childhood favorites, this skillet manages to please everyone at once.
Frequently Asked Questions
- → Can I make this skillet ahead of time?
- Yes! You can prepare the beef mixture and roast the potatoes up to a day ahead. Store them separately in the fridge, then assemble and add the cheese when you're ready to serve. Just reheat and broil until the cheese melts.
- → What can I use instead of Boursin cheese?
- Cream cheese mixed with garlic powder and dried herbs works great. You could also use goat cheese or even extra cheddar if you prefer a simpler flavor.
- → Can I use different types of potatoes?
- Absolutely! Yukon gold potatoes work really well and give a buttery flavor. Red potatoes are another good option. Just keep the cube size consistent so they cook evenly.
- → How should I store the leftovers?
- Let the skillet cool completely, then transfer to an airtight container. It will keep in the fridge for up to 3 days. Reheat in the oven or microwave until warmed through.
- → Can I freeze this dish?
- Yes, this freezes well! Cool it completely and portion into freezer-safe containers. It will keep frozen for up to 3 months. Thaw overnight in the fridge before reheating.
- → Do I need an oven-safe skillet?
- For best results, yes. If your skillet isn't oven-safe, transfer everything to a baking dish before adding the cheese and broiling. It's an extra step but still works perfectly.