
 Pin it
Roasting a whole turkey intimidates a lot of people, and honestly, it should - there's the worry about drying out the breast before the dark meat cooks through, the stress of carving in front of everyone, and the sheer size of the bird taking up your entire oven for hours. This turkey roulade sidesteps all those problems by using a boneless turkey breast that you butterfly, fill with savory sausage stuffing, roll up like a jelly roll, and roast in just about an hour. The butterflied breast creates a large, thin canvas that gets covered with stuffing made from boxed mix elevated with Italian sausage, onions, and celery, then rolled tightly and tied with kitchen twine to hold its shape. What makes this particularly smart for Thanksgiving is that you can assemble the entire thing the night before, refrigerate it, and just pop it in the oven on turkey day while you focus on everything else. The butter mixture rubbed all over the outside keeps the lean breast meat incredibly moist and adds rich flavor, while slicing reveals those beautiful spiral layers of meat and stuffing that look way more impressive than the effort required to make them.
I started making turkey roulade about six years ago when we decided to host Thanksgiving for the first time as a couple instead of going to family gatherings. The idea of roasting a whole turkey terrified me because I'd heard so many horror stories about dry breast meat and undercooked legs, and I didn't want to ruin our first holiday as hosts. Someone suggested trying a roulade instead, and I was skeptical that it would feel special enough for Thanksgiving, but I gave it a shot. When I sliced into that first one and saw those gorgeous spirals of turkey and stuffing, and then tasted how moist and flavorful the meat was, I was completely sold. Now even when we go to family dinners where someone else makes a whole turkey, people ask if I'm bringing "that rolled turkey thing" because they prefer it to traditional roasted turkey.
Ingredients and What Makes Them Essential
- Boneless Turkey Breast Roast (3 to 4 pounds): Look for packages labeled "boneless turkey breast roast" rather than a bone-in breast, because deboning turkey yourself is tedious and tricky. Butterball and Jennie-O both make good versions that are usually already in a brine solution which helps keep them moist. The breast should look pale pink, smell fresh, and feel firm. Many come in netting that you'll remove before butterflying. At 3 to 4 pounds, this size feeds 6 to 8 people comfortably with some leftovers.
- Unsalted Butter (6 tablespoons total, divided): Butter serves double duty here - some goes into the stuffing to add richness, and the rest gets mixed with seasonings and rubbed all over the turkey before and during roasting. This butter coating bastes the lean breast meat continuously as it melts, preventing that dry, stringy texture that ruins so many turkey dishes. Use unsalted so you can control the salt level precisely.
- Italian Sausage (12 ounces, casings removed): Mild or sweet Italian sausage adds savory, herby depth to the stuffing that plain bread cubes just can't provide. The fat from the sausage also keeps the stuffing moist during cooking. Buy it in casings and squeeze the meat out, or look for bulk Italian sausage which saves you that step. If you prefer spicy food, hot Italian sausage works great too.
- Yellow Onion (1 medium, diced) and Celery (2 stalks, diced): These aromatic vegetables form the classic base for stuffing, adding sweetness and savory depth. Dice them into small, uniform pieces about ¼-inch so they soften completely during the brief cooking time and distribute evenly throughout the stuffing.
- Boxed Stuffing Mix (6-ounce box): Pepperidge Farm makes excellent stuffing mix, though any brand you prefer works fine. Using boxed stuffing instead of making it from scratch saves at least thirty minutes and multiple steps. The seasoning blend in quality stuffing mixes is actually quite good, and when you add sausage and vegetables, nobody will know you didn't make it completely from scratch.
- Chicken Broth (1 to 1½ cups): The broth hydrates the dried stuffing and adds savory flavor. Start with 1 cup and add more as needed to reach your preferred consistency - you want the stuffing moist and cohesive but not soupy. Low-sodium broth is best so you can control salt levels.
- Garlic Powder (1 teaspoon): This goes into the butter mixture that coats the turkey, adding savory depth without the moisture that fresh garlic would introduce. Make sure your garlic powder is relatively fresh and not clumped or stale.
- Kosher Salt and Black Pepper (to taste): You'll need salt and pepper at multiple stages - seasoning the butterflied breast, in the butter mixture, and potentially adjusting the stuffing. Use kosher salt for its larger crystals that distribute evenly.
- Kitchen Twine: This cotton string ties around the rolled roulade to hold its shape during roasting. It needs to be actual kitchen twine that can withstand oven heat, not regular string or yarn which might melt or burn.
Step-by-Step Instructions
- Make the Sausage Stuffing:
- Start by removing the Italian sausage from its casings if it came in links - just use a knife to slit the casing lengthwise and peel it away, or squeeze the meat out like toothpaste. Place a large skillet over medium-high heat and let it warm up for about a minute. Add the 12 ounces of sausage meat to the hot skillet, breaking it up immediately with a wooden spoon or spatula into smaller crumbles. Let the sausage cook, stirring occasionally and continuing to break up any large chunks, for about 8 to 10 minutes total until it's completely browned with no pink remaining and has developed some crispy brown bits. Using your spoon, push all the cooked sausage to one side of the skillet, creating an empty space. Add 2 tablespoons of butter to that empty space and let it melt completely. Once the butter is melted and sizzling, add your diced onion and celery to the butter. Cook these vegetables, stirring frequently, for about 6 minutes until the onion turns translucent and soft and the celery loses its raw crunch. Now stir everything together, mixing the sausage with the vegetables so they're evenly combined. Turn off the heat. Add your 6-ounce box of stuffing mix directly to the skillet, pouring it over the sausage and vegetables. Pour in 1 cup of chicken broth and stir everything together thoroughly, making sure all the dried bread pieces get moistened. The stuffing should look moist and cohesive, not dry or crumbly. If it seems too dry, add a few extra splashes of chicken broth, a tablespoon at a time, until you reach a consistency that holds together when pressed but isn't soggy. Taste the stuffing and adjust seasoning if needed with salt and pepper. Set this aside to cool while you prepare the turkey - you don't want to put hot stuffing on the raw turkey.
- Butterfly the Turkey Breast:
- Remove your boneless turkey breast from its packaging and remove any netting or ties. Pat the entire surface completely dry with paper towels because moisture prevents good browning later. Clear a large, clean cutting board and lay the turkey breast on it with the smooth side up and the natural grain of the meat running left to right in front of you. Take a very sharp knife - a long, thin knife works best for this. Starting from one long side of the breast, carefully slice into the meat horizontally, cutting parallel to the cutting board. Keep your other hand flat on top of the breast to hold it steady. Cut through about halfway up the thickness of the breast, but stop about ¾ inch before you reach the opposite edge - don't cut all the way through. You're essentially creating a hinge. Open up the breast like you're opening a book, unfolding it so you have one large, relatively flat piece of turkey with the hinge in the middle. The butterflied breast will look uneven in thickness, with the center being thicker than the edges. To fix this, place a large piece of plastic wrap over the entire butterflied breast - this prevents the meat from sticking to your mallet. Using a meat mallet or the bottom of a heavy pan, gently but firmly pound the thicker areas of the turkey, working from the center outward. Be gentle so you don't tear the meat, but firm enough to actually flatten it. Your goal is to achieve a relatively uniform thickness of about ½ inch across the entire butterflied breast. Once you've pounded it evenly, remove the plastic wrap. Season the entire exposed surface of the turkey generously with kosher salt and black pepper - about 1 teaspoon of salt total and several grinds of pepper, making sure you season all the way to the edges.
- Assemble the Roulade:
- Make sure your sausage stuffing has cooled to at least room temperature or is just barely warm - hot stuffing on raw turkey could create food safety issues. Spoon the cooled stuffing onto the butterflied, seasoned turkey breast, spreading it out evenly across the surface. Use the back of your spoon to spread it into an even layer, leaving about a ½-inch border of bare turkey around all the edges - this border helps the roulade seal properly when you roll it. Depending on the exact size of your turkey breast, you might not use all the stuffing. Don't overfill it or stuffing will squeeze out when you roll and tie it. Any extra stuffing can be baked separately in a small dish. Now comes the rolling part, which is easier than it seems. Starting from one of the long edges (the side nearest you works well), begin rolling the turkey tightly over the stuffing, working your way across like you're rolling a jelly roll or sushi. Keep the roll as tight as possible by pulling back gently on the turkey as you roll, but not so tight that stuffing squishes out the ends. Continue rolling until you've completely enclosed all the stuffing and the seam is on the bottom. Position the rolled roulade seam-side down on your cutting board. Cut several lengths of kitchen twine, each about 12 inches long - you'll need 5 to 7 pieces depending on the length of your roulade. Starting about an inch from one end, slide a piece of twine under the roulade, bring both ends up and over the top, and tie it securely in a knot or bow. The twine should be snug enough to hold the shape firmly but not so tight that it cuts into the meat. Continue tying pieces of twine at roughly 1½-inch intervals along the entire length of the roulade. Make sure each tie is secure and evenly spaced. Trim off any excess twine.
- Prepare the Butter Coating:
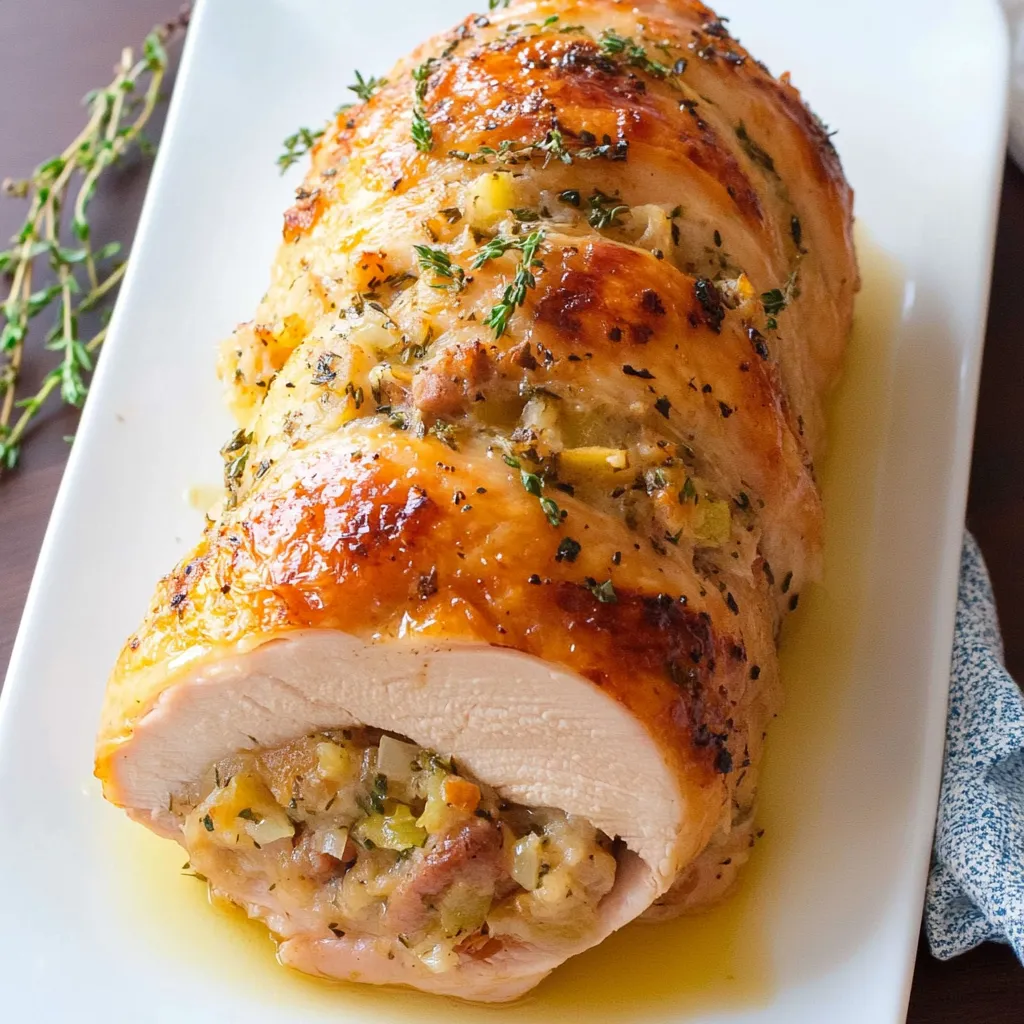
- In a small bowl, combine 4 tablespoons of softened butter (save the remaining 2 tablespoons for later) with 1 teaspoon of garlic powder, ½ teaspoon of kosher salt, and ¼ teaspoon of black pepper. Use a fork or small spoon to mash and stir everything together until you have a smooth, evenly colored butter mixture with all the seasonings fully incorporated. The butter should be soft enough to spread easily but not melted into liquid. Take about half of this seasoned butter mixture and use your hands or a pastry brush to rub it all over the exterior of the tied roulade, coating all surfaces including the ends. Be generous with the butter - you want a nice coating that will baste the turkey as it roasts. Place the butter-coated roulade in a roasting pan or on a rimmed baking sheet, positioning it seam-side down. Set the remaining seasoned butter aside at room temperature for now.
- Roast the Turkey Roulade:
- Preheat your oven to 375°F and position a rack in the center of the oven so the roulade will cook evenly. Once the oven reaches temperature, slide the pan with your prepared roulade into the oven. Set a timer for 35 minutes initially. The total cooking time will be 50 to 60 minutes depending on the exact thickness of your roulade, but you'll baste it partway through. After 35 minutes, open the oven and carefully pull out the pan. Take the remaining seasoned butter you set aside earlier (about 2 tablespoons) and melt it in the microwave for about 15 seconds until it's completely liquid. Use a pastry brush or spoon to drizzle and brush this melted butter all over the turkey roulade, coating it generously. At this point, increase your oven temperature to 400°F to help promote browning and crisping of the exterior. Return the pan to the oven and continue roasting for another 15 to 25 minutes. Start checking the internal temperature at the 15-minute mark by inserting an instant-read thermometer into the thickest part of the roulade, making sure it goes into the meat and not just the stuffing. The turkey is done when the thermometer reads 165°F. If you want more browning on the exterior once it reaches temperature, you can turn on the broiler for the final 2 to 3 minutes, watching it very carefully so it doesn't burn. Once it reaches 165°F, remove the pan from the oven immediately.
- Rest and Slice:
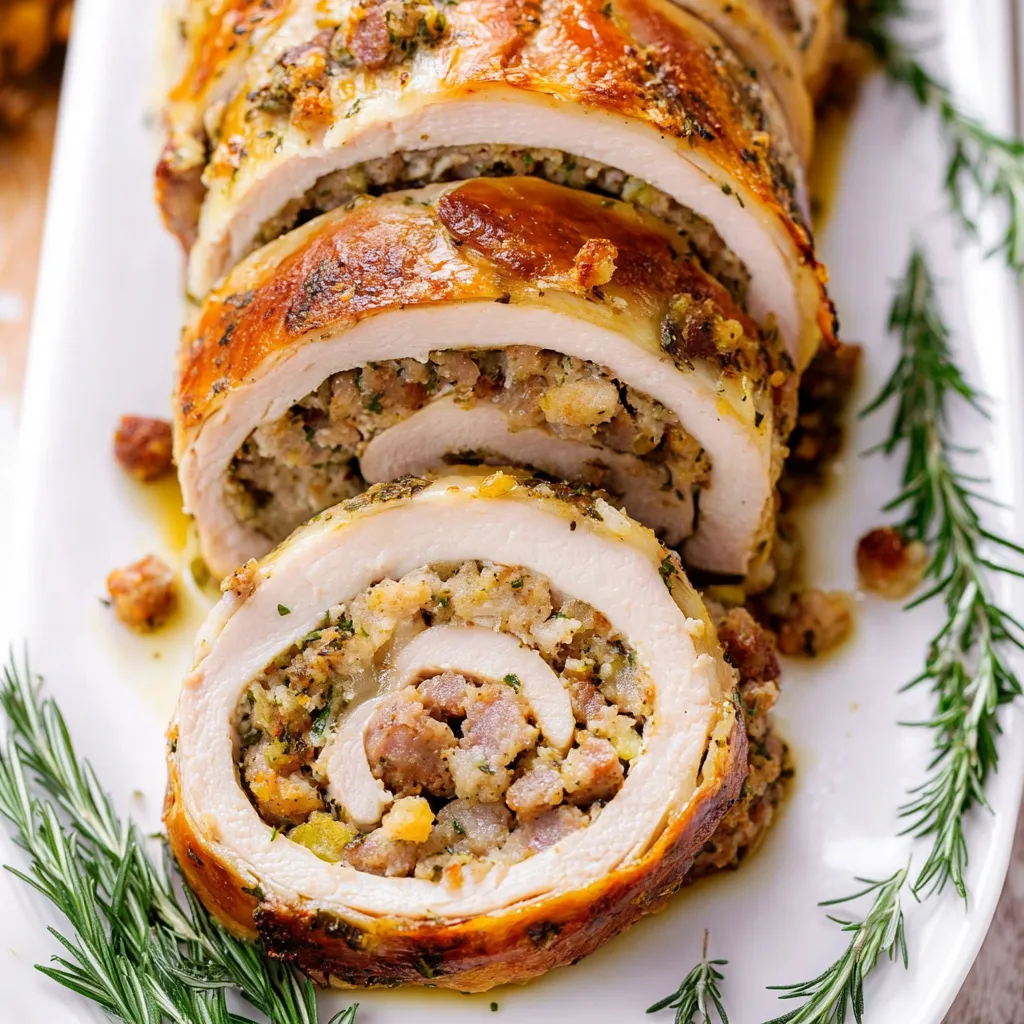
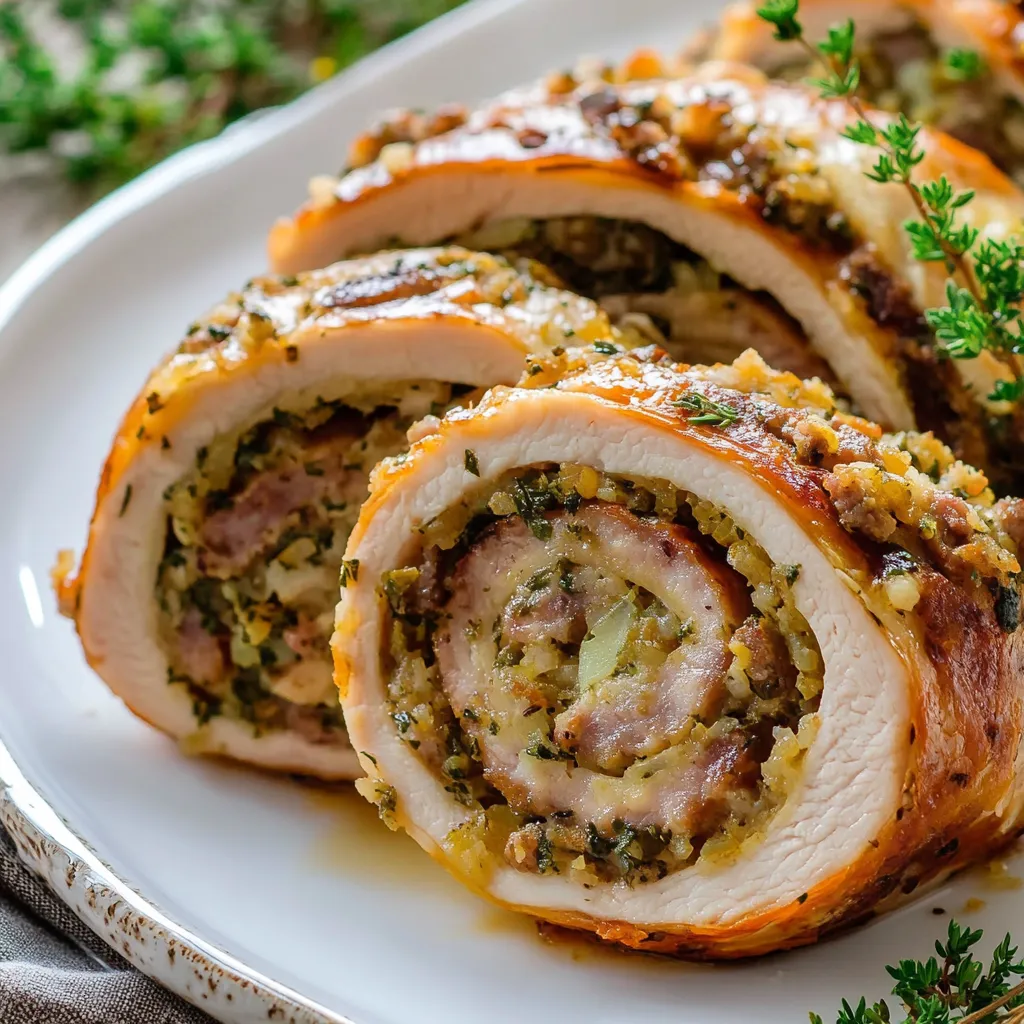
- Transfer the cooked roulade to a cutting board and tent it loosely with aluminum foil. Let it rest for a full 15 minutes without cutting into it - this resting period is crucial because it allows all the juices that have been driven to the center during cooking to redistribute throughout the meat. If you skip this rest and cut immediately, all those juices will run out onto your cutting board instead of staying in the meat, leaving you with dry turkey. After 15 minutes, use kitchen shears or a sharp knife to carefully cut and remove all the kitchen twine, pulling the pieces away from the roulade. Using a sharp knife, slice the roulade crosswise into rounds about ¾-inch to 1-inch thick. Each slice will reveal that beautiful spiral of golden turkey wrapped around savory stuffing. Arrange the slices on a serving platter slightly overlapping each other so people can see the spiral pattern. Serve immediately while hot.
 Pin it
My husband was extremely skeptical the first time I announced I was making turkey roulade for Thanksgiving instead of a traditional whole bird. He grew up with the Norman Rockwell image of a big golden turkey on the table and thought anything else was sacrilege. I convinced him to trust me, and when I brought that platter of sliced roulade to the table with those perfect spirals visible in every piece, he admitted it looked pretty impressive. Then he tasted it and had to concede that it was actually moister than any whole turkey his mother had ever made, though he made me promise never to tell her that. My mother-in-law herself tried it the next year and grudgingly admitted it was "acceptable," which from her is basically a standing ovation. Now our kids, who've only ever had roulade for Thanksgiving, think that sliced spirals of turkey and stuffing is what Thanksgiving turkey is supposed to look like, and they're always confused when they see whole birds at other people's houses.
Understanding Different Cuts of Turkey Breast
When shopping for turkey breast for this recipe, you'll encounter several different products that sound similar but aren't quite the same. A "boneless turkey breast roast" is what you want - it's a whole breast that's been deboned and usually comes in netting to hold its shape, often pre-brined. A "turkey tenderloin" is much smaller, usually only about a pound, and is the tender strip of meat that runs along the underside of the breast - it's too small for this recipe. "Split turkey breast" or "half turkey breast" usually still has bones in it and the skin attached, which doesn't work here because you need boneless meat to butterfly. "Turkey breast cutlets" are thin slices of breast meat, already pounded thin, which also won't work because you need one large piece. The pre-brined versions marked "basted" or "enhanced" or "with up to X% solution" are actually ideal for this recipe because that brine helps keep the lean meat moist. Some cooks avoid pre-brined poultry because they can't control the seasoning, but for roulade where you're adding so much flavor from stuffing and butter, the benefits of extra moisture outweigh any concerns about seasoning control.
The Technique of Butterflying Meat
Butterflying is a knife technique where you cut through thick pieces of meat almost all the way through, then open them flat like a book, creating a thinner, larger piece with more surface area. This technique works for everything from turkey and chicken breasts to pork tenderloin and thick steaks. The key to successful butterflying is using a very sharp knife with a long, thin blade - a dull knife or short blade makes the job much harder and more dangerous. Always position your non-cutting hand flat on top of the meat to hold it steady and feel where your knife is going. Cut slowly and carefully, keeping your knife blade parallel to the cutting board at all times. The goal is to cut through most of the thickness while leaving that ¾-inch hinge intact so the meat opens up without separating into two pieces. If you accidentally cut all the way through, don't panic - you can still use it, you'll just need to overlap the pieces slightly when assembling. After butterflying, the pounding step is equally important because butterflied meat is never perfectly even - there are always thicker sections that need to be pounded thinner. Pounding also tenderizes the meat by breaking down some of the muscle fibers, making the final product more tender. Always cover meat with plastic wrap before pounding to prevent sticking and to keep raw meat from splattering.
The Art of Rolling and Tying a Roulade
Rolling seems intimidating but becomes easy once you understand the technique. Before you start rolling, make sure your stuffing is spread evenly and that you've left that border around the edges - this bare border is what creates the seal when the meat overlaps. Start rolling from one long edge, not a short end, because you want a long, thin roll rather than a short, fat one. Use both hands to roll, and after each rotation, gently pull back on the meat to create tension - this is what makes the roll tight rather than loose and floppy. If stuffing tries to squeeze out the ends, just push it back in with your fingers. Once rolled, the seam should naturally end up on the bottom due to gravity, which helps it seal closed. Tying with twine is what holds everything together during cooking when the meat contracts and releases moisture. Space your ties evenly - too few ties and the roulade will lose its shape, too many and you're just wasting time and twine. Each tie should be snug but not so tight that it cuts into the meat and squeezes out juices. If you've never tied anything with kitchen twine before, practice a few knots before you start - you want them secure enough that they won't slip but not so complicated that you can't untie them later. Some people butterfly and stuff the night before, then roll and tie the morning of to avoid the twine sitting in the raw meat overnight, which is a valid approach if the timing works better for you.
Elevating Boxed Stuffing Without Making It From Scratch
Boxed stuffing mix gets a bad reputation for being bland and boring, but it's actually a well-engineered product that just needs enhancement. The dried bread cubes are already perfectly sized and seasoned with a basic herb blend. What it lacks is texture contrast, savory depth, and moisture control. Adding cooked sausage addresses multiple issues at once - the fat keeps the stuffing moist, the protein adds substance and texture, and the seasoning in Italian sausage brings herbs and spices that complement the stuffing mix. Sautéing aromatics like onion and celery adds another layer of flavor and creates textural variety between the soft bread, crispy vegetables, and crumbly sausage. Using good quality chicken broth instead of water makes a huge difference because it adds savory depth that water can't provide. The key is being generous with moisture - stuffing that's too dry becomes hard and crusty, while properly moist stuffing stays soft and almost creamy inside. Other excellent additions include diced apples for sweetness, dried cranberries for tartness, toasted pecans or walnuts for crunch, fresh herbs for brightness, or mushrooms for earthiness. The beauty of starting with boxed mix is that you're free to focus on these flavor additions rather than measuring bread cubes and toasting them and mixing herbs. If you're a stuffing purist who makes everything from scratch, you absolutely can use your favorite homemade stuffing recipe in this roulade, just make sure it's on the drier side so it holds together during rolling.
Timing and Temperature for Perfect Turkey
Understanding the relationship between time and temperature is essential for cooking turkey properly. Breast meat contains very little fat and overcooks easily, becoming dry and stringy if taken past 165°F. The USDA recommends 165°F for poultry because that temperature instantly kills bacteria, but turkey held at lower temperatures for longer periods achieves the same safety while staying moister. This is why checking temperature is so critical - time alone doesn't tell you doneness because every piece of meat is slightly different in size and shape. Start checking temperature early and often once you're in the ballpark of the estimated time. Insert your instant-read thermometer into the thickest part of the roulade, making sure you're reading the meat temperature and not just the stuffing, because stuffing heats up faster than dense meat. If one end of the roulade is thinner than the other, check multiple spots to ensure everything has reached temperature. The resting period after cooking allows for carryover cooking, where the temperature continues rising a few degrees even though the meat is out of the oven. This is why you can remove it at 165°F and it will actually be at 167-170°F by the time you slice it. Never skip resting because those juices need time to redistribute - cutting into meat immediately after cooking results in all that moisture running out rather than staying in the meat where it belongs.
Make-Ahead Strategies for Holiday Cooking
The ability to assemble this roulade the night before is what makes it genuinely practical for Thanksgiving when you're managing multiple dishes. To make ahead successfully, prepare the stuffing and let it cool completely to room temperature or even refrigerate it - you never want to put warm stuffing inside raw turkey because that creates a food safety risk. Butterfly your turkey breast, pound it, season it, and assemble the entire roulade with the cooled stuffing, rolling and tying it completely. Wrap the assembled, raw roulade tightly in plastic wrap, making sure it's completely sealed, and refrigerate it overnight. The next day, remove it from the refrigerator about an hour before you plan to cook so it's not ice-cold going into the oven - very cold meat takes longer to cook and cooks less evenly. Unwrap it, discard the plastic, apply the butter coating, and roast as directed. You may need to add 5 to 10 minutes to the cooking time if the meat is still quite cold. The overnight rest actually improves flavor because the salt and seasonings have time to penetrate the meat more deeply. For maximum efficiency, you can prep even further ahead - make the stuffing up to two days in advance and refrigerate it, and butterfly the turkey breast the day before even if you don't fill and roll it until later. This staged approach spreads the work across several days so no single day feels overwhelming.
Serving Suggestions and What to Serve Alongside
This turkey roulade pairs beautifully with all the traditional Thanksgiving sides you already love. The built-in stuffing means you might skip making a separate stuffing dish, though some people like offering both. Mashed potatoes are almost mandatory and provide creamy comfort that balances the savory turkey. Green beans or Brussels sprouts add color and a fresh element. Cranberry sauce, either homemade or canned, provides that essential tart sweetness that cuts through rich meat. Dinner rolls or biscuits are always welcome for soaking up gravy. Speaking of gravy, you can make turkey gravy using the drippings from the roasting pan - just pour off the excess fat, place the pan on the stovetop over medium heat, sprinkle in some flour, whisk it into the drippings to make a roux, then gradually whisk in chicken or turkey stock until you have a smooth gravy. For a complete Thanksgiving menu, start with a simple salad or appetizer like cheese and crackers, serve the roulade as your main protein with 3 to 4 sides, and finish with pie - pumpkin, apple, and pecan are traditional favorites. The beauty of this roulade is that it cooks so quickly compared to a whole turkey that you have much more flexibility with oven space and timing for all those sides that also need baking.
Leftover Ideas and Storage
Turkey roulade leftovers are just as delicious as the fresh version and provide the basis for several excellent meals. Store the sliced or whole leftover roulade in an airtight container in the refrigerator for up to four days. The meat stays remarkably moist because of that butter coating and the stuffing helps retain moisture too. Leftover slices make incredible sandwiches - layer them on good bread with mayonnaise, lettuce, cranberry sauce, and maybe a slice of cheese. Make turkey salad by dicing the meat and stuffing together, mixing with mayonnaise, diced celery, and dried cranberries. Use the turkey in soup - add it to chicken noodle soup or make turkey and wild rice soup. Dice everything and make a turkey hash for breakfast by pan-frying it with potatoes and topping with fried eggs. The turkey works in any recipe that calls for cooked chicken - tacos, quesadillas, pasta dishes, casseroles, or potpie. If you have more leftovers than you can use within four days, freeze them for longer storage. Slice the roulade first, then arrange slices in a single layer on a baking sheet and freeze until solid. Transfer the frozen slices to a freezer bag with all the air pressed out. Frozen turkey keeps for up to three months and can be thawed overnight in the refrigerator and reheated gently in the oven or microwave.
 Pin it
After making this turkey roulade every Thanksgiving for the past several years, it's completely replaced whole roasted turkey in our house and we have zero regrets about it. The time savings alone makes it worthwhile - being able to get the turkey in and out of the oven in just over an hour means I'm not spending my entire morning basting and rotating and worrying. The consistent results are what really sold me though, because I've never had a dry roulade, never struggled with uneven cooking, never stressed about whether the thermometer is giving me an accurate reading in a complicated bone-in bird. Every single time, it comes out moist and flavorful with those beautiful spirals when I slice it, and people are always impressed even though it's actually easier than traditional turkey. The make-ahead aspect is the final selling point because being able to assemble it the night before means Thanksgiving morning is actually relaxed instead of frantic. I can sleep in, have coffee, put the roulade in the oven at a reasonable hour, and still have everything ready by early afternoon without feeling like I've been cooking since dawn. This recipe has genuinely changed how I approach Thanksgiving dinner, making it something I look forward to rather than dread, and that's exactly what holiday cooking should be - delicious food that brings joy rather than stress.
Frequently Asked Questions
- → Can I make this turkey roulade ahead of time?
- Yes! Roll it up the day before, wrap it tight, and keep it cold. Let it sit out for 30 minutes before cooking the next day.
- → What if my turkey breast is bigger than 3 pounds?
- Just add more cooking time. Check with a thermometer and pull it out when it hits 165°F in the thickest part.
- → Do I have to use Italian sausage for the stuffing?
- Not at all. Regular breakfast sausage or even ground turkey with some fennel and herbs works great too.
- → How do I keep the turkey from drying out?
- Don't skip the butter rub and watch your cooking time. Pull it at 165°F and let it rest before slicing so the juices settle back in.
- → Can I freeze leftover turkey roulade?
- Absolutely. Slice it up, wrap portions well, and freeze for up to 3 months. Thaw in the fridge overnight before reheating.
- → What should I serve with this turkey roulade?
- Mashed potatoes, roasted vegetables, cranberry sauce, or a simple green salad all pair nicely with it.