
 Pin it
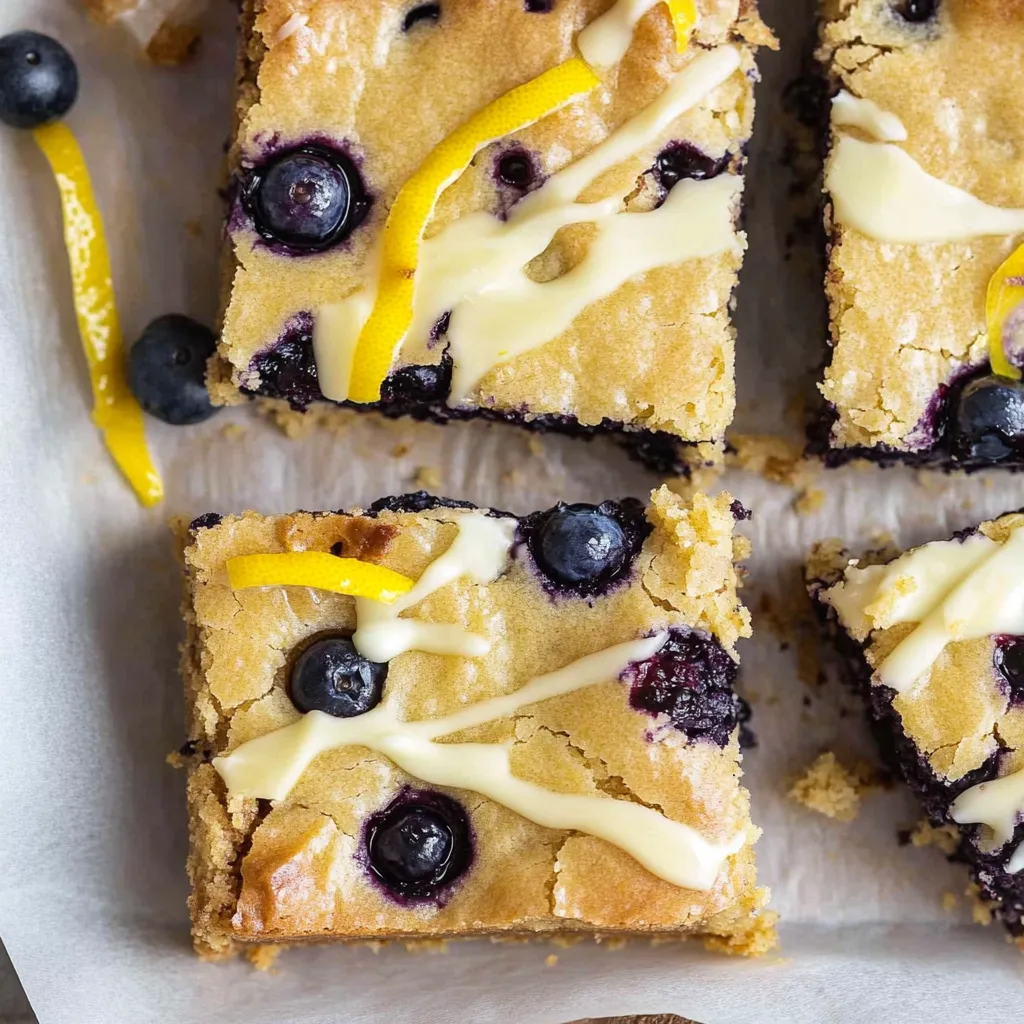
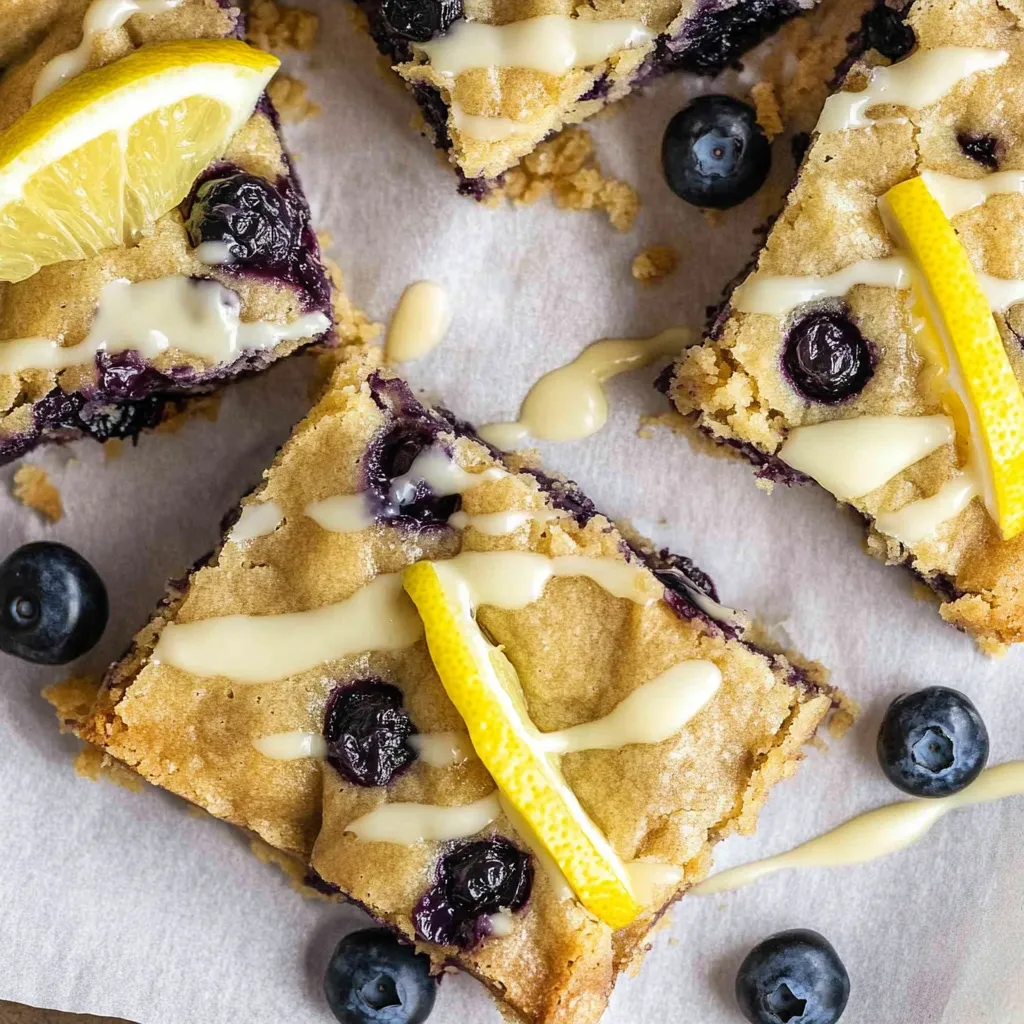
Whisking melted butter with sugar then beating eggs until pale and ribbony creates the foundation for blondies with that signature shiny, crackly top. Folding in flour just until streaks remain prevents overmixing that would create cakey texture instead of fudgy, and studding the batter with white chocolate and blueberries provides bursts of sweetness and fruit throughout. Rubbing lemon zest into the sugar before adding butter releases essential oils that infuse the entire recipe. These come together in one bowl in under 45 minutes with texture that's chewy, fudgy, and absolutely addictive.
Blueberry blondies became my summer baking staple after discovering that frozen blueberries work perfectly without thawing, eliminating the need to wait for berry season. The first time I made these, I tried browning the butter like I do for other blondies, but it overpowered the delicate lemon and blueberry flavors. Learning that simply melting the butter creates cleaner taste that lets the fruit shine was crucial. The trick of rubbing lemon zest into sugar before adding anything else was another revelation - it releases oils that distribute lemon flavor throughout rather than creating pockets of intense zest.
Ingredients and Why They Matter
- Unsalted butter (¾ cup, melted): Simply melted, not browned, for cleaner flavor
- Granulated white sugar (½ cup): Provides sweetness and structure
- Light brown sugar (½ cup, packed): Adds moisture and chewiness from molasses
- Large eggs (2 whole plus 1 yolk): The extra yolk creates fudgy texture
- Vanilla extract (2 teaspoons): Enhances overall flavor
- Lemon zest (from 1 lemon): Bright citrus that complements blueberries
- All-purpose flour (1½ cups): Structure; measure with a scale for accuracy
- Baking powder (½ teaspoon): Slight lift
- Salt (½ teaspoon): Enhances sweetness
- White chocolate (4 ounces, chopped): Creates melty pockets; chips work too
- Fresh or frozen blueberries (1 cup): Don't thaw frozen; provides fruity bursts
How To Make It
- Prepare the pan:
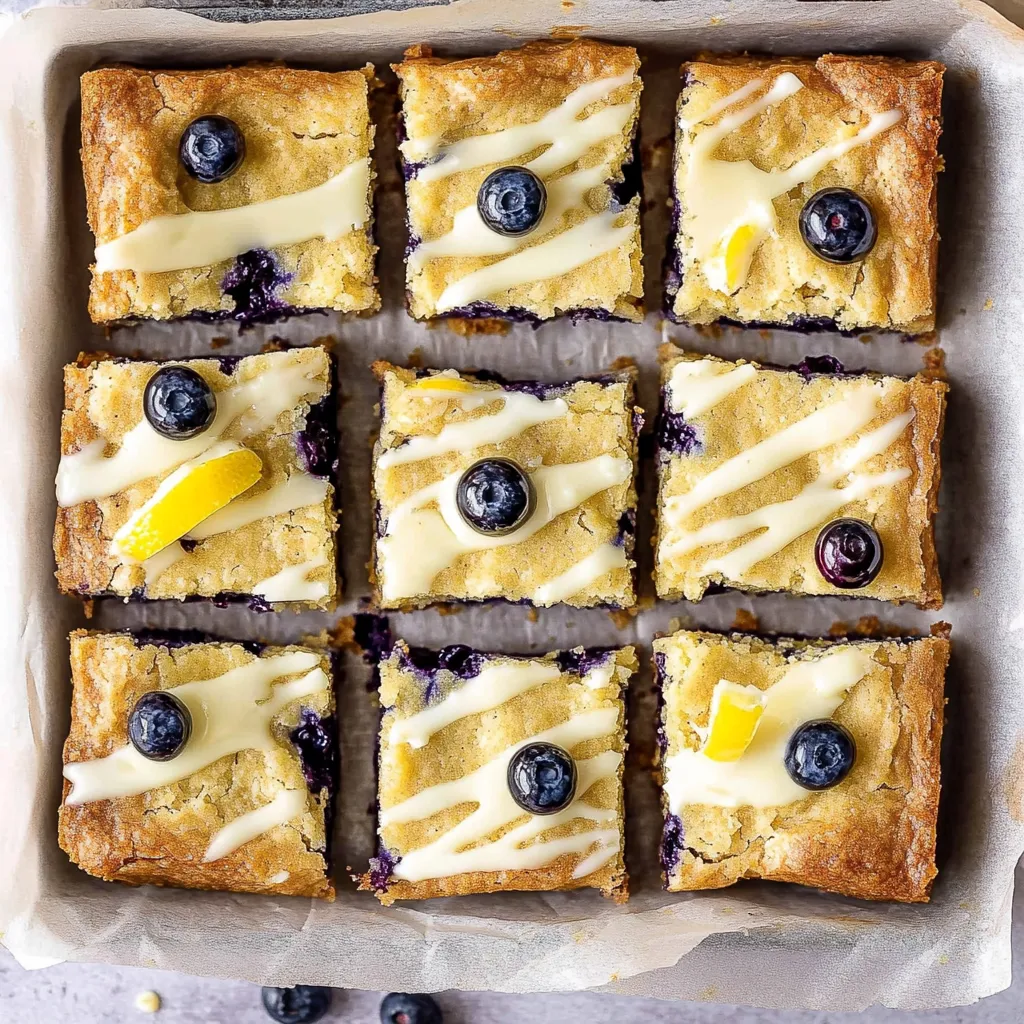
- Preheat your oven to 340°F (170°C). Line a 9x9-inch square baking pan with parchment paper, letting it overhang on all sides like a sling - this makes removing the baked blondies incredibly easy. You can grease the pan first to help the paper stick, though it's not essential. The overhang is important because it gives you handles to lift the entire block out cleanly without having to flip or dig it out with a spatula.
- Release lemon oils into sugar:
- This step seems minor but makes significant flavor difference. Place both the white sugar and brown sugar in a large mixing bowl. Use a microplane or fine grater to zest the lemon directly over the sugar - you want all those fragrant oils falling into the sugar. Use your fingertips to rub the lemon zest into the sugar for about 30 seconds, really working it in. The friction releases the essential oils from the zest and distributes them throughout the sugar. The sugar will become fragrant and slightly yellow-tinted. This technique infuses lemon flavor far more effectively than just mixing zest into batter.
- Combine butter and sugar:
- Pour the melted butter into the lemon-scented sugar while it's still warm. Use a whisk to mix them together vigorously until the sugar dissolves and incorporates throughout. The mixture will look grainy initially but will smooth out as you whisk. Let it cool slightly - you want it warm but not so hot that it cooks the eggs you're about to add. If it's too hot to comfortably touch, wait a minute or two. The butter should be just warm, not steaming.
- Beat eggs until ribbony:
- Add the 2 whole eggs, 1 egg yolk, and vanilla extract to the butter-sugar mixture. Use a hand mixer (or whisk vigorously by hand) to beat everything together for 2-3 minutes until the mixture becomes noticeably paler in color, thicker, and increased in volume. This is crucial - you're incorporating air that creates that signature shiny, crackly top on blondies. When you lift the beaters or whisk, the mixture should fall back in thick ribbons that sit on the surface for a second before sinking in. This ribbon stage indicates proper aeration. Don't skip this step or rush it - the texture depends on this air incorporation.
- Add dry ingredients and mix-ins:
- Place a fine-mesh sieve over the bowl and add the flour, baking powder, and salt. Sift everything directly onto the batter - this removes lumps and aerates the flour. Don't mix yet. Add the chopped white chocolate pieces and blueberries on top of the flour. If using frozen blueberries, toss them with 1 tablespoon of flour first in a small bowl before adding - this coating prevents them from bleeding purple color throughout the batter and helps them stay suspended rather than sinking. Use a rubber spatula to fold everything together gently, using broad, sweeping motions from bottom to top. Stop mixing when you still see a few flour streaks remaining - don't mix until completely smooth. Those last streaks will incorporate during baking. Overmixing develops gluten that makes blondies cakey instead of fudgy.
- Bake until just set:
- Pour the thick batter into the prepared pan and use an offset spatula or the back of a spoon to spread it evenly into all corners. The batter will be quite thick. If you have extra blueberries, scatter a few on top for appearance - don't press them in, just place them on the surface. Bake for 25-30 minutes. The blondies are perfectly done when the edges look set and pull away slightly from the pan sides, but the center still has the slightest jiggle when you gently shake the pan. The top should look shiny with a thin, papery crust forming. A toothpick inserted in the center should come out with a few moist crumbs but not wet batter. Don't overbake - they'll continue setting as they cool. Better to slightly underbake than overbake.
- Cool and cut:
- Remove from the oven and place the pan on a wire cooling rack. Let the blondies cool completely in the pan - this takes at least an hour. Trying to cut them warm will create a gooey mess. Once cool, use the parchment overhang to lift the entire block out of the pan. For the neatest cuts, refrigerate for an hour before slicing. Use a large, sharp knife - run it under hot water, dry it, then cut. Wipe the blade clean between each cut for professional-looking edges. Cut into 16 squares. Store in an airtight container at room temperature for up to 4 days, or freeze for up to 3 months.
 Pin it
Blondies versus brownies confused me until understanding that the fundamental difference isn't just chocolate presence but the entire flavor profile. Brownies derive richness from cocoa or melted chocolate throughout. Blondies get their depth from brown sugar and often browned butter, creating caramel notes. Both have high fat-to-flour ratios that create chewy texture, but blondies are lighter in color and flavor. They're not "white brownies" - they're their own distinct category with vanilla and caramel flavors as the base rather than chocolate.
The Lemon Zest Technique
This simple step transforms how lemon flavor distributes throughout baked goods. Lemon zest contains essential oils locked in tiny oil glands in the peel. Rubbing zest into sugar breaks those glands and releases oils while the sugar crystals absorb them. This distributes lemon flavor uniformly rather than creating concentrated spots of zest. The technique works with any citrus and sugar combination. It takes 30 seconds but creates noticeably more pronounced, evenly distributed citrus flavor than just mixing zest into batter.
Why the Extra Yolk
Using 2 whole eggs plus an additional yolk increases the fat and emulsifier content without adding more egg white (which is mostly water and protein). Egg yolks contain fat and lecithin that create rich, fudgy texture. Extra whites make things cakey and dry. The 2-plus-1 ratio is perfect for blondies - enough egg to bind and create structure but extra yolk for that signature dense, fudgy quality. This technique appears in many brownies and blonies recipes for the same reason.
The Ribbony Stage
Beating eggs with sugar until they reach ribbon stage incorporates air that expands during baking, creating lift and that characteristic shiny top. Ribbon stage means when you lift the beaters, the mixture falls in thick streams that sit on the surface momentarily before sinking. This indicates sufficient aeration. Under-beaten mixture is thin and lacks body. Properly beaten mixture is pale (from incorporated air), thick, and increased in volume. This aeration is what creates the papery, shiny crust that defines well-made blondies.
Fresh vs Frozen Blueberries
Both work beautifully with slightly different handling. Fresh blueberries can go straight into batter without preparation. Frozen blueberries must NOT be thawed first - thawing releases water that makes batter too wet. Use frozen berries straight from the freezer, tossed in a tablespoon of flour first. The flour coating absorbs moisture as the berries thaw during baking, preventing color bleeding and soggy texture. This flour-coating trick works for any frozen fruit in baking.
Mixing to Flour Streaks
The directive to stop mixing when flour streaks remain seems counterintuitive but is crucial for texture. Once flour gets wet, gluten proteins begin forming networks. Mixing develops these networks into strong, elastic strands. In bread, this is desirable. In tender baked goods like blondies, it creates tough, cakey texture. Mixing just until mostly combined with a few streaks remaining prevents gluten development. Those last streaks incorporate during baking through heat and steam without overmixing the batter.
Doneness Indicators
Blondies are tricky because proper doneness looks slightly underdone. The edges should be set and pulling from pan sides. The top should have a thin, shiny crust that may have cracks. But the center should still jiggle very slightly when the pan is gently shaken. This jiggle indicates fudgy texture - if completely set, they'll be overbaked and cakey. They continue cooking from residual heat after removal, so that slight underdone center is perfect. Learning to recognize this took practice but transformed my blondies from cakey to fudgy.
Cutting Technique
Clean, professional-looking cuts require a sharp knife and patience. The hot water trick works because it slightly melts the blondies where the blade contacts, creating smooth cuts rather than dragging and tearing. Heat the blade under hot running water, dry it completely, then cut. After each cut, wipe the blade clean on a damp towel, reheat if needed, and cut again. This process seems tedious but creates Instagram-worthy squares. Refrigerating before cutting firms everything up, making cleaner cuts even easier.
Storage and Freezing
Blondies keep at room temperature in airtight containers for 4 days. The moisture from brown sugar and blueberries keeps them from drying out. For longer storage, wrap the whole uncut block or individual squares tightly in plastic wrap, then aluminum foil, and freeze for up to 3 months. Thaw at room temperature for an hour or overnight in the refrigerator. The texture holds up beautifully after freezing - they taste freshly baked once thawed. This makes them perfect for make-ahead desserts or preparing treats in advance.
Variation Ideas
The base recipe is incredibly versatile. Swap blueberries for raspberries, blackberries, or chopped strawberries. Replace white chocolate with milk or dark chocolate. Add ½ cup chopped almonds or pecans for crunch. Drizzle cooled blondies with lemon glaze (powdered sugar + lemon juice) for extra tang. Add ½ teaspoon almond extract for different flavor profile. Use lime zest instead of lemon. Each variation creates different character while maintaining the core fudgy texture.
 Pin it
These blueberry blondies represent the kind of recipe that proves simple techniques can create bakery-quality results at home. The combination of fudgy texture, white chocolate puddles, bursts of blueberry, and subtle lemon creates something that tastes complex and special while requiring just one bowl and basic ingredients. When you cut into these and see that perfectly fudgy interior with the shiny top, you know you've mastered a recipe worth making over and over. Sometimes the best recipes are the ones that deliver maximum flavor and texture with minimal fuss, and these blondies definitely accomplish that goal perfectly every single time you make them.
Frequently Asked Questions
- → Can I use frozen blueberries instead of fresh?
- Yes! Use frozen blueberries straight from the freezer without thawing. Toss them in a tablespoon of flour before adding to prevent color bleeding.
- → How do I store leftover blondies?
- Keep them in an airtight container at room temperature for up to 4 days, or refrigerate for a week. You can also freeze wrapped blondies for up to 3 months.
- → Why did my blondies turn out dry?
- Overbaking is usually the culprit. Take them out when the center still has a slight jiggle and a toothpick comes out with moist crumbs, not completely clean.
- → Can I swap the white chocolate for something else?
- Absolutely! Try milk chocolate, dark chocolate, chopped nuts, or dried cranberries. The recipe is really flexible.
- → How do I get that crackly top on blondies?
- Whip the eggs with the butter and sugar mixture for 3 to 4 minutes until pale and fluffy. This creates air bubbles that give you that shiny, crackled surface.
- → Do I need to grease the pan if I'm using parchment paper?
- No need! The parchment paper prevents sticking. Just make sure it hangs over the edges so you can lift the blondies out easily.