
 Pin it
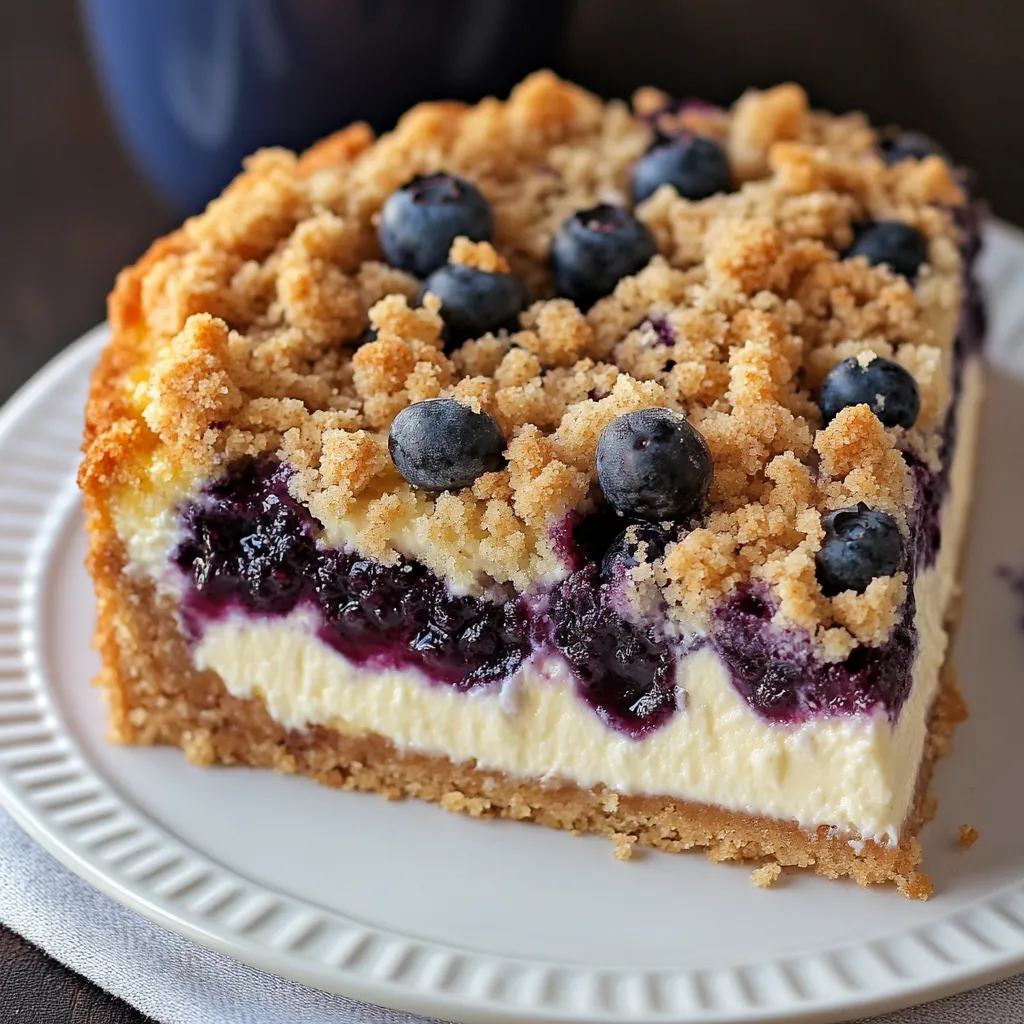
This blueberry crumble cheesecake marries two beloved desserts into one spectacular showstopper. A buttery cookie crust serves as the foundation for a velvety smooth cheesecake filling, all crowned with juicy blueberries and a generous layer of crumbly, buttery streusel. Each bite delivers an exciting contrast of textures – from the crisp base to the creamy center and the fruity, crumbly topping. It's a dessert that looks impressive enough for special occasions yet remains approachable enough to make whenever the craving strikes.
I first created this cheesecake for my sister's birthday, as she could never decide whether she preferred cheesecake or fruit crumble for her celebration. Her eyes widened when I brought out this hybrid dessert, and after one bite, she declared it the "best of both worlds." Now it's become our family's go-to special occasion dessert, requested for everything from holidays to anniversaries. The combination of textures and flavors always earns rave reviews, even from guests who typically aren't cheesecake fans.
Ingredients
For the Crust:
- 250g digestive biscuits or graham crackers: Creates a buttery, slightly sweet foundation that complements the filling perfectly
- 3 tablespoons granulated sugar: Adds just enough sweetness to the crust without overpowering
- 100g unsalted butter, melted: Binds the cookie crumbs together and adds rich flavor to the base
For the Blueberry Topping:
- 300g fresh blueberries: Fresh berries provide the best texture and flavor, with less liquid than frozen ones
- 2 tablespoons granulated sugar: Enhances the natural sweetness of the berries
- 1 tablespoon all-purpose flour: Helps thicken the berry juices as they bake
- 1 tablespoon lemon juice: Brightens the flavor and balances the sweetness of the berries
For the Crumble:
- 100g all-purpose flour: Forms the base of our buttery crumble topping
- 80g light brown sugar: Adds a caramel-like sweetness and helps create that perfect crumbly texture
- 60g unsalted butter, melted: Creates those irresistible buttery clusters in the topping
For the Cheesecake Filling:
- 900g full-fat cream cheese, room temperature: The star of the show – provides that classic tangy cheesecake flavor
- 200g granulated sugar: Balances the tanginess of the cream cheese without making it too sweet
- 200g sour cream, room temperature: Adds a subtle tang and contributes to the silky-smooth texture
- 2 tablespoons cornstarch: Helps stabilize the filling and prevent cracks
- 2 teaspoons vanilla extract: Enhances all the other flavors with its warm aroma
- 4 large eggs, room temperature: Provides structure while maintaining that creamy texture
Step-by-Step Cooking Instructions
- Step 1:
- Prepare your equipment and ingredients: Preheat your oven to 325°F (160°C) conventional oven. Prepare a 9-inch (23cm) springform pan by lining the bottom with parchment paper and lightly greasing the sides. Wrap the outside of the pan with two layers of heavy-duty aluminum foil, ensuring it comes up the sides to prevent any water from seeping in during baking. This water bath protection is crucial for achieving that perfectly smooth, crack-free cheesecake texture. Take your cream cheese, sour cream, and eggs out of the refrigerator 1-2 hours before beginning to ensure they reach room temperature, which is essential for a smooth filling.
- Step 2:
- Make the crust: Place the digestive biscuits (or graham crackers) and granulated sugar in a food processor and pulse until you have fine crumbs that resemble sand. Pour in the melted butter and pulse again until everything is well combined and resembles wet sand. Transfer this mixture to your prepared springform pan and use the flat bottom of a glass to press it firmly and evenly across the bottom and about 1 inch up the sides of the pan. The firm pressure helps create a compact crust that won't crumble when slicing. Bake for 10 minutes until just beginning to turn golden. Remove from the oven and set aside to cool completely.
- Step 3:
- Prepare the blueberry topping: While the crust is baking, in a medium bowl, gently toss the fresh blueberries with the sugar and flour until coated. Add the lemon juice and stir gently until no dry flour remains. The flour will help thicken the juices released by the berries during baking, preventing a soggy topping. Set aside to allow the flavors to meld while you prepare the other components.
- Step 4:
- Make the crumble topping: In a separate bowl, whisk together the flour and brown sugar until well combined. Pour the melted butter over the mixture and use a fork to stir until the mixture forms crumbs of various sizes. The perfect crumble has a variety of texture – some larger clusters and some smaller bits. If it seems too wet, add a little more flour; if too dry, a touch more melted butter. Set aside while you make the cheesecake filling.
- Step 5:
- Prepare the cheesecake filling: In the bowl of a stand mixer fitted with the paddle attachment (or using a hand mixer), beat the cream cheese on low speed for about 1 minute until smooth and free of lumps. Keeping the speed low is crucial throughout this process – higher speeds incorporate too much air, which can lead to cracks later. Add the sugar gradually and beat on low speed for another minute, stopping to scrape down the sides of the bowl to ensure everything is evenly incorporated.
- Step 6:
- Complete the filling: In a small bowl, whisk together the sour cream and cornstarch until smooth. Add this mixture to the cream cheese along with the vanilla extract and beat on low speed until just combined. Add the eggs, two at a time, beating on low speed until each pair is just incorporated before adding the next. Once all eggs are added, give the bowl a final scrape down and mix briefly just to ensure everything is combined. Overmixing at this stage can lead to a less creamy texture, so be gentle.
- Step 7:
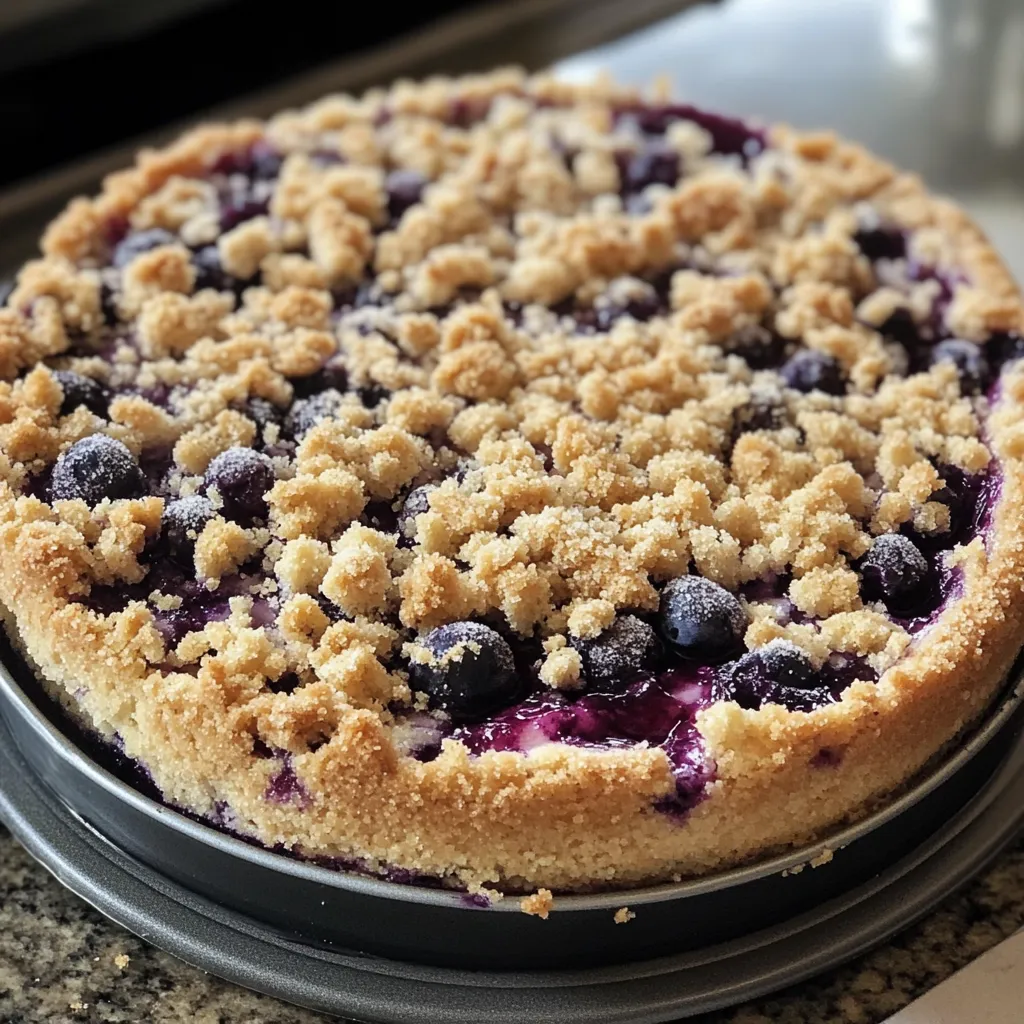
- Assemble and bake: Pour the cheesecake filling over the cooled crust, smoothing the top with a spatula. Gently spoon the blueberry mixture evenly over the cheesecake filling, followed by an even sprinkling of the crumble topping. Place the foil-wrapped springform pan in a larger roasting pan and add enough hot water to come about halfway up the sides of the springform pan. This water bath ensures gentle, even baking. Carefully transfer to the oven and bake for approximately 1 hour and 20-30 minutes.
- Step 8:
- Check for doneness and cool properly: The cheesecake is done when the edges are set but the center still has a slight wobble when gently shaken – it should jiggle like Jell-O, not ripple like a wave. Turn off the oven, crack the door open slightly, and allow the cheesecake to cool slowly in the oven for 1 hour. This gradual cooling helps prevent cracks from forming. After an hour, remove the cheesecake from the water bath, discard the foil, and let it cool completely on a wire rack. Once at room temperature, refrigerate for at least 6 hours, preferably overnight, to fully set.
 Pin it
The Secret to Perfectly Smooth Cheesecake
The key to achieving that coveted velvety texture lies in several crucial techniques that I've perfected over years of cheesecake baking. These small but significant details make the difference between a good cheesecake and an exceptional one.
First and foremost is the temperature of your ingredients. Room temperature cream cheese, sour cream, and eggs blend seamlessly, creating a silky-smooth batter without overbeating. Cold ingredients require more mixing, which incorporates too much air and can lead to cracks and a less creamy texture. I learned this the hard way after making a rushed cheesecake with ingredients straight from the refrigerator – the texture was noticeably different.
The water bath is non-negotiable if you want that professional-quality result. It creates a gentle, humid environment that allows the cheesecake to bake evenly without the harsh direct heat that causes cracking and curdling. Think of it as a protective spa treatment for your cheesecake! I once skipped this step when pressed for time, and while the flavor was still good, the texture wasn't nearly as silky, and the top developed unsightly cracks.
Finally, the slow cooling process in the partially open oven prevents the dramatic temperature change that can cause the cheesecake to contract too quickly and crack. This gradual transition from hot to cool ensures that your cheesecake maintains its perfect texture and appearance.
Last Easter, I brought this cheesecake to our family gathering, where my uncle – a notorious dessert critic – was in attendance. After his first bite, he fell silent (unusual for him), then slowly looked up and asked if I'd consider making this for his upcoming retirement party. Coming from a man who typically offers a list of "improvements" for every dish, this silent approval was perhaps the highest compliment I've ever received on my baking!
Variations and Serving Ideas
While this blueberry version is my personal favorite, the beauty of this recipe is how easily it adapts to different fruits and flavors. Here are some variations I've experimented with:
For a fall-inspired version, replace the blueberries with thinly sliced apples tossed with cinnamon and a touch of nutmeg. The warmth of the spices creates a cozy dessert that's perfect for autumn gatherings or Thanksgiving.
During summer, fresh peaches make a spectacular substitute for the blueberries. Their juicy sweetness pairs beautifully with the creamy filling and buttery crumble. Add a quarter teaspoon of almond extract to the filling to complement the peach flavor.
For a more decadent presentation, try serving each slice with a drizzle of warm chocolate sauce or a dollop of lightly sweetened whipped cream. The contrast of temperatures and textures elevates this already special dessert to new heights.
I've been refining this recipe for nearly five years, tweaking proportions and techniques with each iteration. What began as a simple combination of two favorite desserts has evolved into one of my signature bakes, requested for birthdays, holidays, and special occasions. There's something deeply satisfying about creating a dessert that brings together so many beloved elements – the rich creaminess of cheesecake, the sweet-tart burst of blueberries, and the comforting crunch of buttery crumble – into one spectacular slice.
Frequently Asked Questions
- → Can I use frozen blueberries instead of fresh?
- Yes, frozen blueberries work great! No need to thaw them first - just mix with the sugar, flour and lemon juice while still frozen.
- → How do I know when my cheesecake is done baking?
- The edges should be set but the center should still have a slight wobble when you gently shake the pan. It will continue to set as it cools.
- → Can I make this cheesecake ahead of time?
- Absolutely! This cheesecake actually tastes better when made a day ahead and refrigerated overnight, allowing the flavors to develop fully.
- → Why do I need a water bath for baking?
- The water bath creates a moist environment that helps the cheesecake bake evenly and prevents cracks from forming on the surface.
- → How should I store leftover cheesecake?
- Cover and store in the refrigerator for up to 5 days. You can also freeze individual slices for up to 3 months in airtight containers.
- → Can I use other berries in this recipe?
- Yes! Strawberries, raspberries, or a mixed berry combination would all work beautifully with this recipe.