
 Pin it
These chocolate cake pops transform leftover or purposely-baked chocolate cake into adorable, bite-sized treats - moist, rich cake crumbled into fine crumbs then bound with chocolate frosting creating fudgy, truffle-like texture, rolled into perfect one-inch spheres, chilled until firm, impaled on lollipop sticks for easy handling, then dunked into melted chocolate candy coating that hardens into smooth, glossy shell, all finished with festive sprinkles, crushed nuts, or creative decorations that make each pop look like miniature works of art. What makes cake pops so beloved for parties and gifts is how they solve multiple dessert challenges simultaneously: they're portion-controlled (no cutting required), completely portable without plates or forks, visually impressive despite simple technique, endlessly customizable for any theme or occasion, and genuinely fun to make with kids who love the hands-on rolling and decorating. The genius of this dessert format is how it repurposes cake - using leftover birthday cake, imperfect layers that cracked, or cake baked specifically for this purpose - binding it with frosting to create something actually better than plain cake since every bite contains perfect cake-to-frosting ratio, while the chocolate coating adds textural contrast and keeps everything moist, and the lollipop stick presentation transforms everyday cake into something that feels special and celebratory.
The first time making these reveals how forgiving the technique is - even if your cake balls aren't perfectly round or your chocolate coating isn't magazine-smooth, the finished pops still look impressive and taste delicious. That moment when you dip the first cake ball and watch the chocolate cascade over it, then add sprinkles while it's still wet creates immediate artistic satisfaction. Tasting that first bite where you get the crunch of the chocolate shell followed by the soft, moist, intensely chocolatey interior demonstrates why this format works so well - it's texturally interesting and delivers concentrated flavor in a convenient, no-mess package.
Ingredients - What You Need and Why
- Baked and cooled chocolate cake: about one nine-inch round layer or equivalent (approximately three to four cups of crumbled cake) provides the base; the cake must be completely cool or it will be too sticky to work with; use homemade cake, boxed cake mix, leftover birthday cake, or chocolate cupcakes; moist cake works better than dry cake which doesn't bind as well; day-old cake is actually ideal since it's slightly drier and crumbles cleanly; if your cake is very moist, you may need slightly less frosting
- Chocolate frosting: about one-half to three-quarters cup acts as the binder that holds crumbled cake together; use store-bought or homemade frosting; chocolate frosting reinforces the chocolate flavor, but vanilla frosting works too for different flavor profile; cream cheese frosting creates tangier taste; the frosting amount is variable - add gradually until mixture holds together when squeezed but isn't overly wet or sticky
- Chocolate candy melts: about twelve ounces (one and a half to two cups) for coating provides the smooth, hard outer shell; candy melts (also called coating chocolate or almond bark) are formulated to melt smoothly and harden with glossy finish without tempering; they come in multiple colors (white, milk chocolate, dark chocolate, pink, blue, etc.) for easy customization; chocolate chips can substitute but require adding one tablespoon of coconut oil or shortening to thin the consistency and create proper coating texture that hardens properly
- Lollipop sticks: about twenty-four sticks (six-inch paper lollipop sticks are standard) provide handles and presentation; these are available at craft stores, baking supply stores, or online; in a pinch, use toothpicks for smaller pops, plastic spoons, or pretzel sticks for edible handles
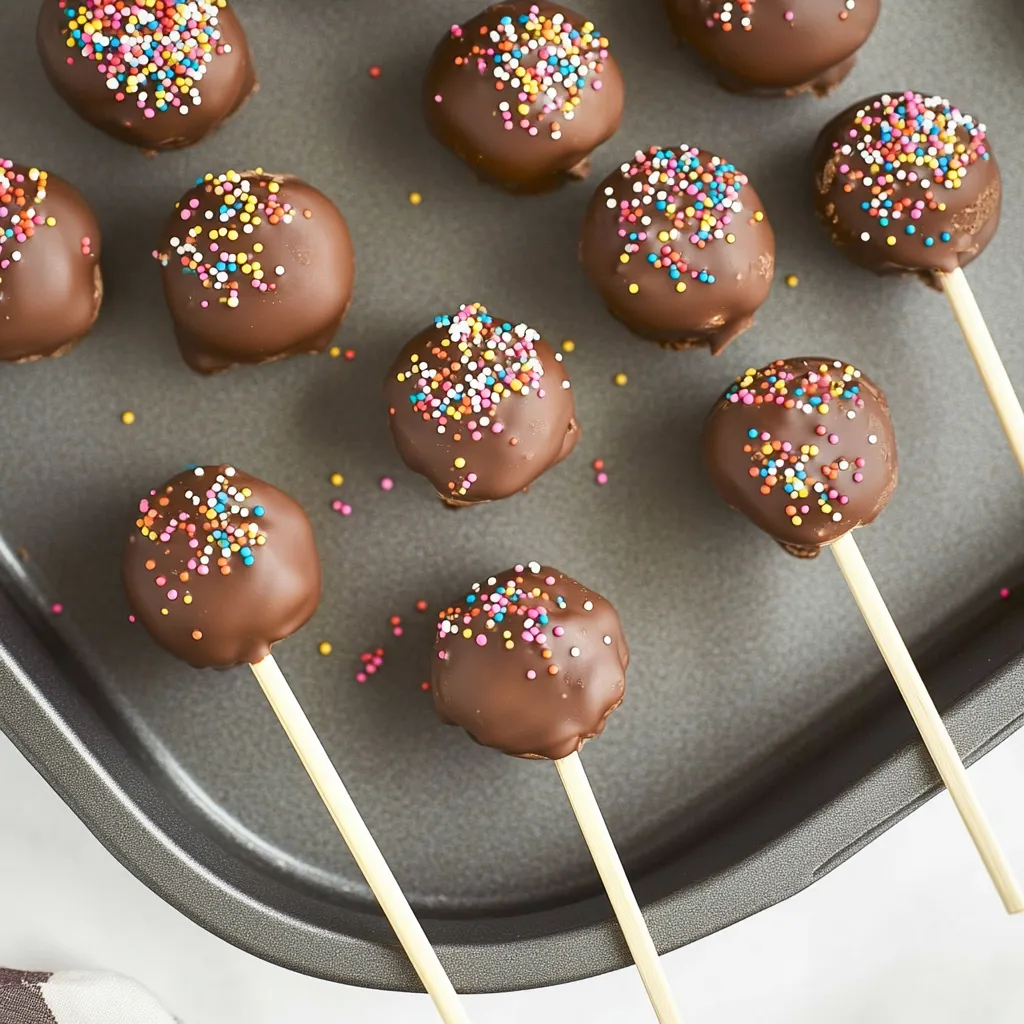
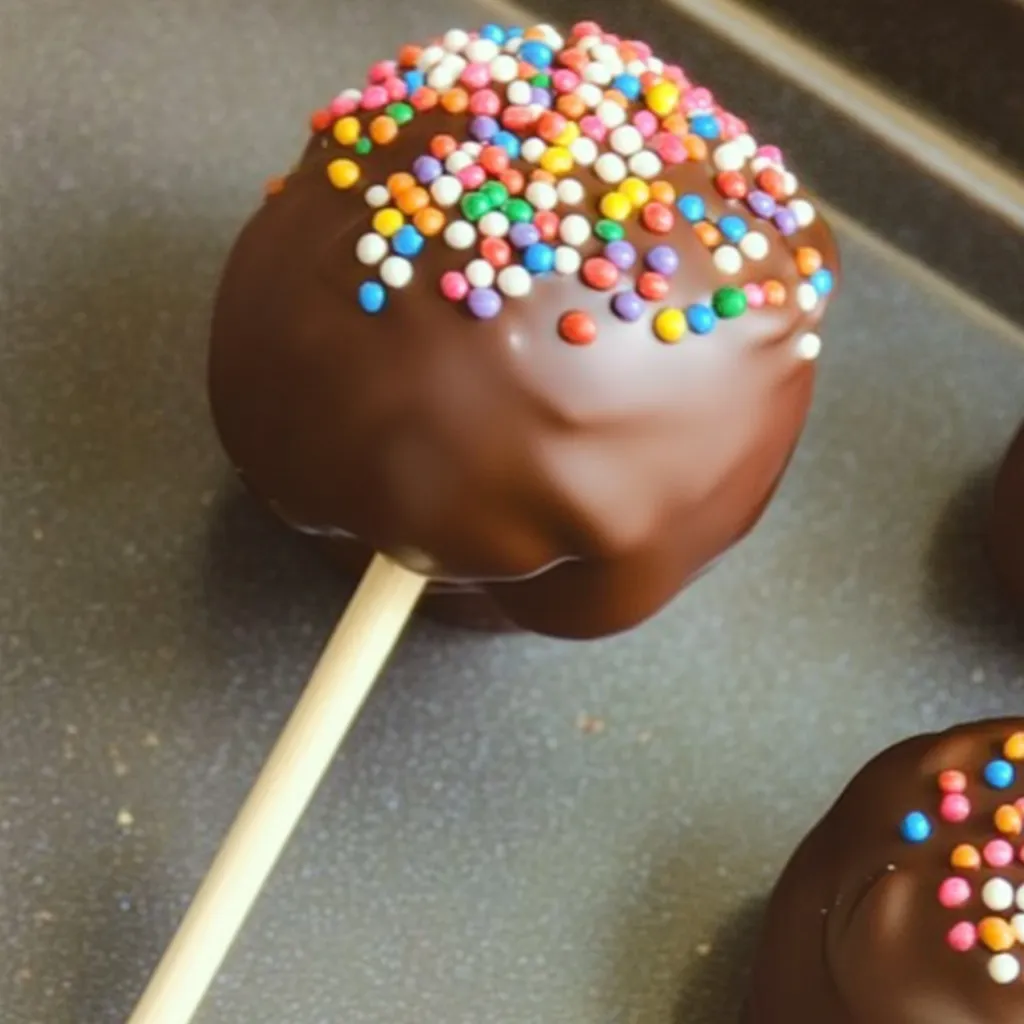
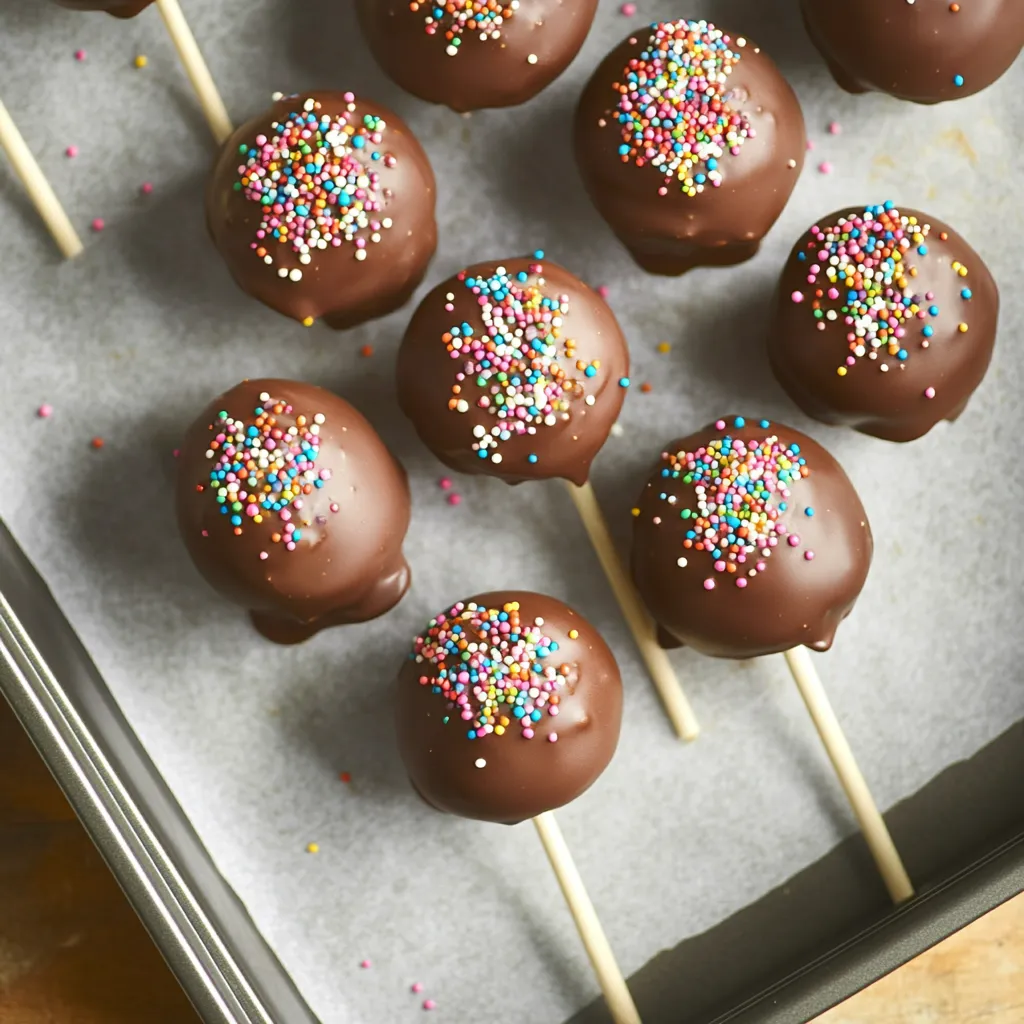
- Decorations: sprinkles, jimmies, nonpareils, sanding sugar, chopped nuts, mini chocolate chips, crushed cookies, edible glitter, or themed decorations add visual appeal and textural contrast; these are completely optional but make cake pops more festive and party-appropriate
How to Make Chocolate Cake Pops - Step by Step
- Crumble the cake into fine texture:
- Start with one completely cooled nine-inch chocolate cake layer (or equivalent - about twelve cupcakes, half a nine-by-thirteen-inch cake, etc.). If you're baking cake specifically for this recipe, do it a day ahead so it's completely cool and slightly dried which makes better cake pops. If using leftover cake, remove any hardened frosting from the exterior as it can create lumps. Break the cake into large chunks and place them in a large mixing bowl. Now crumble the cake using your hands or a fork, breaking it down into fine, uniform crumbs - think breadcrumb consistency, not large chunks. This takes several minutes of thorough crumbling. You want no large pieces remaining because lumps will make it difficult to form smooth balls. The finer and more uniform your crumbs, the smoother your finished cake pops will be. You should have approximately three to four cups of fine cake crumbs when finished. This step seems tedious but is crucial - take the time to crumble thoroughly.
- Bind with frosting to create moldable mixture:
- Add about one-half cup of chocolate frosting to your bowl of cake crumbs. Using your hands (this is messy but most effective) or a sturdy spoon, mix and knead the frosting into the cake crumbs thoroughly, working it through until every crumb is coated and the mixture starts coming together. Squeeze a small handful - if it holds together in a cohesive ball without crumbling apart, you have enough frosting. If it's still dry and crumbly, add more frosting a tablespoon at a time, mixing thoroughly after each addition. Be careful not to add too much frosting or the mixture becomes overly sticky, soft, and difficult to work with, plus it won't hold its shape well and may slide off the sticks. The ideal consistency is like Play-Doh or cookie dough - moldable and holding together when pressed, but not wet or sticky. Different cakes absorb frosting differently, so trust the texture test rather than measuring exactly. Once properly mixed, the mixture should be uniform in color with no dry patches or frosting streaks. This binding step transforms cake crumbs into workable mixture that can be shaped.
- Form into uniform cake balls:
- Line a baking sheet with parchment paper or a silicone mat. Now portion and shape the cake mixture into balls. For uniform size (which ensures even coating and professional appearance), use a small cookie scoop (about one tablespoon capacity) to portion the mixture, or simply pinch off portions about the size of a walnut. Roll each portion between your palms using gentle, circular motion to form smooth, round balls about one inch in diameter. Don't squeeze too hard or they'll be too dense; don't roll too loosely or they'll fall apart. Place each formed ball on the prepared baking sheet, spacing them about an inch apart. You should get approximately twenty to thirty cake balls depending on size. If the mixture is too soft and sticky to roll smoothly, refrigerate it for fifteen to twenty minutes to firm up, then roll. If it's too dry and cracking, work a tiny bit more frosting in. Once all balls are formed and arranged on the sheet, place the entire sheet in the refrigerator and chill for at least one hour (or up to several hours). This chilling is essential - it firms the cake balls so they hold together during dipping and prevents them from falling apart or sliding off the sticks.
- Insert sticks and chill again:
- After the initial chilling period, remove the baking sheet from the refrigerator. Melt about one-quarter cup of your chocolate candy melts in a small bowl in the microwave (heat in thirty-second intervals, stirring between, until smooth). This small amount is just for "gluing" the sticks to the balls. Dip the tip of one lollipop stick about half an inch into the melted chocolate, then immediately insert the chocolate-coated end into one cake ball, pushing it about halfway through the ball (not all the way through - stop in the center). The melted chocolate acts as glue that sets and holds the stick securely in place. Repeat with remaining balls and sticks. Return the baking sheet to the refrigerator for another thirty minutes to allow the chocolate "glue" to set and the balls to firm up again. This second chill ensures the cake balls won't slide down the sticks or fall off during dipping. Don't skip this step even though it seems redundant - the stick insertion creates warmth from your hands that softens the balls, so they need re-chilling.
- Melt chocolate coating properly:
- While the cake pops are chilling for the second time, prepare your coating. Place twelve ounces of chocolate candy melts in a microwave-safe bowl - a deep, narrow bowl or large mug works better than a wide, shallow bowl since you need enough depth to dip the cake balls. Microwave on fifty percent power in thirty-second intervals, stirring thoroughly between each interval, until the chocolate is completely melted and smooth. Don't rush this by using full power or you'll burn the chocolate. The melted chocolate should be thin enough to easily coat but not so hot that it melts the cake balls - let it cool for a minute or two if it's very hot. If using chocolate chips instead of candy melts, add one tablespoon of coconut oil or vegetable shortening to the chips before melting; this thins the chocolate to proper coating consistency and helps it harden with glossy finish. The coating should be fluid and drizzle smoothly off a spoon. If it's too thick, add another teaspoon of coconut oil or shortening and stir.
- Dip and decorate the cake pops:
- Set up your decorating station: have your melted chocolate ready, your decorations in small bowls nearby, and a foam block, piece of Styrofoam, upside-down colander, or a box with holes poked in it to hold the dipped pops upright while they dry. Remove the chilled cake pops from the refrigerator. Working with one at a time, hold the lollipop stick and dip the cake ball completely into the melted chocolate, submerging it fully. Gently rotate or swirl to coat all sides evenly. Lift it out and hold it over the bowl, letting excess chocolate drip back into the bowl - you can gently tap the stick against the bowl edge to encourage dripping, but don't tap too hard or the cake ball might fall off. The coating should be thin and smooth, not thick and globby. While the chocolate is still wet (work quickly), add your decorations - sprinkle over sprinkles, press on chopped nuts, drizzle with contrasting chocolate, or add whatever decorations you're using. Immediately insert the stick into your foam block or stand so the cake pop stands upright. The chocolate will begin setting within a few minutes. Repeat with remaining cake pops, working fairly quickly. If the coating chocolate becomes too thick as it cools, reheat it briefly in the microwave. Once all pops are dipped and decorated, let them stand at room temperature for about thirty minutes to allow the chocolate to set completely hard.
 Pin it
Understanding that cake pops emerged from cake truffle traditions (cake mixed with frosting and rolled into balls) but became distinct with the addition of sticks and chocolate coating in the 2000s, popularized by baker Angie Dudley (Bakerella), helps you appreciate this as a modern dessert innovation rather than traditional recipe.
Understanding Cake Pop History and Cultural Phenomenon
Cake pops as we know them today were popularized in the late 2000s by Angie Dudley, a baker who blogs as Bakerella. She didn't invent the concept of mixing cake with frosting (cake balls or cake truffles existed previously), but she innovated the lollipop stick presentation and creative decoration that made them go viral on social media. Her blog posts and subsequent cookbook sparked a massive cake pop trend that swept through home baking, craft fairs, and eventually commercial bakeries. Starbucks began selling cake pops in their stores in 2011, bringing them to mainstream awareness. The appeal lies partly in their Instagram-worthy appearance - they're inherently photogenic and easily customized for any aesthetic. Cake pops fit perfectly into Pinterest culture where visual appeal drives recipe popularity. They also emerged during the cupcake trend's height, offering similar individual-portion, customizable-design appeal but in even more portable, mess-free format. The phenomenon reflects broader shifts toward handheld, shareable, visually-appealing desserts optimized for both eating and photographing. Understanding this context helps explain why cake pops feel simultaneously trendy and accessible - they're modern enough to feel current but simple enough that home bakers can master them.
Creating Flavor Variations and Creative Decorations
While chocolate cake pops are classic, exploring variations showcases this format's versatility and allows endless customization for different tastes and occasions. For vanilla cake pops, use vanilla cake with vanilla or cream cheese frosting, dip in white chocolate candy melts, and decorate with pastel sprinkles for elegant, wedding-appropriate treats. Red velvet cake pops combine red velvet cake with cream cheese frosting, coat in white chocolate, then drizzle with red candy melts for Valentine's Day or Christmas. Lemon cake pops use lemon cake with lemon buttercream, dip in yellow or white candy melts, and top with lemon zest for spring celebrations. Cookies and cream variation mixes crushed Oreos into vanilla cake and frosting, coats in white chocolate, and tops with more crushed Oreos. Peanut butter cake pops add peanut butter to chocolate cake mixture, coat in milk chocolate, then drizzle with melted peanut butter. Mint chocolate uses chocolate cake with mint extract in frosting, coats in dark chocolate, decorates with crushed peppermint candies for winter holidays. Birthday cake pops use funfetti cake with vanilla frosting and rainbow sprinkles. S'mores version adds mini marshmallows and graham cracker crumbs to chocolate cake, coats in milk chocolate. For creative decorations, make character faces with candy eyes and chocolate-chip features, create holiday themes (pumpkins for Halloween, snowmen for Christmas, hearts for Valentine's), use edible markers to draw designs, drizzle contrasting chocolate in patterns, roll in crushed cookies or candy, or use themed sprinkles matching party colors.
Troubleshooting Common Cake Pop Problems
Even with straightforward technique, cake pops can present challenges, but understanding solutions prevents frustration and wasted ingredients. If cake balls fall off sticks during dipping, you either didn't chill long enough after inserting sticks, didn't dip stick tips in chocolate before inserting (which acts as glue), or the mixture is too heavy from excess frosting - ensure proper chilling and use chocolate "glue" technique. When chocolate coating is too thick and clumpy rather than smooth, the chocolate is too cool or you need to add more coconut oil or shortening - reheat gently and thin with additional fat. If coating is cracking after it sets, the temperature difference between cold cake balls and warm chocolate was too extreme causing thermal shock - let cake balls sit at room temperature five minutes before dipping, or ensure chocolate isn't too hot. Cake balls that are too soft and don't hold shape contain too much frosting or weren't chilled adequately - if mixture is too wet, work in more cake crumbs; always chill thoroughly. When pops are too dry and crumbly, you didn't add enough frosting or used very dry cake - add more frosting gradually until mixture binds. If decorations won't stick, you waited too long and the chocolate already set - work faster and add decorations immediately after dipping while coating is still wet. Chocolate that becomes thick and unworkable while dipping indicates it cooled too much - reheat briefly in microwave, stirring, to restore fluidity. Cake balls with air pockets or hollow centers weren't rolled firmly enough - roll with moderate pressure to compress mixture and eliminate air pockets.
Complete Presentation and Serving Suggestions
Understanding creative display and serving options maximizes cake pops' party potential and gift-giving appeal. For party displays, arrange cake pops upright in a decorative vase or container filled with floral foam, creating a "bouquet" that serves as both centerpiece and dessert. Use cake pop stands (available at craft stores) that hold multiple pops at varying heights for professional presentation. Create themed arrangements - all red and pink for Valentine's, orange and black for Halloween, pastels for Easter. For individual serving, wrap each cake pop in a clear cellophane bag tied with ribbon for party favors guests can take home. Present on decorative platters with the sticks creating height and visual interest. For gifting, arrange cake pops in decorative boxes with tissue paper, package in mason jars standing upright, or create gift baskets with multiple flavors. At dessert tables, mix cake pops with other treats for variety. Label different flavors if serving multiple types. For kids' parties, arrange pops at child-height for easy grabbing. Create interactive displays where guests can add their own decorations to plain cake pops. For weddings, coordinate colors with wedding theme and display on elegant tiered stands. During holidays, create seasonal displays - cake pops arranged like Christmas trees, in baskets for Easter, or on themed serving trays. Serve at room temperature for best texture - avoid refrigerating before serving as cold chocolate loses its snap.
Storage, Make-Ahead Timeline, and Transportation Tips
Understanding proper storage and advance preparation maximizes convenience while maintaining quality. Store finished cake pops at room temperature in an airtight container for up to one week - layer with parchment paper between layers to prevent sticking, or store standing upright if container allows. The chocolate coating protects the cake interior keeping it moist. Refrigerate for up to two weeks if your kitchen is very warm or humid, though refrigeration can make chocolate coating lose its glossy appearance and the cake balls become quite firm - bring to room temperature before serving. Freeze uncoated cake balls (before dipping in chocolate) for up to one month: freeze in a single layer on a baking sheet until solid, then transfer to freezer bags; thaw overnight in refrigerator, then bring to room temperature and proceed with coating. Freeze fully-finished cake pops for up to six weeks: freeze standing upright in a container, or wrap individually in plastic wrap; thaw at room temperature for one to two hours before serving. For make-ahead timeline: Day 1 - bake and cool cake; Day 2 - crumble cake, mix with frosting, form balls, chill, insert sticks, chill again; Day 3 - dip in chocolate and decorate; Days 4-7 - store and serve. This spread-out approach prevents last-minute rushing. For transporting to parties, use a sturdy box or container with foam or Styrofoam insert to hold pops upright during transport - poke holes in foam and insert sticks so pops don't touch each other or the container lid. Transport in a cool car but not blazing sun which melts chocolate. For hot weather, use an insulated cooler with ice packs (but don't let pops touch ice directly).
The Science of Cake-Frosting Binding and Chocolate Coating
Understanding the chemistry behind cake pops helps explain why technique matters and how to troubleshoot. When you mix frosting into cake crumbs, several things occur: the frosting's fats (butter, shortening) coat the cake's starch molecules, acting as a binder that holds crumbs together; the frosting's sugar dissolves slightly into any residual cake moisture, creating additional binding; the mixture transforms from individual crumbs into a cohesive mass that can be molded - essentially, you're creating a truffle-like confection where cake provides structure and frosting provides fat and sweetness. The chilling step is crucial because cold firms the fats in the frosting, setting the structure so balls hold their shape. When you dip cake balls in melted chocolate, the liquid chocolate flows over the surface and into any tiny crevices. As the chocolate cools and the cocoa butter crystallizes, it forms a hard shell that encases the cake ball completely, creating moisture barrier that keeps the interior soft while providing textural contrast. Candy melts contain additional stabilizers beyond regular chocolate, which is why they set harder and glossier without requiring tempering (the precise temperature control process needed for regular chocolate). The stick insertion with chocolate "glue" works because the melted chocolate seeps into the porous cake ball structure slightly, then hardens creating a mechanical lock between stick and cake that prevents slippage.
Teaching Fundamental Baking and Decorating Skills
This recipe provides excellent opportunity to learn techniques that transfer to other desserts and decorating projects. The skill of properly measuring ingredients by feel and texture rather than exact measurements (knowing when mixture has enough frosting by squeeze test) develops baking intuition crucial to all cooking. Learning to roll uniform spheres by hand teaches portion control and shaping useful for cookies, truffles, meatballs, and countless applications. Understanding working with melted chocolate - proper melting technique, maintaining fluidity, achieving coating consistency - applies to chocolate-covered strawberries, pretzels, cookies, and candy making. The concept of using chocolate as "glue" or adhesive teaches creative problem-solving in dessert construction. Decorating while chocolate is still wet develops quick decision-making and execution skills. Learning to set up efficient work stations (mise en place for decorating) with all supplies ready before starting teaches professional kitchen organization. The patience required for multiple chilling steps builds understanding that some recipes simply cannot be rushed. For beginners intimidated by decorating or working with chocolate, cake pops provide forgiving practice since imperfections are easily disguised and mistakes can often be remelted or scraped off and redone. Success builds confidence for more advanced chocolate work and decorated desserts.
The Economics of Homemade Versus Purchased Cake Pops
Understanding cost comparisons reveals significant savings while achieving equal or superior quality to commercial versions. Homemade cake pop costs: one box cake mix or homemade cake (three to four dollars), one container frosting (three dollars), chocolate candy melts (four to five dollars), lollipop sticks (three dollars for fifty-count pack you'll reuse), sprinkles and decorations (two to three dollars) - total approximately fifteen to eighteen dollars for twenty-five to thirty cake pops, or about fifty to seventy cents per pop. Compare this to: Starbucks cake pops (three to four dollars each), bakery cake pops (two to four dollars each), or specialty cake pop shops (three to five dollars each). Making just six to eight cake pops at home recoups your initial investment in supplies (like the stick pack), and subsequent batches cost only ingredients. For a party of twenty kids, purchasing twenty bakery cake pops costs forty to eighty dollars versus making them for about twelve dollars in ingredients. Beyond monetary savings, homemade offers complete control over flavors, decorations, ingredient quality, and customization. You can accommodate allergies, use organic ingredients, create custom colors for specific themes, and make flavors unavailable commercially. The time investment (about two hours total across multiple days including chilling) is minimal considering the quantity produced and cost savings. For people who regularly buy cake pops as treats or party desserts, learning to make them at home saves hundreds of dollars annually.
Understanding Visual Appeal and Social Media Culture
Cake pops' explosion in popularity coincides with and reflects broader food culture shifts toward visual appeal and "Instagrammable" desserts. These treats are inherently photogenic - small enough to photograph well, colorful, three-dimensional, easy to style and arrange creatively, and novel enough to generate interest. The lollipop presentation creates whimsical appeal that reads as fun and celebratory in photos. The ability to customize them infinitely for any theme, color scheme, or occasion makes them perfect for content creators who need fresh material. Food bloggers and home bakers discovered that cake pop tutorials and photos perform extremely well on Pinterest and Instagram, driving the trend further. This visual focus has influenced how people approach dessert making - prioritizing appearance alongside taste, considering how desserts will photograph, and seeking recipes that offer visual variety through customization. Understanding this context helps explain why cake pops remain popular despite being more labor-intensive than just serving cake slices - the visual impact and individual-portion convenience justify the extra effort for occasions where presentation matters. However, it's worth noting that beneath the social media appeal, cake pops genuinely taste good and solve real practical problems (portability, portion control, using leftover cake), so their popularity isn't purely superficial.
Creative Applications Beyond Standard Cake Pops
While traditional round cake pops are classic, understanding creative shape variations expands possibilities and prevents boredom. Shape cake balls into hearts for Valentine's Day by forming ovals, then pressing gently at one end to create heart shape before chilling. Create egg shapes for Easter by forming slightly elongated spheres. Make cube shapes by pressing mixture into ice cube trays lined with plastic wrap, chilling, then removing and coating. Form mini "cakes" by shaping mixture into cylinders with flat tops and bottoms. Create character shapes - balls for heads with candy features, elongated shapes for bodies. Make seasonal shapes like pumpkins (round with orange coating, green candy stem), snowmen (stack two small balls), or Christmas ornaments (round with decorative tops). Use silicone molds to create specific shapes before coating. Make cake ball "truffles" without sticks for more elegant presentation in paper cups. Create layered effects by using two cake flavors - form half the ball in chocolate, half in vanilla. Make "inside-out" cake pops with colorful cake balls coated in white chocolate, then drizzled with colored chocolate revealing bright interior when bitten. Each variation maintains the fundamental technique while exploring different presentations.
 Pin it
This chocolate cake pops recipe represents the perfect intersection of creative fun and practical dessert-making, proving that some of the most popular treats aren't necessarily the most complicated but rather those that combine visual appeal, portability, customization options, and genuine deliciousness in a format that works for modern lifestyles and celebrations. What makes this recipe genuinely valuable is how it solves multiple problems simultaneously - using up leftover cake that would otherwise be wasted, creating portion-controlled individual desserts that eliminate the need for plates and forks, providing endless customization for any party theme or color scheme through simple decoration changes, offering a genuinely engaging activity for families to do together on weekends, and producing results that look impressively professional despite requiring only basic skills and equipment. The transformation of ordinary cake and frosting into something that seems special and celebratory demonstrates that impressive desserts come from creative presentation and thoughtful execution rather than requiring advanced pastry techniques or expensive ingredients. Whether you're a parent seeking birthday party treats that kids will love, a baker wanting to use leftover cake creatively, someone who loves customizing desserts for specific themes and occasions, a gift-giver looking for homemade presents that feel personal and special, or simply anyone who appreciates how something small and bite-sized can deliver concentrated flavor and satisfaction without overwhelming, this delivers completely. The make-ahead friendly nature means you can spread preparation across multiple days avoiding that frantic last-minute baking panic, while the room-temperature storage eliminates refrigeration concerns for parties and gift-giving. Once you've experienced how satisfying it is to create dozens of perfectly decorated cake pops that look bakery-quality, seen how excited people get about receiving these as gifts or finding them at parties, tasted how the chocolate shell gives way to that fudgy, moist interior that's somehow better than plain cake despite being made from cake, understood how therapeutic and meditative the rolling and decorating process can be when you're in the zone, and appreciated how one basic technique opens up infinite creative possibilities through different flavors and decorations, you'll find yourself making batch after batch for every occasion, experimenting with new flavor combinations and decoration techniques, confidently bringing homemade cake pops to parties knowing they'll be photographed and devoured, and recognizing that sometimes the best recipes are those that spark creativity and joy in the making while producing treats that bring genuine delight to everyone who eats them.
Frequently Asked Questions
- → Can I use store-bought cake for this recipe?
- Yes! Grab a box mix or bakery cake to save time. Any chocolate cake works great for making these pops.
- → How long do cake pops stay fresh?
- Keep them in the fridge for up to 5 days in a container. You can also freeze them for a month if you want to make them ahead.
- → Why do my cake pops fall off the stick?
- Make sure to chill them for at least an hour before dipping. The cold helps them stay on the stick when you coat them in chocolate.
- → Can I use white chocolate instead?
- Absolutely! White chocolate, milk chocolate, or dark chocolate all work. You can even mix different types for variety.
- → Do I need a special stand for cake pops?
- Not really. A foam block works great, but you can also just lay them flat on parchment paper while the chocolate sets.
- → What other cake flavors work well?
- Vanilla, red velvet, lemon, and marble cake are all delicious options. Feel free to get creative with different combinations.