
 Pin it
This irresistible pumpkin crunch cake delivers all the cozy flavors of fall in one incredibly simple dessert that requires no special skills or complicated techniques. The bottom layer creates a creamy, custard-like pumpkin filling that tastes almost like pumpkin cheesecake, while the top transforms into a golden, crunchy streusel with toasted pecans that provides the perfect textural contrast. What makes this recipe truly special is how it uses convenient shortcuts like cake mix and canned pumpkin to create something that tastes completely homemade while coming together in just minutes of prep time.
I've been making this pumpkin crunch cake for years, and it never fails to disappear completely at every gathering where I bring it. What started as a quick dessert solution for a last-minute potluck has become my most requested fall recipe because it perfectly captures everything people love about pumpkin desserts. The genius of this recipe is how it creates two distinct layers - that creamy, almost cheesecake-like bottom and the crunchy, streusel-like top - all from simple ingredients that most people have on hand. Now it's become such a signature dish that people actually plan their fall menus around whether I'm bringing "that amazing pumpkin cake."
Ingredients
- Pure pumpkin puree (29 oz can or 2 standard 15 oz cans): Use only plain pumpkin, not pumpkin pie filling which contains added spices and sugar
- Evaporated milk (12 oz can): Creates the creamy, custard-like texture; don't substitute condensed milk which is much sweeter
- Granulated sugar (1 cup): Sweetens the pumpkin layer; brown sugar works too for deeper flavor
- Large eggs (3): Bind the custard layer and help it set properly during baking
- Pumpkin pie spice (2 teaspoons): Use store-bought or make your own blend of cinnamon, nutmeg, ginger, and allspice
- Yellow cake mix (1 box, 15.25 oz): The dry mix only, don't add the ingredients called for on the box
- Unsalted butter (3/4 cup, sliced thin): Creates the golden, crunchy topping when melted over the cake mix
- Chopped pecans (1 cup): Adds wonderful crunch and nutty flavor; walnuts work as substitutes
- Toffee bits (1/2 cup, optional): Adds extra sweetness and crunch for those who want something special
Instructions
- Prepare your baking setup properly.
- Preheat oven to 350°F and generously spray a 9x13 inch baking dish with cooking spray, then lightly dust with flour to prevent sticking. This ensures easy serving and cleanup later.
- Create the creamy pumpkin base.
- In a large mixing bowl, whisk together pumpkin puree, evaporated milk, sugar, eggs, and pumpkin pie spice until completely smooth and well combined. The mixture should be free of lumps and have a custard-like consistency.
- Pour pumpkin mixture into prepared pan.
- Transfer the pumpkin mixture to your prepared baking dish, spreading it evenly to create a smooth base layer. This will become the creamy bottom layer of your finished cake.
- Add the cake mix layer evenly.
- Sprinkle the dry cake mix evenly over the entire surface of the pumpkin mixture. Try to distribute it as uniformly as possible, though it doesn't need to be perfect since it will even out during baking.
- Create the butter layer for crunch.
- Slice the cold butter into very thin pats and distribute them evenly over the cake mix layer. Don't worry if you can't cover every inch - the butter will melt and spread during baking to create that golden, crunchy top.
- Add nuts for extra texture and flavor.
- Sprinkle chopped pecans evenly over the butter and cake mix layers. If using toffee bits, add them now as well for extra sweetness and crunch in the finished dessert.
- Bake until golden and set.
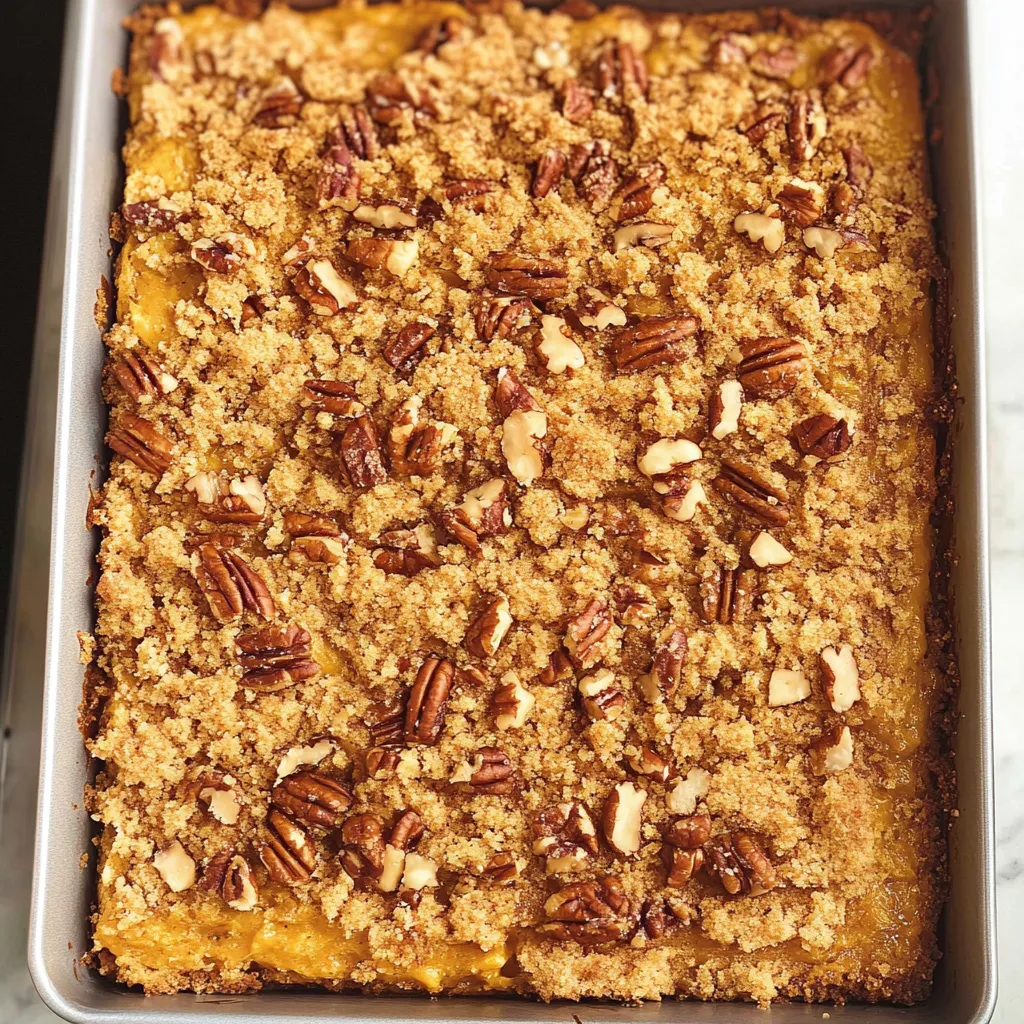
- Bake for 55-60 minutes until the center is set and no longer jiggly, and the top is golden brown with crispy edges. The pecans should be toasted and the butter should have created a beautiful golden crust.
- Cool before serving for best texture.
- Let the cake cool for at least 15-20 minutes before serving to allow the layers to set properly. This prevents the dessert from being too loose and makes serving much neater.
 Pin it
Understanding the Dump Cake Method
The magic of dump cakes lies in their simplicity - you literally dump ingredients into a pan and let the oven do all the work. During baking, the butter melts and combines with the cake mix to create a streusel-like topping, while the pumpkin mixture underneath sets into a creamy, custard-like layer that's incredibly rich and satisfying.
This technique became popular in church cookbooks and potluck circles because it produces impressive results with minimal effort and virtually no risk of failure. The layers separate naturally during baking, creating that perfect contrast of textures that makes each bite so satisfying.
Achieving Perfect Texture Balance
The secret to this cake's incredible appeal lies in the contrast between the creamy bottom layer and the crunchy top. The pumpkin mixture, enriched with evaporated milk and eggs, bakes into something that's almost like a cross between pumpkin pie filling and cheesecake, while the cake mix and butter create a golden, streusel-like topping.
Using evaporated milk rather than regular milk or cream is crucial for achieving the right consistency - it provides richness and helps the custard set properly without making it too heavy or dense. The eggs serve as both binder and thickener, creating that perfect custard texture.
Tips for Even Better Results
While this recipe is nearly foolproof, a few simple tips can make it even better. Toasting the pecans before adding them intensifies their flavor and ensures they stay crunchy throughout baking. Simply spread them on a baking sheet and toast at 350°F for 5-7 minutes until fragrant.
Slicing the butter as thinly as possible helps it distribute more evenly over the cake mix, creating a more uniform golden top. Don't worry if some areas have more butter than others - it will even out during baking and create those delicious crispy spots that make this cake so addictive.
Make-Ahead and Storage Strategies
This pumpkin crunch cake is actually excellent for make-ahead entertaining because it tastes just as good the next day and is easier to serve when it's had time to set up completely. You can bake it a day ahead and store covered in the refrigerator, then bring to room temperature or warm slightly before serving.
The cake keeps beautifully for up to four days covered in the refrigerator, making it perfect for meal prep or enjoying throughout the week. It also freezes well for up to two months - just thaw overnight in the refrigerator and serve cold or at room temperature.
Creative Variations and Add-Ins
While this recipe is absolutely perfect as written, it welcomes many delicious variations based on personal preferences or what you have available. Try using spice cake mix instead of yellow for more intense fall flavors, or add a layer of cream cheese between the pumpkin and cake mix for extra richness.
Different nuts work beautifully - walnuts, chopped almonds, or even a mixture of nuts creates interesting flavor and texture variations. For special occasions, consider adding a drizzle of caramel sauce or a dollop of cinnamon whipped cream when serving.
Serving Suggestions and Presentation
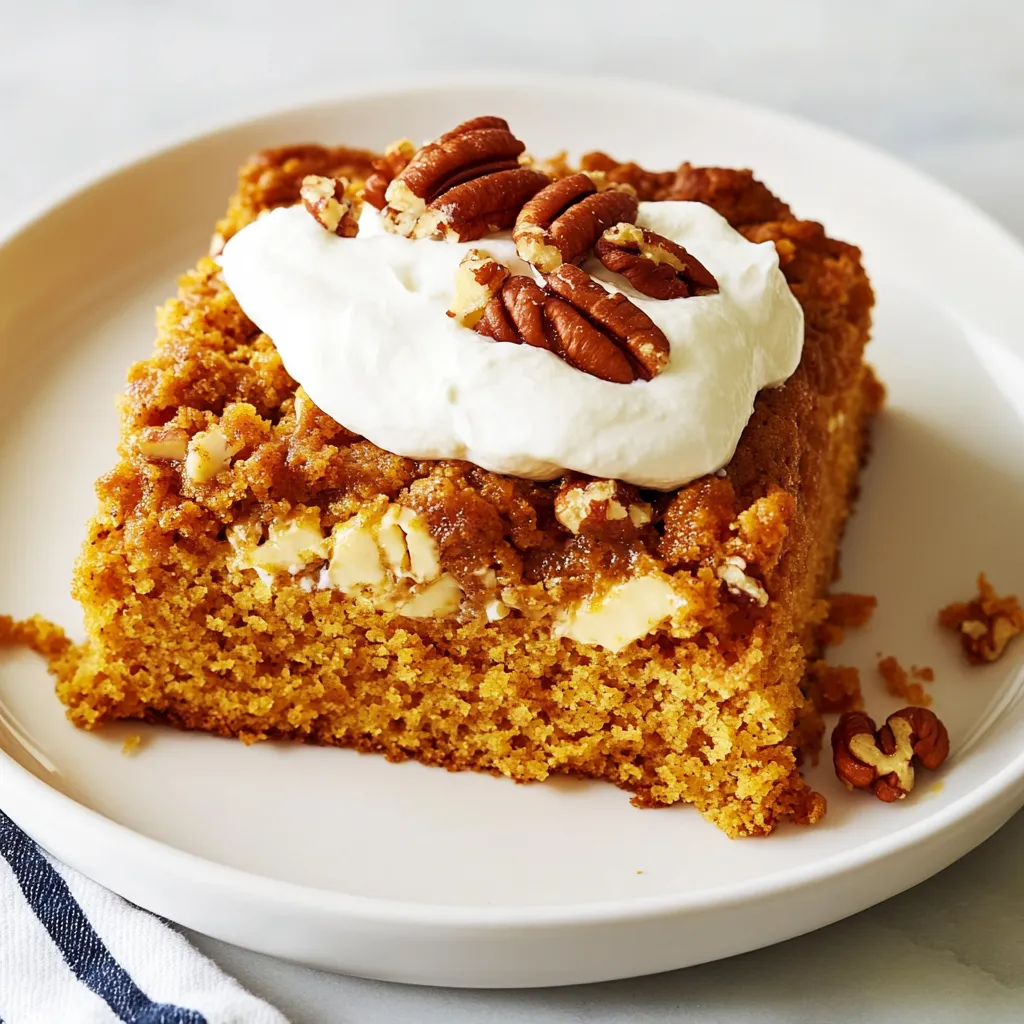
This rustic dessert is meant to be scooped rather than cut into neat squares, which is part of its casual, homestyle charm. Serve warm or at room temperature with freshly whipped cream, vanilla ice cream, or a drizzle of caramel sauce for extra indulgence.
For entertaining, consider serving directly from the baking dish for that authentic potluck feel, or transfer portions to individual plates and garnish with a sprinkle of cinnamon or a few extra toasted pecans for a more elegant presentation.
Why This Recipe Works So Well
The genius of this recipe lies in how it uses convenient shortcuts to create something that tastes completely homemade and sophisticated. The cake mix provides structure and sweetness for the topping while eliminating the need to measure multiple dry ingredients, while canned pumpkin delivers consistent flavor and texture every single time.
The combination of simplicity and impressive results makes this the perfect recipe for both novice bakers who want to create something special and experienced cooks who need a reliable crowd-pleaser that doesn't require hours of preparation.
I love how this recipe has become such a reliable go-to for any fall gathering, creating those moments of satisfaction when something so simple produces such incredible results. Every time I make this pumpkin crunch cake, I'm reminded that some of the best recipes are the ones that combine convenience with genuine deliciousness, proving that shortcuts don't have to mean compromising on taste or the joy of creating something special for the people we care about.
This pumpkin crunch cake recipe embodies everything I believe about comfort food baking - that with quality ingredients and proper technique, even the simplest preparations can create something that brings genuine joy and satisfaction to everyone who tries it. Every time I serve this cake, whether to family or at a large gathering, I'm reminded that the best recipes often come from understanding how to balance convenience with flavor, creating dishes that become treasured traditions because they consistently deliver both ease and excellence.
Frequently Asked Questions
- → Can I use pumpkin pie filling instead of pumpkin puree?
- No, stick with plain pumpkin puree. Pumpkin pie filling already has sugar and spices added which will make your cake too sweet.
- → How do I know when the cake is done baking?
- Bake for 55-60 minutes until the center is set and doesn't jiggle when you gently shake the pan. The top should be golden brown.
- → Can I make this cake ahead of time?
- Yes! This cake actually tastes better the next day. Make it 1-2 days ahead and store it covered in the fridge.
- → What if I don't have pecans?
- You can use walnuts, chopped almonds, or even skip the nuts entirely. The cake will still taste great.
- → How long does this cake keep?
- Store covered in the refrigerator for 3-4 days, or freeze for up to 2 months after it's completely cooled.
- → Do I need to cover all the cake mix with butter?
- Don't worry if the butter doesn't cover every spot. It will melt and spread while baking to create that delicious crunch topping.