
 Pin it
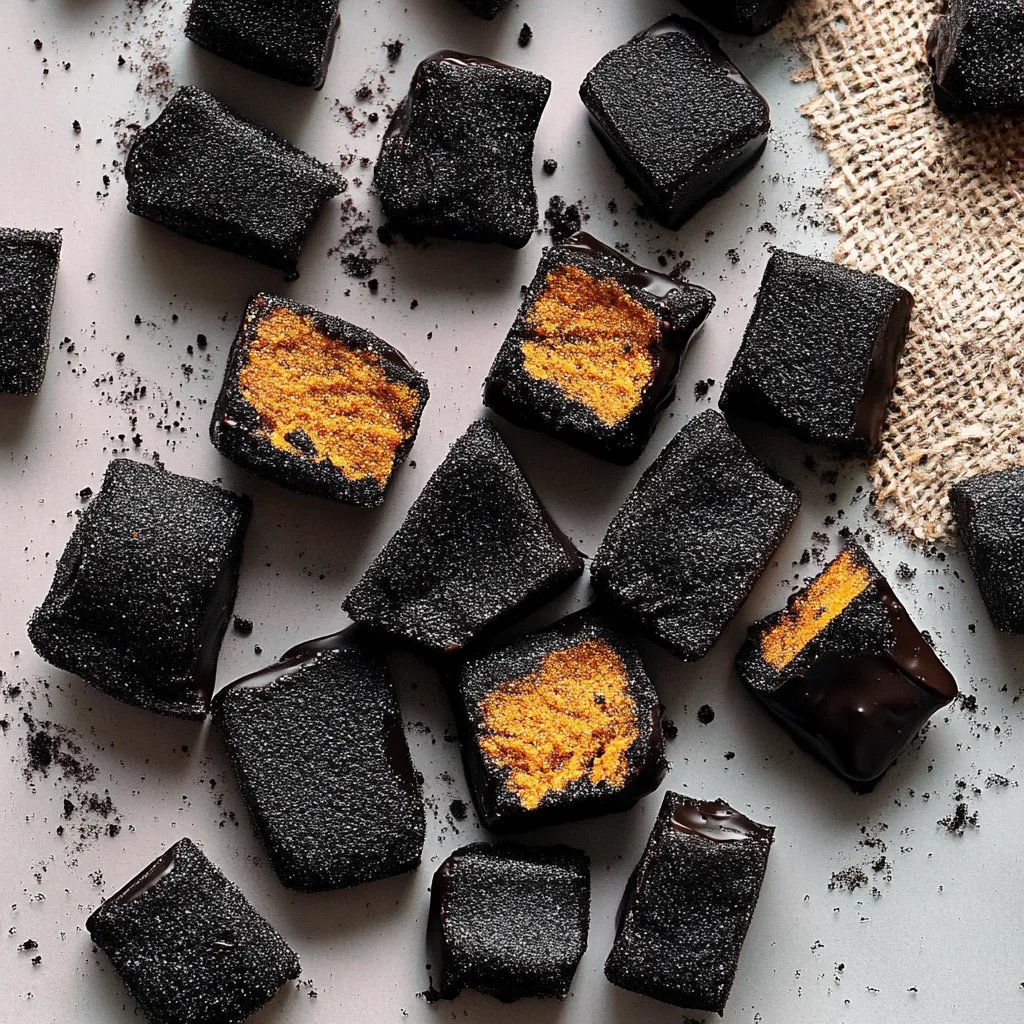
This edible coal candy transforms classic honeycomb candy (also called sponge toffee or cinder toffee) into a surprisingly delicious holiday novelty - brittle, airy, golden-amber honeycomb made from just sugar, corn syrup, water, and baking soda that erupts into a foam filled with hundreds of tiny air pockets when the baking soda hits the superheated sugar syrup (reaching 300-310°F), creating that distinctive crunchy-yet-light texture that shatters satisfyingly when you bite it, then gets broken into jagged, coal-sized chunks, dipped in melted dark chocolate for richness and visual authenticity, and rolled in homemade black sugar (superfine sugar mixed with black food coloring) that clings to the still-wet chocolate creating a convincingly dusty, sooty appearance that makes these look genuinely like lumps of coal fresh from a stocking. What makes this recipe so delightfully clever is the contrast between expectation and reality - the coal appearance suggests punishment for being naughty, but biting into one reveals intensely sweet, caramelized, buttery-tasting honeycomb that's actually a treat, while the dark chocolate coating adds sophisticated bitterness that balances the candy's extreme sweetness, and the homemade black sugar creates such authentic coal-dust appearance that people genuinely do double-takes wondering if you're actually giving them rocks. The chemistry behind honeycomb is fascinating and requires precision - heating sugar syrup to exactly the right temperature (hard crack stage at 300-310°F), then whisking in baking soda which instantly releases carbon dioxide bubbles that get trapped in the viscous sugar creating the aerated structure, then immediately pouring before it sets creates candy that's technically demanding but achievable with a candy thermometer and careful attention.
The first time making this reveals how dramatic the baking soda reaction is - watching that golden sugar syrup suddenly foam up and triple in volume within seconds demonstrates impressive kitchen chemistry. That moment when you break the cooled honeycomb into pieces and see all those air pockets creating the characteristic honeycomb structure inside creates satisfaction. Tasting that first piece where you get the initial chocolate snap followed by the shattering honeycomb that dissolves on your tongue in waves of intense caramelized sweetness demonstrates why this candy has been beloved for generations despite the simple ingredient list.
Ingredients - What You Need and Why
For the Honeycomb Candy:
- Granulated white sugar: about one cup provides the primary structure and sweetness; regular white sugar is essential - do not substitute brown sugar, coconut sugar, or other alternatives which will prevent proper crystallization and texture; the sugar must reach precise temperature to create the glassy, brittle structure that shatters properly
- Light corn syrup: one-quarter cup prevents sugar crystallization (forming grainy texture) while adding body and helping the mixture reach proper temperature without burning; corn syrup's glucose molecules interfere with sucrose molecules preventing them from bonding into crystals; golden syrup (for non-US cooks) substitutes perfectly; honey or molasses don't work as well and create inconsistent results
- Water: about one-quarter cup dissolves the sugar initially and prevents it from burning before it reaches proper temperature; the water evaporates as temperature rises, concentrating the sugar solution
- Baking soda: one and a half teaspoons is the crucial ingredient that creates honeycomb's characteristic texture; when added to the superheated sugar syrup, baking soda (sodium bicarbonate) immediately decomposes releasing carbon dioxide gas that gets trapped in the viscous syrup creating hundreds of tiny bubbles; this must be added quickly and mixed briefly before the mixture sets
For the Coal Coating:
- Dark chocolate: about eight to twelve ounces (one and a half to two cups chopped or chips) for coating provides the outer layer that looks like coal's black surface; dark chocolate's bitter notes balance the honeycomb's intense sweetness better than milk chocolate, though semisweet or milk chocolate work if preferred; chocolate also protects honeycomb from humidity
- Superfine (caster) sugar: about one cup creates the "coal dust" coating; superfine sugar's tiny crystals create more authentic dusty appearance than regular granulated sugar; you can make superfine sugar by pulsing regular sugar in a food processor for thirty seconds
- Black gel food coloring: a few drops (start with three to four, add more as needed) mixed into the sugar creates convincingly black color; gel or paste food coloring works better than liquid which makes sugar clumpy; the sugar should look dark gray to black like coal dust
How to Make Edible Coal Candy - Step by Step
- Prepare equipment and workspace before starting:
- This is crucial because once you start cooking the sugar, events move quickly and you won't have time to scramble for equipment. Line an eight-by-ten-inch or nine-by-nine-inch heat-safe baking dish (glass Pyrex, metal, or ceramic - never plastic which will melt) with parchment paper, letting excess hang over the edges for easy removal later. If using a nine-by-thirteen-inch pan, the honeycomb will be thinner (more like bark than chunks), which still works but doesn't look as coal-like. Set this lined pan near your stove where you can quickly reach it. Measure out one and a half teaspoons of baking soda into a small bowl and have a whisk ready beside the stove. Clip your candy thermometer to the side of a large, heavy-bottomed pot (at least three-quart capacity - this is important as the mixture will foam dramatically and a small pot creates dangerous overflow). Have long-handled utensils and oven mitts ready. Clear your workspace of anything that could get in the way. This prep seems excessive but is essential for safety and success since you'll be working with sugar heated to over 300°F.
- Cook the sugar syrup to hard crack stage:
- In your large pot over medium-low heat, combine one cup of granulated sugar, one-quarter cup of light corn syrup, and one-quarter cup of water. Stir constantly with a heat-safe silicone spatula or wooden spoon until all the sugar dissolves completely - you shouldn't see or feel any sugar crystals when you stir. This takes about three to five minutes. Once completely dissolved (the mixture will look clear rather than cloudy), increase heat to medium and clip your candy thermometer to the pot's side, ensuring the bulb or probe is submerged in the syrup but not touching the pot bottom (which would give false reading). Here's critical: STOP STIRRING once the sugar dissolves and do not stir again until you add the baking soda. Stirring after this point can cause crystallization ruining the texture. Just let it cook undisturbed, watching the thermometer. The mixture will boil vigorously - this is normal. The syrup will gradually change from clear to pale yellow to light amber as temperature rises and caramelization begins. Watch carefully as it approaches 300°F. You're aiming for 300-310°F (hard crack stage) - most recipes suggest 305°F as the sweet spot. At this temperature, the syrup will be deep golden amber, smell intensely caramelized, and move sluggishly when you tilt the pot slightly. This process takes about eight to twelve minutes total depending on your stove's heat.
- Add baking soda and create the honeycomb:
- The moment your thermometer reads 305°F (or your target temperature within the 300-310°F range), immediately remove the pot from heat - don't wait even seconds or it will overshoot temperature and potentially burn. Working quickly, add your measured one and a half teaspoons of baking soda to the hot syrup. Immediately whisk vigorously for no more than ten seconds - just until the baking soda is incorporated. The mixture will foam up dramatically, roughly tripling in volume, and turn a lighter, more opaque golden color as thousands of carbon dioxide bubbles form. Don't over-whisk or you'll deflate the bubbles creating dense rather than airy honeycomb. The mixture should look like pale golden foam. Within seconds it will start to set (sugar solidifies quickly as it cools below 300°F), so you must move fast. Immediately and carefully pour the foaming mixture into your prepared, parchment-lined pan. Don't scrape the pot - just let it flow out naturally. Don't spread or manipulate it - just let gravity level it. The mixture is dangerously hot (over 300°F), so use extreme caution, preferably wearing oven mitts and working carefully. The honeycomb will continue bubbling and expanding slightly for about thirty seconds after pouring, then will begin setting.
- Cool, break into coal-sized pieces:
- Let the honeycomb cool completely at room temperature - this takes one to two hours minimum. Don't refrigerate or the temperature shock can cause cracking or sticky texture. The honeycomb should be completely cool and dry to the touch before you proceed. Once cool, use the parchment paper overhang to lift the entire honeycomb slab out of the pan. Place it on a cutting board. Using a large, heavy knife (or your hands if you prefer more rustic, irregular shapes), break or cut the honeycomb into coal-sized chunks - roughly one to two-inch pieces with irregular, jagged edges that mimic coal's natural shape. Don't worry about uniformity; irregular shapes look more authentic. You'll inevitably create some smaller shards and crumbs - save these for sprinkling on ice cream, mixing into cookies, or topping cakes. The honeycomb should snap cleanly with a satisfying crunch. If it bends rather than snapping, it either didn't reach proper temperature or wasn't fully cooled.
- Make black sugar and coat the honeycomb:
- Place about one cup of superfine (caster) sugar in a large resealable plastic bag. Add three to four drops of black gel food coloring. Seal the bag, removing excess air. Massage and rub the bag vigorously, working the food coloring into the sugar until it's evenly distributed throughout with no white streaks remaining. The sugar should be uniformly dark gray to black. If it's not dark enough, add one or two more drops of food coloring and massage again. Transfer the black sugar to a shallow bowl and set aside. Melt your chocolate (eight to twelve ounces of chopped dark chocolate or chocolate chips) in a microwave-safe bowl in thirty-second intervals at fifty percent power, stirring thoroughly between each interval, until completely smooth and melted. Don't rush with full power or the chocolate will scorch. Working with one piece at a time, dip each honeycomb chunk into the melted chocolate, turning with a fork to coat all sides. Lift it out, letting excess chocolate drip back into the bowl. Place on a parchment-lined baking sheet. Repeat with remaining pieces, working relatively quickly. Before the chocolate fully sets (within about two minutes), roll each chocolate-coated piece in the black sugar, pressing gently so it adheres to all surfaces. The sugar should stick to the still-tacky chocolate. If the chocolate sets too quickly, put on food-safe gloves and gently rub the chocolate with your warm fingers - the friction and body heat will warm it just enough to make it slightly tacky again so sugar sticks. Once all pieces are coated in black sugar, let them sit at room temperature for thirty minutes to one hour until the chocolate fully sets and hardens.
 Pin it
Understanding that honeycomb candy goes by many names (sponge toffee, cinder toffee, hokey pokey, seafoam candy) depending on region helps you recognize this as a traditional confection with variations worldwide, not a modern novelty.
Understanding Honeycomb Candy Science and Chemistry
The dramatic transformation from liquid sugar syrup to airy, solid honeycomb involves fascinating chemistry and physics. When sugar syrup heats, water evaporates and sugar concentration increases. At 300-310°F (hard crack stage), the syrup contains minimal water and is essentially liquid sugar - viscous, thick, and at the edge of caramelization. When you add baking soda (sodium bicarbonate - NaHCO₃) to this superheated syrup, rapid chemical reaction occurs: the heat causes baking soda to decompose into sodium carbonate (Na₂CO₃), water (H₂O), and carbon dioxide gas (CO₂). The CO₂ bubbles form immediately and get trapped in the extremely viscous sugar syrup which is thick enough to hold the bubbles rather than letting them escape. As the mixture cools, the sugar solidifies around these trapped bubbles, preserving them as the characteristic honeycomb structure. The result is solid sugar riddled with thousands of tiny air pockets creating low-density candy that's mostly air by volume. This is why honeycomb is incredibly light for its size and why it shatters so satisfyingly - you're breaking through walls of thin, brittle sugar. The temperature precision matters because sugar must be hot enough to trigger rapid baking soda decomposition but viscous enough to trap bubbles; too cool and insufficient bubbles form, too hot and the sugar burns or bubbles escape before setting.
Troubleshooting Common Honeycomb Problems
Even with careful technique, honeycomb candy can be temperamental, but understanding what went wrong helps you succeed on subsequent attempts. If honeycomb is chewy and sticky rather than crisp and shattering, you didn't heat the sugar syrup to proper temperature (must reach at least 300°F), the weather is very humid causing moisture absorption, or you stirred after the sugar dissolved causing crystallization - always use a reliable candy thermometer and make on low-humidity days. When honeycomb is dense and hard rather than light and airy, you either over-mixed after adding baking soda (deflating the bubbles), didn't add enough baking soda, or the baking soda was old and had lost its leavening power - whisk for no more than ten seconds, use fresh baking soda, and measure accurately. If honeycomb has large irregular holes rather than tiny uniform bubbles, you under-mixed after adding baking soda or poured too slowly allowing bubbles to escape - whisk vigorously for the full ten seconds and pour immediately. Honeycomb that tastes burnt and bitter overshot the target temperature (went above 310°F) or cooked too long - watch your thermometer carefully and remove from heat the instant it hits 305°F. When the mixture crystallizes during cooking becoming grainy and opaque, you stirred after the sugar dissolved, got undissolved sugar crystals on the pot sides, or used dirty utensils - never stir once boiling, brush down pot sides with wet pastry brush if crystals form, and use completely clean equipment. If black sugar won't stick to chocolate, the chocolate set too quickly or you didn't use enough chocolate creating too-thin coating - work faster, reheat chocolate slightly, or warm the chocolate with gloved hands. Honeycomb that becomes sticky after a few hours wasn't stored in airtight container or was made on humid day - always store airtight and consider chocolate coating essential for humid climates.
Creating Flavor Variations and Creative Presentations
While classic honeycomb with chocolate coating is delicious, exploring variations allows customization for different tastes and occasions. For peppermint coal, add one-quarter teaspoon of peppermint extract to the sugar syrup just before removing from heat for minty twist perfect for Christmas. Coffee-flavored version adds one tablespoon of instant espresso powder to the melted chocolate for mocha notes adults appreciate. Orange honeycomb stirs one-quarter teaspoon of orange extract or orange oil into the chocolate coating for citrus brightness. Sea salt variation sprinkles flaky sea salt over chocolate-coated pieces before adding black sugar for sweet-salty contrast. White chocolate "snow-covered coal" uses white chocolate coating with white sanding sugar for humorous inversion. Cinnamon honeycomb adds one-half teaspoon of ground cinnamon to the chocolate for warming spice. Nutty version rolls chocolate-coated honeycomb in crushed toasted hazelnuts or almonds along with (or instead of) black sugar. For presentation variations, package in small burlap bags tied with twine and labeled "Naughty List," arrange in decorative tins with tissue paper, place in Christmas stockings as surprise treats, display in apothecary jars labeled "Coal Supply," or stack in clear bags tied with red ribbon showing off the coal appearance. Create gift tags reading "You've been naughty!", "Merry Coal-istmas!", "From Santa's Coal Mine," or "Sweet Punishment." For parties, display on a platter labeled "Fresh from the North Pole Coal Mine" or serve in individual small bags as party favors.
Complete Gift Packaging and Presentation Ideas
Understanding creative presentation transforms simple candy into memorable, Instagram-worthy gifts. For individual gift bags, place three to five pieces of coal candy in small burlap bags (available at craft stores), tie with natural twine or red-and-white baker's twine, and attach handwritten tags with permanent marker or printed labels. Create custom tags with sayings like "Coal for Christmas," "You made the naughty list," "Sweet punishment," or "Mined especially for you." For larger gifts, fill mason jars with coal candy layered with crinkled black tissue paper, seal with fabric circles attached with twine, and add chalkboard labels. Vintage-style apothecary jars labeled "Edible Coal - Est. 1823" create elegant presentation for gift-giving or party displays. Stack pieces in clear cellophane bags tied at the top with curled ribbon for simple but attractive packaging. For stocking stuffers, wrap individual pieces in black tissue paper tied with red string creating mystery until opened. Create "coal mining kits" pairing the candy with chocolate gold coins and plastic pickaxes for kids. Display at holiday parties in metal buckets labeled "Fresh Coal" with small scoops for guests to serve themselves. For corporate gifts or teachers, arrange in small wooden crates filled with wood shavings and attach business card or thank-you note. The contrast between the coal appearance and sweet reality makes these conversation starters that recipients remember and photograph.
Storage Guidelines and Shelf Life Considerations
Understanding proper storage ensures these maintain quality and crispness throughout the holiday season. Store chocolate-coated honeycomb in airtight containers at room temperature (65-70°F) for up to one month - the chocolate coating protects the honeycomb from humidity. Layer pieces with parchment or wax paper between layers to prevent sticking. Do NOT refrigerate as this causes condensation when brought to room temperature, making chocolate bloom (develop white streaks) and honeycomb become sticky. If storing in very warm environments (above 75°F), keep in the coolest room and ensure airtight seal to prevent chocolate softening. For uncoated honeycomb (if making ahead before coating), store in airtight container at room temperature for maximum one week - it will gradually absorb moisture from air becoming sticky and soft if exposed. Humidity is honeycomb's nemesis, so if you live in humid climates, the chocolate coating becomes essential protection and pieces should be coated within a day of making. For gifting, package pieces just before giving rather than storing in gift bags for weeks - the burlap bags aren't airtight and will allow moisture in. For maximum freshness, make honeycomb within three days of coating and gift within two weeks of coating. Leftover chocolate can be stored separately and reused. The candy is safe to eat well beyond one month but texture quality degrades - it becomes less crisp and more chewy over time.
Safety Considerations and Working with Hot Sugar
Understanding the serious safety concerns of candy-making prevents dangerous burns and accidents. Sugar heated to 300°F+ is significantly hotter than boiling water (212°F) and causes severe burns instantly on contact with skin - it sticks and continues burning unlike water which runs off. Always use extreme caution: wear long sleeves if possible, use oven mitts when handling hot pots, use long-handled utensils keeping hands far from mixture, never touch or taste hot sugar syrup, work on a stable surface away from counter edges where pots could be knocked over, keep children and pets completely out of the kitchen during candy making, have a bowl of ice water nearby for emergencies (if sugar gets on skin, immediately plunge into ice water and seek medical attention), never put your face over the pot when adding baking soda as the violent reaction can splash, and be prepared for the dramatic foaming when baking soda is added. Use heat-safe containers (never plastic which melts) and work on heat-safe surfaces. If sugar spills on the counter, don't touch it - let it cool completely before cleaning. Don't pour hot honeycomb down the sink as it can damage pipes - let pots cool completely, then soak in very hot water to dissolve stuck sugar. Keep a damp towel nearby for cleaning up small spills. Consider this advanced candy-making that shouldn't be attempted by or around young children. The risks are manageable with proper precautions but shouldn't be underestimated.
Teaching Fundamental Candy-Making Skills
This recipe provides excellent opportunity to learn techniques that transfer to other confections and advanced baking. Understanding candy stages (thread, soft ball, hard ball, soft crack, hard crack) and their corresponding temperatures teaches you how sugar behaves at different temperatures - essential for making caramels, fudge, marshmallows, nougat, toffee, and countless other candies. Learning to use a candy thermometer properly - calibrating it, positioning correctly, reading accurately - builds precision crucial to all candy work. The skill of working quickly with hot sugar (mise en place with everything ready before you start) applies to caramel making, sugar sculptures, and other time-sensitive preparations. Understanding how crystallization works and how to prevent it (don't stir once boiling, use corn syrup as interfering agent) teaches sugar chemistry applicable broadly. The technique of incorporating leavening into hot sugar (baking soda in this case) appears in divinity, marshmallows, and meringues. Learning to temper chocolate for coating (though this recipe uses simple melting rather than tempering) introduces concepts needed for more advanced chocolate work. For beginners interested in candy-making but intimidated by complexity, this recipe is challenging enough to teach real skills but not so difficult that failure is inevitable - with a thermometer and careful attention, success is quite achievable. The dramatic results build confidence for attempting other candy recipes.
The Economics of Homemade Versus Store-Bought Novelty Candy
Understanding cost comparisons reveals significant savings while creating more personalized, impressive gifts. Homemade edible coal costs: sugar (twenty-five cents), corn syrup (fifty cents), baking soda (five cents), chocolate (three to five dollars), food coloring and sugar for black coating (one dollar), packaging (burlap bags and tags, about one dollar per gift) - total approximately six to eight dollars for twenty-five to thirty pieces, or about twenty-five to thirty cents per piece. Compare this to: novelty coal candy at specialty stores (eight to fifteen dollars for four to six ounces), online edible coal (ten to twenty dollars per bag), or other specialty holiday candies (twelve to twenty dollars per pound). Making just one batch recoups your minimal equipment investment (candy thermometer). For gift-giving to multiple people (teachers, coworkers, neighbors, friends), buying store-bought coal candy for ten people costs one hundred to two hundred dollars versus making it yourself for fifteen to twenty dollars including packaging - saving eighty to one hundred eighty dollars. Beyond monetary savings, homemade offers customization (adjust chocolate type, add flavors), quality control (use better chocolate), and the intangible value of handmade gifts that recipients appreciate more than store-bought. The time investment (about one hour active time, two hours total including cooling) is minimal considering you're making enough for multiple gifts. For people who regularly give holiday gifts, learning to make novelty treats like this creates economical, impressive options.
Understanding Honeycomb's Cultural Context and History
Honeycomb candy has appeared across many cultures under different names, reflecting human fascination with this dramatic sugar transformation. In the United Kingdom and Commonwealth countries, it's called "cinder toffee" or "sponge toffee," traditionally made at home and also sold commercially (Crunchie bars contain honeycomb centers). In New Zealand, it's "hokey pokey" and appears in hokey pokey ice cream. Korean cuisine includes dalgona (though typically without baking soda, creating different texture) popularized by the show Squid Game. American variations include "seafoam candy" often made at Christmas. The technique likely emerged in the 1800s when baking soda became widely available as a leavening agent and creative cooks discovered its dramatic reaction with hot sugar. The science experiment nature of honeycomb - watching inert sugar syrup suddenly foam and expand - makes it particularly engaging for children to observe (though not participate in given safety concerns). The edible coal application is relatively modern, emerging as holiday novelty probably in the late 1900s playing on the Christmas tradition of "coal in stockings for naughty children." Understanding this context helps you appreciate that while the coal presentation is contemporary novelty, the underlying candy technique has long history across multiple cultures, each adding their own variations and names.
 Pin it
This edible coal candy represents the perfect intersection of science experiment spectacle and delicious confection, proving that some of the most memorable treats aren't necessarily the most complicated but rather those that combine visual drama, surprising flavor, and clever presentation that subverts expectations while teaching impressive candy-making skills. What makes this recipe genuinely valuable is how it introduces real candy-making technique - precise temperature control, working with hot sugar, understanding chemical leavening - through a preparation that feels playful and accessible rather than intimidating, making serious confectionery skills approachable for home cooks while producing results impressive enough for gifts or party centerpieces. The transformation of basic pantry ingredients into something that looks genuinely like coal yet tastes like caramelized luxury demonstrates that impressive cooking comes from understanding chemistry and technique rather than requiring exotic ingredients or professional equipment beyond a simple candy thermometer. Whether you're someone seeking unique holiday gifts that recipients will remember and photograph, a parent wanting to share kitchen science with kids who can safely observe the dramatic reaction, a baker expanding into candy-making who needs an impressive but achievable first project, someone who appreciates novelty foods that play with visual expectations, or simply anyone who loves the satisfying crunch and intense sweetness of honeycomb candy regardless of how it's packaged, this delivers completely. The make-ahead friendly nature and month-long shelf life mean you can produce these well before the holiday rush, spreading your baking across relaxed weekends rather than cramming everything into December's final chaotic week, while the economical ingredients mean you can make dozens of gifts without significant investment. Once you've experienced the addictive satisfaction of breaking into that brittle honeycomb and hearing it shatter, tasted how the dark chocolate balances the candy's aggressive sweetness creating more sophisticated confection than either element alone, watched how people's faces light up when they realize the "coal" is actually delicious candy playing an elaborate joke, understood how mastering this one technique opens doors to countless other candy applications from toffee to brittle to caramels, and appreciated how something made from four ingredients can create such theater and delight, you'll find yourself making batch after batch every holiday season, experimenting with different chocolate coatings and flavor additions, confidently giving these as gifts knowing the combination of humor, quality, and homemade effort makes them genuinely special, and recognizing that sometimes the best recipes are those that make people smile before they even taste anything, then surprise them again by tasting far better than expected, proving that cooking at its best engages multiple senses and emotions creating experiences that transcend mere eating to become cherished memories associated with specific times, places, and the people who cared enough to make something both delicious and delightfully absurd.
Frequently Asked Questions
- → Can I use regular sugar instead of caster sugar?
- Yes, but caster sugar works best because it's finer and sticks better to the chocolate. Regular granulated sugar will work in a pinch though.
- → Why did my honeycomb turn out flat and hard?
- You probably didn't get it hot enough. Make sure your candy thermometer reads at least 300°F before adding the baking soda or it won't puff up properly.
- → How long does this coal candy last?
- It stays good for about a month when stored in an airtight container at room temperature. Just keep it out of the fridge or it'll get sticky.
- → Can I skip the chocolate coating?
- Sure! The honeycomb is delicious on its own. You can just toss it in black sugar without chocolate if you want a lighter version.
- → What can I do with the small honeycomb pieces?
- Don't throw them away! Sprinkle the bits on ice cream, fold them into cookie dough, or use them as a crunchy topping for cakes and cupcakes.
- → Do I really need a candy thermometer?
- Yes, it's pretty important for this recipe. Without one, it's hard to know when you've hit the right temperature and your honeycomb might not turn out right.
- → Can I use milk chocolate instead of dark?
- Absolutely! Milk chocolate works great too. Use whatever chocolate you like best - white chocolate would even be fun for a different look.