
 Pin it
Fantasy fudge is one of those vintage recipes that became famous through appearing on the back of Kraft Marshmallow Creme jars - a foolproof combination of butter, sugar, evaporated milk, chocolate chips, and marshmallow creme cooked to exactly 234°F then beaten until smooth and poured into a pan to set. The technique is straightforward once you understand that the precise temperature is what creates proper fudge consistency - too low and it stays soft and never firms up, too high and it becomes dry and crumbly instead of creamy. What makes this particularly appealing is how it eliminates the traditional fudge challenges of sugar crystallization and grainy texture through the marshmallow creme, which acts as a stabilizer that keeps everything smooth, and how you can make it either in the microwave or on the stovetop with equally reliable results.
I started making fantasy fudge about twenty years ago using my grandmother's recipe card that was stained and barely readable. The first batch I made didn't reach proper temperature because I stopped heating at 220°F thinking it was close enough, and the fudge never set - it remained a thick, sticky sauce even after hours in the refrigerator. After learning that 234°F is the precise soft-ball stage temperature required for fudge to set properly, and that a candy thermometer is essential rather than optional, it became foolproof. Now I make multiple batches every Christmas because it's one of those recipes that consistently turns out perfectly and makes excellent gifts.
Ingredients and What Makes Them Essential
- Salted Butter (¾ cup, 1½ sticks): Butter provides richness and the salt balances sweetness. Use salted butter specifically - the salt enhances all the flavors. Don't substitute margarine which doesn't have the same fat content and will create different texture.
- Granulated White Sugar (3 cups): Sugar is the bulk of the fudge and creates the structure. Don't substitute brown sugar or powdered sugar which have different properties.
- Evaporated Milk (one 12-ounce can, about 1⅔ cups): Evaporated milk is essential. It's milk with 60% of the water removed, creating concentrated dairy flavor and proper consistency. Don't substitute regular milk, sweetened condensed milk, or heavy cream - none will work. Use whole or 2% evaporated milk.
- Semi-Sweet Chocolate Chips (2 cups, about 12 ounces): Semi-sweet chocolate provides classic fudge flavor. You can substitute milk chocolate for sweeter fudge or dark chocolate for more intense flavor, but semi-sweet is traditional.
- Marshmallow Creme (one 7-ounce jar): Marshmallow creme (Kraft Jet-Puffed Marshmallow Creme or Marshmallow Fluff) is the secret ingredient that stabilizes the sugar and prevents crystallization. Don't substitute actual marshmallows which have different properties and won't create the same texture.
- Pure Vanilla Extract (1 teaspoon): Vanilla enhances chocolate flavor. Use pure extract, not imitation, for best taste.
Equipment You'll Need:
- Candy Thermometer: Essential for precise temperature monitoring. Don't use a meat thermometer which isn't accurate in this range.
Step-by-Step Instructions (Microwave Method)
- Prepare Your Pan:
- Line a 9x9-inch square baking pan with aluminum foil or parchment paper, leaving overhang on two sides for easy removal. Spray the lining with nonstick cooking spray. Set aside. If you want thicker fudge, use an 8x8-inch pan.
- Melt Butter:
- Place ¾ cup of butter in a large microwave-safe glass bowl (at least 3-quart capacity - the mixture will bubble up significantly). Microwave on high for about 1 minute until completely melted.
- Add Sugar and Milk:
- Add 3 cups of sugar and the entire 12-ounce can of evaporated milk to the melted butter. Whisk together until well combined. The mixture will look grainy at this point.
- First Microwave Interval:
- Microwave on high power for 3 minutes. Remove and stir thoroughly with a wooden spoon or heat-proof spatula. The mixture will be hot and bubbling.
- Second Interval:
- Microwave on high for 2 more minutes. Remove and stir again thoroughly.
- Third Interval:
- Microwave on high for 3 more minutes. Remove and carefully insert your candy thermometer. Check the temperature - you're aiming for exactly 234°F (soft-ball stage). If it hasn't reached this temperature, microwave in 1-minute intervals, checking the temperature after each minute, until it reaches 234°F. The total microwave time is typically 8-10 minutes depending on your microwave's power, but temperature is more important than time.
- Add Chocolate:
- Once the mixture reaches 234°F, immediately add 2 cups of chocolate chips. Stir vigorously with a wooden spoon until the chocolate is completely melted and the mixture is smooth and uniform in color. This takes about 2-3 minutes of stirring.
- Add Marshmallow Creme and Vanilla:
- Add the entire 7-ounce jar of marshmallow creme and 1 teaspoon of vanilla extract. Stir vigorously until the marshmallow creme is completely incorporated and you see no white streaks. The mixture should be smooth, glossy, and uniform. This vigorous stirring takes about 3-4 minutes. Don't rush this step - incomplete mixing creates streaky fudge.
- Pour and Cool:
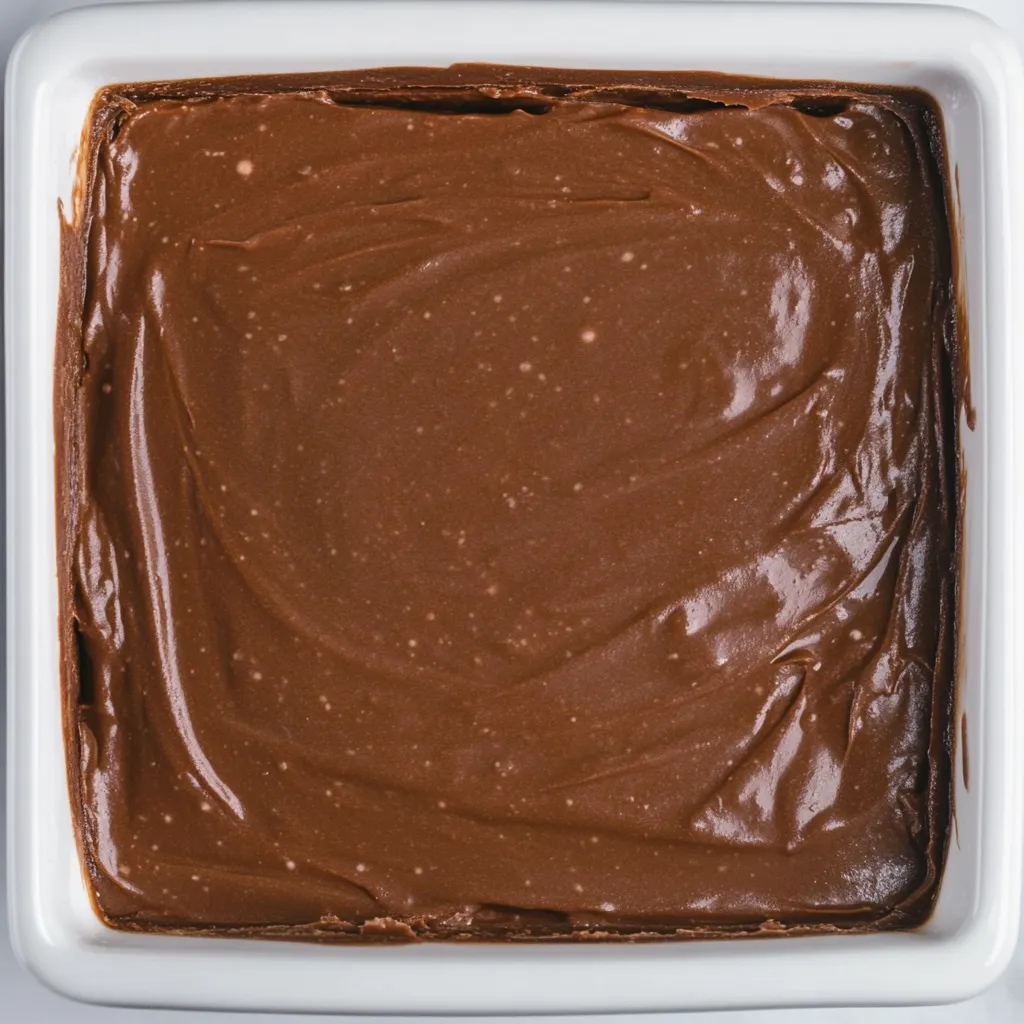
- Immediately pour the hot fudge mixture into the prepared pan. Use a rubber spatula to scrape all of it out of the bowl and smooth the top into an even layer. Let the fudge cool at room temperature for about 1 hour, then refrigerate for at least 2 hours until completely firm and set.
- Cut and Serve:
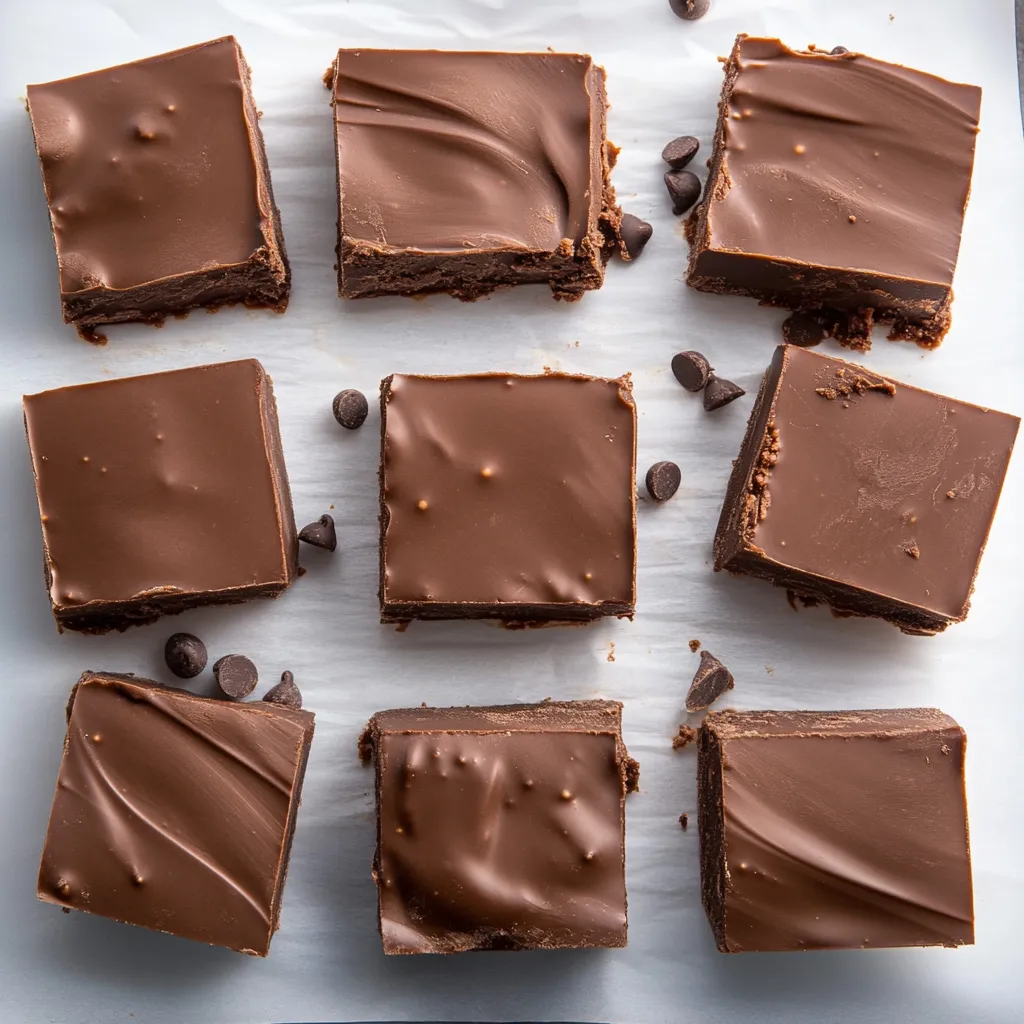
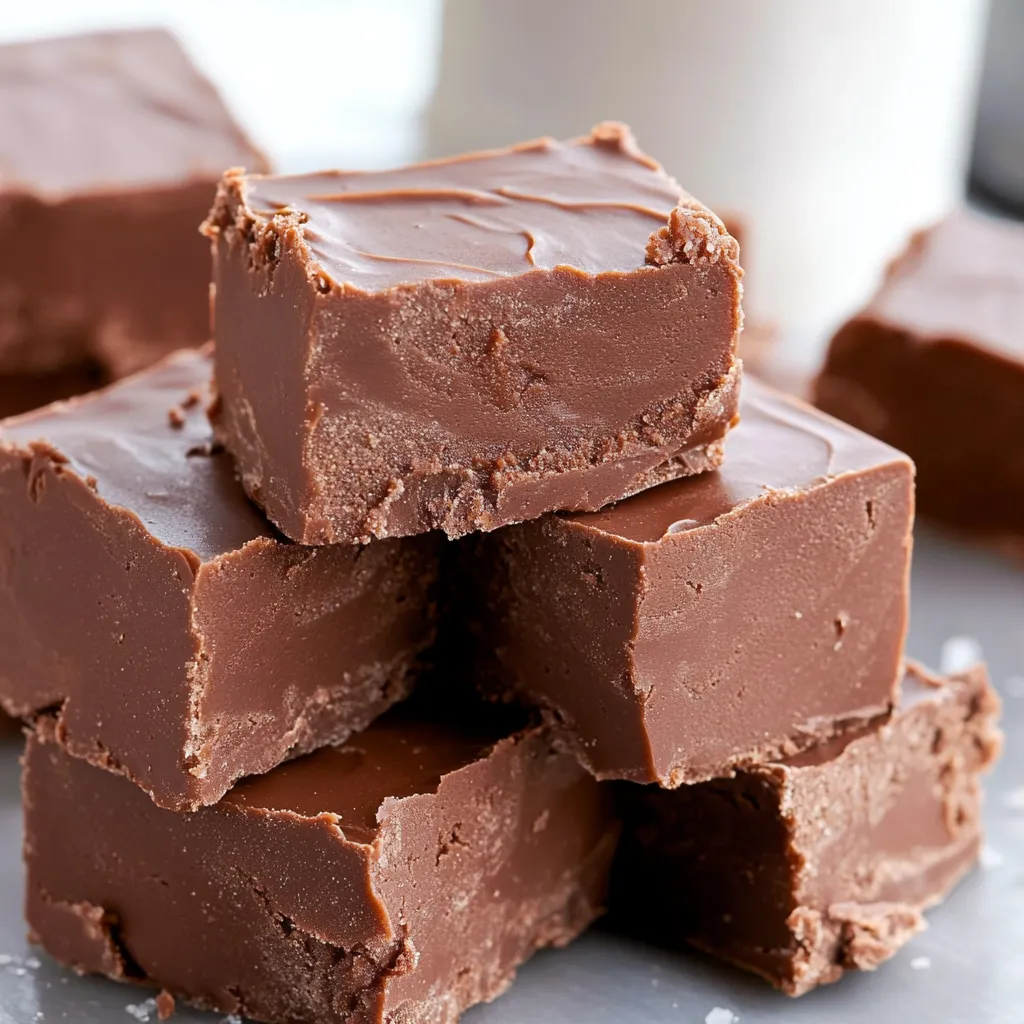
- Use the foil overhang to lift the fudge block out of the pan. Peel away the foil. Use a sharp knife to cut into squares - wipe the knife clean between cuts for neat edges. You can cut into 16 large pieces (about 2x2 inches each) or 36 smaller pieces (about 1x1 inch each). Store in an airtight container.
Alternative Stovetop Method:
Combine ¾ cup butter, 3 cups sugar, and one 12-ounce can evaporated milk in a heavy-bottomed 3-quart saucepan. Place over medium heat and stir constantly until the butter melts and sugar dissolves. Bring to a full rolling boil, stirring constantly. Continue cooking and stirring constantly until the mixture reaches 234°F on a candy thermometer - this takes about 4-5 minutes from when it starts boiling. Remove from heat immediately. Add chocolate chips and stir until melted, then add marshmallow creme and vanilla and stir until smooth. Pour into prepared pan and cool as directed above.
 Pin it
My neighbor who's an excellent baker was convinced fudge was impossibly difficult and that achieving smooth, creamy texture required mysterious skills she didn't possess. After I showed her this recipe and explained that reaching 234°F was the only real trick, and that the marshmallow creme prevents the graininess that ruins traditional fudge, she successfully made perfect fudge on her first try. Getting the intimidated baker to realize fudge isn't actually difficult feels like demystifying unnecessary complexity.
Understanding Candy Temperature Stages
Sugar dissolved in water goes through specific temperature stages as it cooks and water evaporates. Each stage creates different textures. Thread stage (230-235°F) creates syrup. Soft-ball stage (235-240°F) creates fudge and fondant. Firm-ball stage (245-250°F) creates caramels. Hard-ball stage (250-265°F) creates marshmallows. Soft-crack stage (270-290°F) creates taffy. Hard-crack stage (300-310°F) creates brittles. For fudge, you want 234°F, which is precisely soft-ball stage. At this temperature, the sugar concentration is high enough that the mixture will set when cooled but not so high that it becomes hard. Lower temperatures create fudge that stays soft and sticky. Higher temperatures create dry, crumbly fudge. This is why the candy thermometer is essential - visual cues aren't reliable.
The Role of Marshmallow Creme
Marshmallow creme is what makes this recipe foolproof compared to traditional fudge recipes. Traditional fudge requires beating hot sugar syrup while it cools to a specific temperature, and improper beating causes sugar crystallization that creates grainy texture. Marshmallow creme contains ingredients (corn syrup, egg whites) that interfere with sugar crystal formation, keeping the fudge smooth and creamy without requiring precise beating technique. The corn syrup is an invert sugar that prevents crystallization. The egg whites are proteins that coat sugar crystals and keep them small. This means you can simply stir the marshmallow creme in and get smooth fudge without the traditional fudge-beating process. This is why fantasy fudge is considered foolproof while old-fashioned fudge has a reputation for being tricky.
Why Evaporated Milk Is Essential
The recipe specifically requires evaporated milk, and no substitution works. Evaporated milk is fresh milk with about 60% of the water removed through heating under vacuum. This creates milk that's twice as concentrated with a slightly caramelized flavor from the heating process. In fudge, evaporated milk provides dairy richness while containing the right amount of water for proper texture. Regular milk contains too much water - the mixture would need to cook much longer to reach 234°F, and the extended cooking would caramelize the sugars and change the flavor. Sweetened condensed milk contains added sugar and would make the fudge too sweet with wrong consistency. Heavy cream has too much fat and not enough water. Half-and-half is similar to evaporated milk but lacks the concentrated dairy flavor. Evaporated milk is the only option that works.
Storage, Gifting, and Freezing
Fantasy fudge stores well and makes excellent gifts. Store in an airtight container at room temperature for up to 1 week, or refrigerate for up to 3 weeks. Layer pieces between sheets of wax paper or parchment paper to prevent sticking. For gifting, pack in decorative tins or boxes with wax paper between layers. Include a note that it should be stored at room temperature or refrigerated. For freezing, wrap individual pieces or small stacks in wax paper, then wrap in aluminum foil, and place in freezer bags or airtight containers. Freeze for up to 3 months. Thaw in the refrigerator overnight or at room temperature for about 30 minutes before serving. The texture remains excellent after freezing.
Variations and Customization Ideas
While classic chocolate is traditional, you can create variations. For nut fudge, stir in 1 cup of chopped walnuts or pecans after adding marshmallow creme. For peanut butter fudge, add ½ cup of peanut butter with the marshmallow creme. For mint fudge, use mint chocolate chips or add ½ teaspoon of peppermint extract. For rocky road, add mini marshmallows and nuts. For turtle fudge, swirl in caramel and add pecans. For cookies and cream, fold in crushed Oreos. For pretzel fudge, sprinkle crushed pretzels on the bottom of the pan before pouring. For different chocolate flavors, use milk chocolate chips, dark chocolate chips, or a combination. Each variation maintains the base recipe while adding complementary flavors or textures.
Troubleshooting Common Problems
When fantasy fudge doesn't turn out right, there's usually a fixable cause. If it won't set and stays soft, you didn't cook it to 234°F - it must reach this precise temperature. If it's dry and crumbly, you overcooked it past 234°F - use a thermometer and stop at the right temperature. If it has white streaks, you didn't stir the marshmallow creme enough - stir vigorously until completely smooth. If it's grainy, you used a meat thermometer instead of candy thermometer or didn't reach proper temperature - always use candy thermometer. If it scorched, the heat was too high - use medium heat for stovetop and watch carefully. If microwave version cooked unevenly, your microwave has hot spots - stir thoroughly between intervals. Most issues relate to temperature accuracy or insufficient stirring.
 Pin it
After making fantasy fudge probably a hundred times over the past twenty years, it's become my most reliable holiday candy because it consistently turns out perfectly and people genuinely love receiving it as gifts. I appreciate how the marshmallow creme eliminates the traditional fudge challenges of crystallization and graininess, making something that has a reputation for difficulty actually foolproof. The ability to make multiple batches in under an hour removes stress from holiday preparation. Knowing the simple secret - cook to exactly 234°F - transforms something that could be tricky into something genuinely reliable. This represents exactly what holiday candy should be - impressive enough to gift, genuinely delicious rather than just sweet, practical enough to make in quantity, and achievable through understanding the one critical temperature rather than requiring mysterious skills or years of practice.
Frequently Asked Questions
- → Why is my fudge not setting properly?
- The mixture needs to reach exactly 234°F. If it doesn't hit that temperature, the fudge won't set right. Use a candy thermometer to check and keep heating until you reach the correct temp.
- → Can I make this fudge without a microwave?
- Yes! Cook the sugar, butter, and milk in a saucepan over medium heat, stirring constantly until it reaches 234°F. This takes about 4 minutes after it starts boiling. Then add the chocolate and marshmallow creme.
- → How long does this fudge stay fresh?
- Keep it in a covered container at room temperature and it will stay good for 1-2 weeks. Make sure the container seals well to keep it from drying out.
- → Can I add nuts to this recipe?
- Definitely! Stir in 1 cup of chopped walnuts or pecans right after you add the marshmallow creme and vanilla. Mix them in before pouring into the pan.
- → What size pan should I use?
- Use a 9x9-inch pan for thicker pieces or a 13x9-inch pan for thinner fudge. Grease whichever pan you choose so the fudge comes out easily once it's set.
- → Do I have to use evaporated milk?
- Evaporated milk works best because it creates the right texture. Regular milk or cream won't give you the same smooth, creamy results that make this fudge so good.