
 Pin it
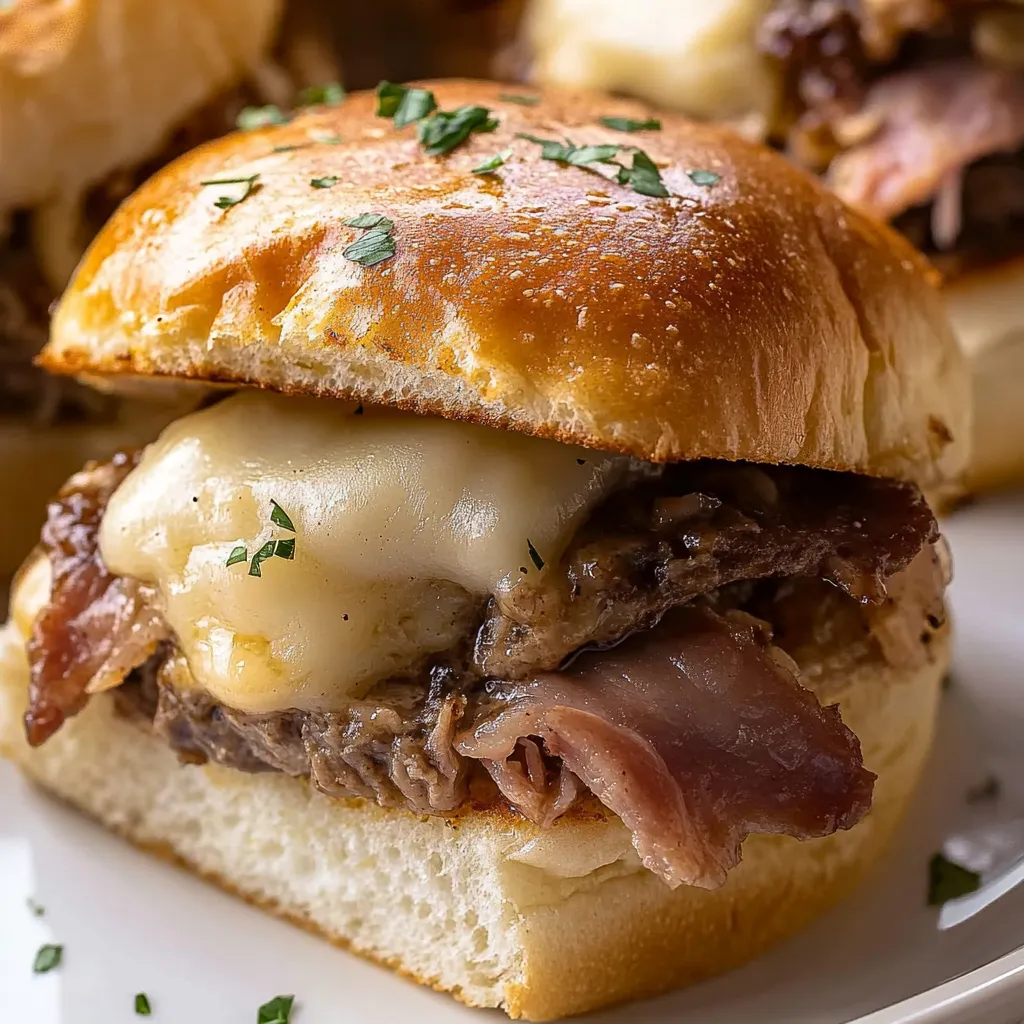
These French dip sliders transform the classic French dip sandwich into party-perfect miniature portions - tender, rare-sliced deli roast beef and melted Swiss or provolone cheese layered with sweet caramelized onions and tangy horseradish mayo, all tucked into buttery Hawaiian rolls that get brushed with seasoned butter and baked until golden and crispy on top while staying soft and steamy inside. What makes these sliders so brilliant for entertaining is how they're assembled as one connected slab that bakes together, then gets sliced into individual portions just before serving, eliminating the fussy work of constructing twelve separate sandwiches while ensuring every slider tastes identical. The homemade au jus - a rich, savory beef broth enhanced with butter, garlic, fresh thyme, and Worcestershire sauce - gets served warm in individual ramekins for that signature French dip dipping experience, though this version uses a touch of flour to give the jus just enough body to cling to the soft rolls without making them soggy like traditional thin jus would. The combination of rare roast beef that stays tender and juicy, gooey melted cheese, sweet-savory caramelized onions, that tangy horseradish kick, buttery toasted rolls, and deeply flavorful dipping jus creates the ultimate crowd-pleasing appetizer or casual meal that disappears within minutes at any gathering.
The first time making these reveals how much easier the slab method is compared to making individual sandwiches - spreading, layering, and baking everything at once before cutting into portions saves massive amounts of time while producing better results since everything bakes evenly. Watching guests dip their sliders into that rich, aromatic jus and seeing their expressions when they bite into the combination of tender beef, melted cheese, sweet onions, and buttery roll validates the effort, while having them disappear within minutes confirms you've made something genuinely crave-worthy.
Ingredients - What You Need and Why
For the Sliders:
- Hawaiian slider rolls: provide soft, slightly sweet base that stays tender inside while crisping on top during baking; one 12-count package of King's Hawaiian Savory Butter Rolls (yellow banner) offers subtle buttery flavor, while Original Sweet Rolls (orange banner) add slight sweetness; the connected slab format makes assembly easy and ensures uniform baking; other slider roll brands work but Hawaiian rolls are distinctly soft and flavorful
- Thinly sliced deli roast beef: the star protein providing tender, juicy beef flavor; request rare or medium-rare roast beef sliced as thin as possible at the deli counter for best results; about three-quarters to one pound covers twelve sliders generously; rare beef stays tender during baking while well-done becomes dry and tough; avoid pre-packaged roast beef which is often thicker and less flavorful than fresh-sliced deli meat
- Swiss or provolone cheese: melts beautifully into smooth, mild, slightly nutty layer that doesn't overpower the beef; about eight slices (roughly half a pound) thinly sliced provides proper coverage; Swiss offers slightly sharper, nuttier flavor with those characteristic holes, while provolone is milder and creamier; avoid thick-sliced cheese that doesn't melt completely
- Mayonnaise: forms the base of the tangy spread that adds moisture and richness; use quality mayo like Hellmann's or Duke's for best flavor; about one-quarter cup total; avoid fat-free or light mayo which tastes thin and artificial
- Cream-style horseradish: adds pungent, spicy kick that cuts through rich beef and cheese; Inglehoffer Cream Style Horseradish works beautifully with its robust fresh horseradish flavor; about two tablespoons mixed with mayo creates balanced spread; prepared horseradish from a jar (in the refrigerated section) is different and more watery than cream-style
- Caramelized onions: provide sweet, rich, deeply savory flavor that complements the beef; about one cup of slowly cooked onions transformed from sharp and pungent to mellow and sweet through extended cooking; make ahead using a dedicated recipe for best results, though store-bought caramelized onions work in a pinch
- Unsalted butter: creates the seasoned butter sauce that gets brushed over rolls, adding moisture, richness, and helping achieve golden-brown tops; about four tablespoons melted for the butter sauce plus additional for the jus
- Onion powder and garlic powder: dried aromatics that flavor the butter sauce without adding moisture or texture that fresh alliums would; about one teaspoon of each provides savory depth without overwhelming
- Worcestershire sauce: adds umami-rich, tangy, slightly sweet complexity to both the butter sauce and jus; this fermented condiment contributes depth that makes flavors taste more developed
- Fresh parsley: chopped and mixed into butter sauce plus sprinkled on finished sliders for fresh, herby notes and bright green color that makes presentation more attractive; about two tablespoons total
For the Au Jus:
- Beef broth or stock: forms the base of the dipping sauce; use high-quality beef broth or stock for best flavor as this is the dominant ingredient; about two cups; low-sodium broth lets you control salt levels while regular broth intensifies savory character
- Unsalted butter: stands in for traditional pan drippings from roasted beef, adding richness and silky mouthfeel; about two tablespoons
- All-purpose flour: provides slight thickening that helps jus cling to rolls without making them soggy; just one tablespoon creates body without making it gravy-thick; omit for traditional thin jus if serving on crusty bread rather than soft rolls
- Worcestershire sauce: adds the same savory, tangy depth as in the butter sauce, tying flavors together; about one tablespoon
- Roasted beef base: optional but highly recommended concentrate that intensifies beefy flavor; Better Than Bouillon Reduced Sodium Roasted Beef Base adds tremendous depth; start with one to two teaspoons and adjust to taste based on your broth's existing flavor
- Minced garlic: about two cloves sautéed in butter infuse the jus with aromatic depth; fresh garlic tastes brighter than powder here since the jus doesn't cook long enough to mellow dried garlic's harshness
- Fresh thyme: a few sprigs simmered in the jus contribute subtle herby, slightly floral notes that complement beef beautifully; dried thyme (half teaspoon) substitutes but lacks the brightness of fresh
- Kosher salt and freshly ground black pepper: season to taste depending on your broth's sodium content and personal preference
How to Make French Dip Sliders - Step by Step
- Prepare and toast the slider rolls:
- Begin by preheating your oven's broiler with a rack positioned on the second level from the top, roughly six inches below the heating element. While it heats, place your entire slab of twelve connected slider rolls on a cutting board. Using a long, sharp serrated bread knife, carefully slice through the slab horizontally, separating the tops from the bottoms in one smooth cut. The key is using a gentle sawing motion without pressing down, which compresses the soft rolls. Place both halves cut-side up on a large baking sheet. Slide the baking sheet under the broiler and toast for one to two minutes, watching constantly through the oven window. You're looking for light golden color on the cut surfaces - they can go from perfectly toasted to burnt in seconds, so don't walk away. This toasting step creates a slight barrier that helps prevent the rolls from becoming soggy when you add the horseradish mayo and later when people dip them in jus. Once lightly toasted, remove from the oven and set aside. Turn off the broiler and adjust your oven to 350 degrees Fahrenheit for baking the sliders later.
- Assemble the slider layers:
- Lightly coat a rectangular baking dish (at least 10.5x7.5 inches, though 13x9 inches works great) with cooking spray to prevent sticking. Place the bottom slab of toasted rolls in the dish, toasted side facing up. In a small bowl, combine one-quarter cup of mayonnaise with two tablespoons of cream-style horseradish, stirring until uniform. Spread half of this horseradish mayo over the bottom rolls in the dish, covering the entire surface. Now begin layering the fillings in specific order for best results: start with four slices of cheese (half your total), tearing pieces as needed to cover the bread completely. Layer all your roast beef over the cheese - about three-quarters to one pound total, distributing it evenly across the surface. Spread your one cup of caramelized onions over the roast beef, again covering the entire surface. Top with the remaining four slices of cheese, covering everything. Take the top slab of rolls and spread the remaining horseradish mayo on the toasted side. Carefully place the top slab mayo-side down over the cheese layer, creating your completed slider assembly. Press down gently to compact everything slightly.
- Brush with seasoned butter and bake:
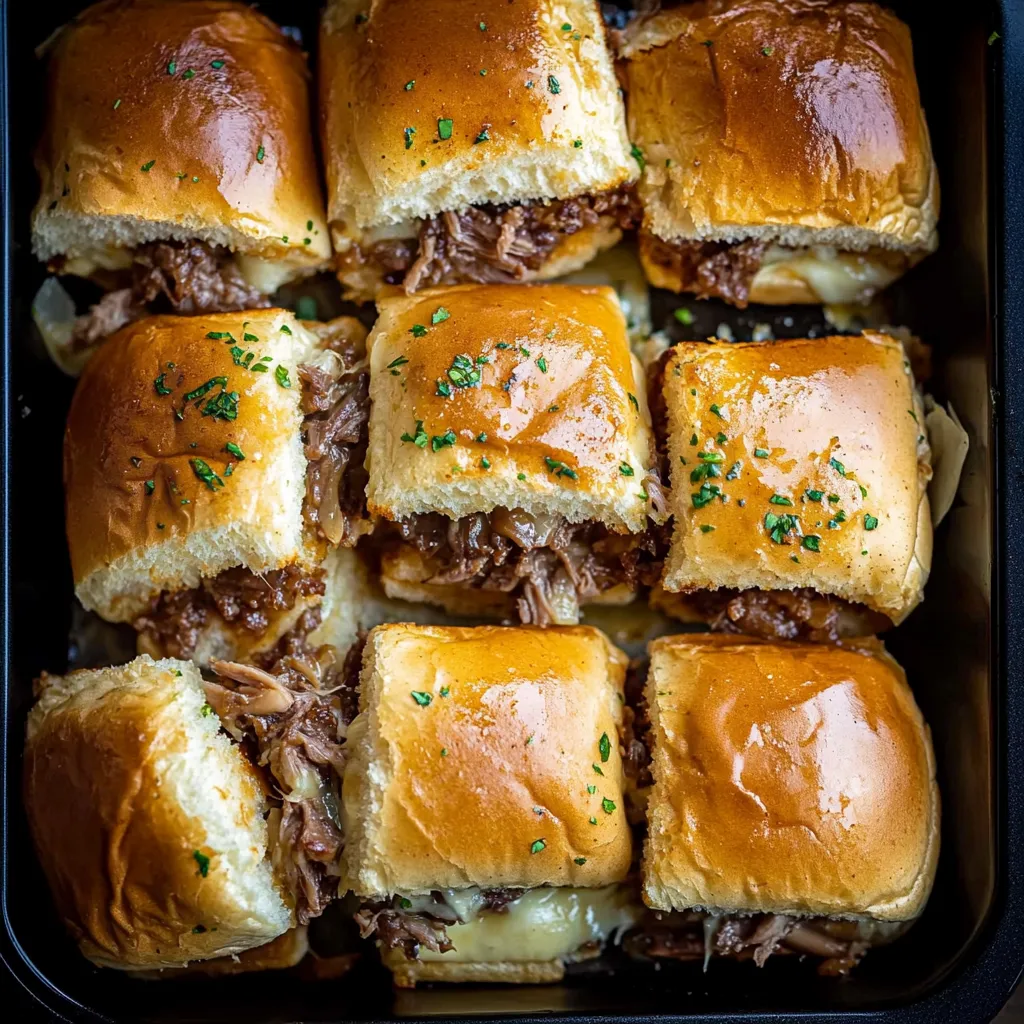
- In a small bowl, combine four tablespoons of melted unsalted butter with one teaspoon each of onion powder and garlic powder, one tablespoon of Worcestershire sauce, and one tablespoon of chopped fresh parsley, whisking to combine. Taste and add a small pinch of salt if desired, though remember the jus will add saltiness later. Using a pastry brush or basting brush, generously apply this seasoned butter mixture over the entire top surface of the slider rolls and down the sides. Don't worry if excess butter pools in the bottom of the dish - the rolls will absorb it during baking, adding flavor and moisture. Make sure to distribute the parsley bits evenly across the tops for attractive appearance. Cover the baking dish tightly with aluminum foil and place in your preheated 350-degree oven. Bake for twenty to twenty-five minutes until the cheese inside melts completely - you can peek under the foil after twenty minutes to check. Once the cheese is melted, remove the foil and return the uncovered dish to the oven. Bake for an additional five to eight minutes until the tops turn golden brown and slightly crispy. The two-step process ensures melted, gooey interiors while achieving toasted, buttery exteriors.
- Prepare the au jus while sliders bake:
- While your sliders bake, make the dipping jus on the stovetop. In a small saucepan over medium heat, melt two tablespoons of butter. Add two cloves of minced garlic and sauté for about two minutes until fragrant and just beginning to turn golden - don't let it brown or it will taste bitter. Sprinkle one tablespoon of all-purpose flour over the butter and garlic, stirring constantly with a whisk. Cook for one to two minutes, stirring continuously, to cook out the raw flour taste. Gradually whisk in two cups of beef broth in a steady stream, followed by one tablespoon of Worcestershire sauce, a few sprigs of fresh thyme, and freshly ground black pepper to taste. Increase heat to bring the mixture to a boil, then reduce heat to maintain a gentle simmer. Let it simmer uncovered for about ten minutes, allowing flavors to meld and the liquid to reduce slightly. After simmering, taste the jus and assess if it needs more beefy flavor - if your broth was mild, whisk in one to two teaspoons of roasted beef base (like Better Than Bouillon) until dissolved. Taste again and adjust seasoning with salt and additional pepper as needed. For smooth texture, strain the jus through a fine-mesh sieve into a serving container, removing the garlic pieces and thyme sprigs. Keep warm over low heat until serving time.
- Slice, garnish, and serve with jus:
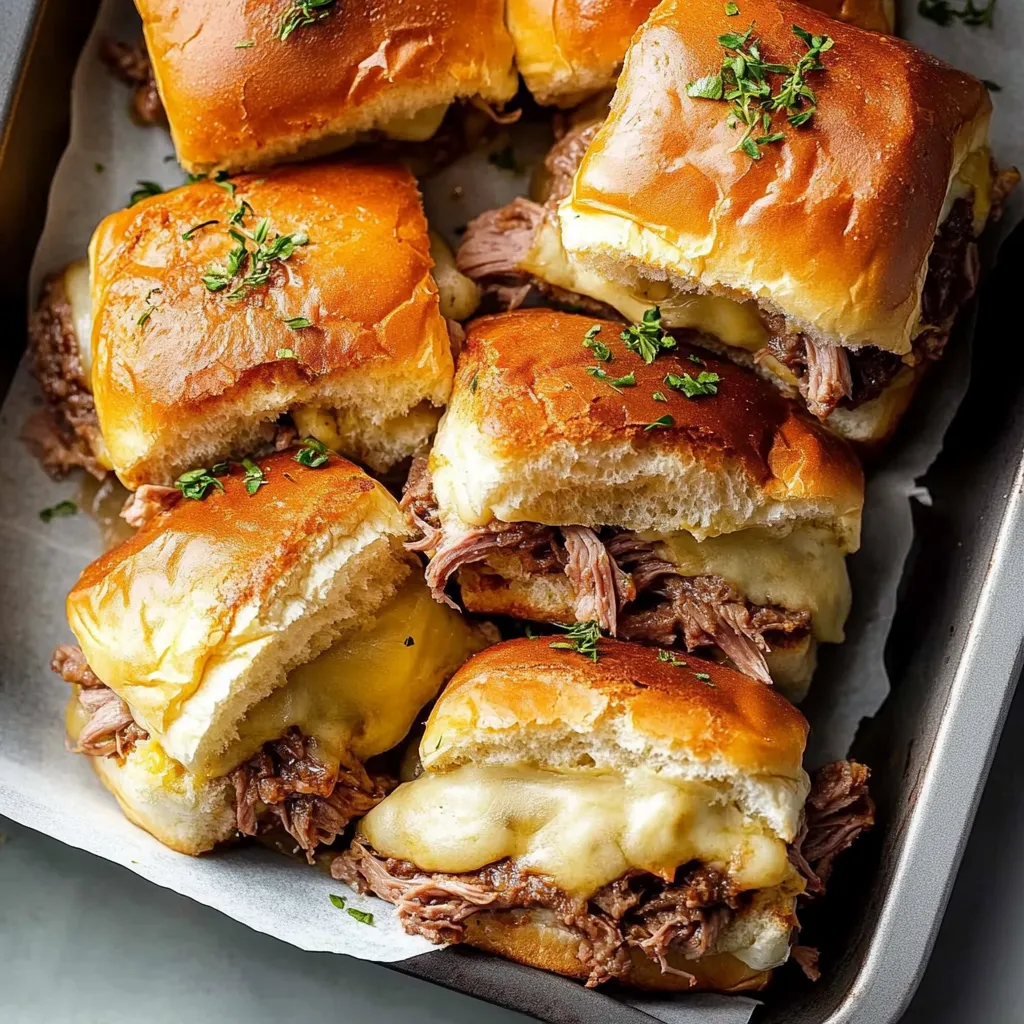
- Once the sliders finish baking, remove the dish from the oven and let them rest for about five minutes. This resting period allows the cheese to set slightly, making the sliders easier to slice cleanly without everything sliding apart. Using a large spatula or cake lifter, carefully transfer the entire slab from the baking dish to a cutting board. Using your serrated knife, cut down through the natural divisions in the rolls, creating twelve individual sliders. Sprinkle the remaining tablespoon of chopped fresh parsley over the tops for that final touch of color and freshness. Arrange the sliders on a serving platter. Pour the warm au jus into small individual ramekins - four to six-ounce size works perfectly - giving each guest their own for dipping. Alternatively, serve the jus in small bowls that multiple people can share. Serve immediately while the sliders are hot and the cheese is still melty. Encourage guests to dip each bite into the jus for that classic French dip experience.
 Pin it
The genius of this recipe lies in how it takes a restaurant sandwich that's typically messy to eat - dripping jus everywhere, fillings sliding out - and transforms it into party-friendly portions that are easier to handle and less intimidating while maintaining all the flavors that make French dip sandwiches so beloved. The connected-slab assembly method is a game-changer for entertaining, eliminating tedious individual sandwich construction.
Understanding Caramelized Onions and Making Them Ahead
Caramelized onions transform from sharp, pungent raw alliums into sweet, jammy, deeply savory condiments through slow cooking that breaks down cell structures and converts sugars into caramelized compounds. True caramelization takes time - usually forty-five minutes to an hour of patient stirring over medium-low heat as thinly sliced onions gradually release moisture, soften, shrink dramatically in volume, and turn progressively darker from translucent to golden to deep brown. The process cannot be rushed despite what many recipes claim; higher heat burns the outsides before interiors properly caramelize. For these sliders, you need about one cup of finished caramelized onions, though making a full batch (which yields about two cups from two to three pounds of raw onions) makes sense since they keep refrigerated for three to four days or frozen for months. The slightly sweet, complex, umami-rich flavor of properly caramelized onions elevates countless dishes beyond just these sliders - try them on burgers, pizzas, in dips, stirred into mashed potatoes, or layered in sandwiches. Making them ahead is strongly recommended since caramelizing onions during slider assembly adds significant time and requires attention. Having a container of caramelized onions ready in the refrigerator means you can pull together these sliders quickly when entertaining.
Creating Flavor Variations and Customizations
While classic French dip sliders are delicious as written, exploring variations creates different flavor experiences while maintaining the fundamental technique and format. For Philly cheesesteak sliders, swap roast beef for thinly sliced ribeye or shaved steak, use provolone cheese, add sautéed bell peppers with the onions, and serve with a cheesy sauce instead of au jus. Italian beef sliders substitute the horseradish mayo with giardiniera (Italian pickled vegetables) for spicy, tangy Chicago-style flavor. For French onion sliders, use Gruyère cheese instead of Swiss, double the caramelized onions, and add a splash of sherry to the au jus for sophisticated flavor reminiscent of French onion soup. BBQ beef sliders replace the horseradish mayo with your favorite barbecue sauce and serve with coleslaw on top instead of caramelized onions. Reuben-inspired sliders use corned beef instead of roast beef, add sauerkraut, use Swiss cheese, and replace horseradish mayo with Thousand Island dressing. For mushroom-lovers, sauté sliced mushrooms in butter and layer them with the caramelized onions for earthy umami depth. Buffalo chicken sliders adapt the format with shredded rotisserie chicken tossed in buffalo sauce, using blue cheese or ranch dressing instead of horseradish mayo. Each variation maintains the efficient slab-baking method while exploring different flavor profiles.
Troubleshooting Common Slider Problems
Even with straightforward assembly, sometimes issues arise, but understanding what went wrong helps you prevent problems next time. If your slider bottoms are soggy rather than lightly toasted, you either skipped the initial broiling step, didn't toast them long enough, or added too much horseradish mayo - toast until visibly golden and use mayo sparingly, spreading thin layers rather than thick globs. When the tops burn before the cheese melts inside, your oven runs hot or you positioned the rack too close to the heating element during the uncovered baking phase - use an oven thermometer to verify temperature and reduce by twenty-five degrees if using a dark-colored baking dish. If cheese doesn't melt completely even after the covered baking time, your oven temperature is too low, you used very thick cheese slices, or you underbaked - use thinly sliced cheese and verify oven temperature accuracy. Sliders that fall apart when slicing either weren't pressed together adequately during assembly, weren't given enough resting time after baking, or were cut with a dull knife that tore rather than sliced - press firmly during assembly, rest five minutes, and use a sharp serrated knife with gentle sawing motion. When the jus tastes weak and bland, you used low-quality broth without enhancing it with beef base, or you didn't simmer it long enough to concentrate flavors - invest in quality broth and don't skip the beef base if your broth tastes watery.
Serving Size and Guest Planning
Understanding how many sliders to plan per person helps you scale the recipe appropriately for different gathering sizes and serving contexts. As appetizers at parties with multiple other dishes, estimate one to two sliders per guest - people will graze on various options and won't fill up on just sliders. For game day spreads with several substantial snacks (wings, nachos, dips), calculate toward the lower end since guests have choices. As a main course for lunch or casual dinner, plan for three to four sliders per person depending on appetites and what sides you're serving - heartier eaters or those with fewer sides may want four, while lighter eaters or those with substantial sides like fries and salad may be satisfied with three. For children, estimate two to three sliders depending on age. This recipe makes twelve sliders, feeding roughly four people as a main course or six to twelve as appetizers. For larger crowds, double or triple the recipe, using multiple baking dishes and baking in batches or simultaneously if you have oven space. The beauty of the slab method is how easily it scales - assembling two or three slabs takes only marginally more time than one, making this realistic for feeding twenty-four or thirty-six people without spending hours in the kitchen.
The History and Appeal of French Dip Sandwiches
Understanding the French dip sandwich's origins and cultural significance adds context to why this slider adaptation works so well. The French dip sandwich was invented in Los Angeles in the early 1900s, with two restaurants - Philippe's and Cole's - both claiming to have created it first. Despite the name, it has no French origins; "French" likely refers to the French roll traditionally used or possibly to "French dipped" (dipped in jus). The classic sandwich features thin-sliced roast beef piled on a crusty French roll or baguette, served with beef jus for dipping. The appeal lies in the textural and flavor contrasts - tender, juicy beef against crusty bread, with the hot, savory jus adding moisture and intense flavor to each bite. The sandwich became an LA institution and spread nationwide, appearing on menus from casual diners to upscale restaurants. This slider adaptation maintains the essential elements while making them more party-friendly and less messy - the soft Hawaiian rolls replace crusty bread, caramelized onions add sweetness, cheese brings creaminess, and horseradish provides kick, while the au jus preserves that signature dipping experience. The miniature format makes French dip accessible for casual gatherings where full-sized sandwiches would be unwieldy.
Storage, Reheating, and Quality Considerations
While these sliders taste dramatically better fresh from the oven, understanding proper storage and reheating helps you handle leftovers without complete quality loss. Store leftover sliders and jus separately in airtight containers in the refrigerator for up to two days. The texture deteriorates with storage - the rolls lose their crispy exterior and become uniformly soft, the cheese firms up, and the beef can dry slightly. To reheat, wrap sliders (either individual ones or the remaining slab) in aluminum foil and place on a baking sheet. Bake at 350°F for ten to fifteen minutes until warmed through - timing depends on how many sliders you're reheating and whether they're fully separated or still connected as a slab. If you want to restore some crispness to the tops, open the foil for the last five minutes of reheating. Alternatively, reheat individual sliders in the microwave for thirty to forty-five seconds, though this won't restore any crispness and may make them slightly tough. Reheat the jus gently on the stovetop over low heat or in the microwave, stirring occasionally until it reaches at least 165°F for food safety. The jus reheats beautifully and tastes nearly as good as freshly made. For best results, only make as many sliders as you'll serve, reserving extra rolls, meat, and cheese for another meal rather than assembling and baking more than needed.
Teaching Entertaining and Party Hosting Skills
This recipe provides excellent opportunity to learn or practice fundamental entertaining and party hosting skills that transfer to countless other gatherings. The make-ahead component - preparing caramelized onions days in advance and assembling sliders up to four hours before baking - demonstrates strategic timeline planning that prevents last-minute kitchen chaos when guests arrive. Understanding how to scale recipes for different crowd sizes teaches you to calculate quantities based on serving context (appetizers versus main course) and guest count. Learning to serve individual portions of dipping sauce in ramekins rather than one communal bowl creates more elegant, hygienic presentation while preventing double-dipping concerns. The concept of "finishing" dishes right before serving - adding fresh herb garnish, slicing at the last minute - shows how small final touches dramatically improve presentation. These sliders also teach oven management when you're juggling multiple dishes - knowing that something can hold warm in a low oven while you prepare other components relieves timing pressure. For beginners hosting their first game day party or casual gathering, this recipe offers high reward for modest effort, building confidence to tackle more ambitious entertaining projects.
The Economics of Homemade Versus Catered Appetizers
Understanding cost comparisons between making these sliders at home versus purchasing similar catered appetizers reveals substantial savings that make a difference when entertaining. One package of Hawaiian rolls costs about five to six dollars. Three-quarters to one pound of deli roast beef runs eight to twelve dollars depending on quality. Cheese costs about four dollars. Butter, mayo, horseradish, and seasonings represent maybe three dollars total. Beef broth costs two to three dollars. Onions for caramelizing cost two to three dollars. Total ingredient cost for twelve sliders works out to approximately twenty-five to thirty-five dollars, or roughly two to three dollars per slider. Catered slider trays from delis or catering companies typically charge five to eight dollars per slider, making twelve sliders cost sixty to ninety-six dollars - nearly triple the homemade cost. Restaurant appetizer platters with similar items often exceed one hundred dollars. Beyond monetary savings, homemade offers control over ingredient quality, meat thickness, cheese selection, and seasoning levels that purchased options don't provide. The warmth of freshly baked sliders beats room-temperature catered options. For large parties requiring multiple dozen sliders, the savings multiply dramatically - making thirty-six sliders costs perhaps seventy-five to ninety dollars homemade versus two hundred to three hundred dollars catered.
Pairing Drinks with French Dip Sliders
Understanding beverage pairings enhances the overall dining experience, whether serving these as appetizers or main course. Beer pairs naturally with these rich, savory sliders - robust red ales, brown ales, or porters complement the beef and caramelized onions without being too heavy, while lighter lagers or pilsners provide refreshing contrast. For wine lovers, medium-bodied red wines like Côtes du Rhône, Merlot, or Cabernet Franc match the beef's richness, while fuller-bodied Cabernet Sauvignon or Syrah work for heartier appetites. If serving as a main course dinner rather than game day appetizer, red wine feels more appropriate than beer. For non-alcoholic options, iced tea (sweetened or unsweetened) provides tannins that cut through richness, while lemonade offers tart refreshment. Sparkling water with lemon cleanses the palate between bites. For game day parties where variety matters, offer multiple beverage options - keep a cooler stocked with beer and soft drinks, plus a pitcher of iced tea or lemonade. The key is providing refreshing, relatively light drinks that cleanse the palate rather than competing with the sliders' bold flavors or adding more heaviness to an already rich dish.
Building Confidence with Slab-Style Recipes
This recipe introduces the slab-baking technique that applies to countless other slider and sandwich variations, making it a valuable skill to master. The concept of assembling connected rolls as one unit, filling them while intact, and baking together before cutting into portions simplifies preparation dramatically compared to individual sandwich construction. Once you understand this method, you can adapt it to ham and cheese sliders, turkey sliders, breakfast sliders with eggs and bacon, pulled pork sliders, meatball sliders, and endless other variations. The fundamental principles remain consistent: split the roll slab horizontally, toast the cut sides if desired, layer fillings strategically (starting with cheese helps it melt and bind everything), spread butter sauce on top, bake covered then uncovered, rest before slicing, and serve immediately. The efficiency of this method makes entertaining less stressful since you're assembling one slab rather than twelve individual items. The uniform results ensure every guest gets identical quality rather than some sliders being overstuffed while others are skimpy. Success with this recipe builds confidence to experiment with your own flavor combinations and filling ideas, gradually building a repertoire of crowd-pleasing slider recipes that leverage this time-saving technique.
Understanding Baking Dish Selection and Heat Distribution
The recommendation to use light-colored baking dishes rather than dark ones reflects important principles about heat absorption and browning that apply broadly in cooking. Dark-colored pans (whether metal or ceramic) absorb more heat than light-colored ones, causing bottoms to brown faster and more aggressively. For delicate items like slider rolls that need time for cheese to melt and interiors to heat through before bottoms burn, light-colored dishes provide more even, gentle heat distribution. If you only have dark pans, reducing oven temperature by twenty-five degrees compensates for the increased heat absorption, though watching carefully remains important. The size recommendation (at least 10.5x7.5 inches, though 13x9 inches works better) ensures the slider slab fits comfortably without being cramped or having excessive empty space. Too-small dishes crowd the sliders, preventing proper heat circulation and making it difficult to lift them out. Too-large dishes leave excessive exposed surface that collects butter and drippings rather than the rolls absorbing them. Glass and ceramic dishes are preferred over metal for this recipe because you can see the bottom browning level through glass, and ceramic retains heat well for keeping sliders warm after baking. These principles about pan selection, color, and size transfer to countless other baking projects beyond just sliders.
 Pin it
These French dip sliders represent the perfect intersection of restaurant-quality flavor and practical home entertaining, proving that impressive party food doesn't require culinary school training or all-day kitchen marathons when you understand smart techniques and efficient methods. What makes this recipe genuinely valuable is how it takes a beloved sandwich that's typically messy and difficult to serve at parties, then transforms it into manageable, elegant portions that maintain all the iconic flavors while being dramatically easier to execute and serve. The slab-baking method is genuinely revolutionary for entertaining - once you've experienced how much simpler it is to assemble one connected unit rather than twelve individual sandwiches, you'll apply this technique to countless other slider variations throughout your hosting life. Whether you're planning game day spreads for football-watching crowds, casual dinner parties with friends, holiday gatherings where you need impressive but not complicated appetizers, or simply craving French dip sandwiches in a format that's less messy and easier to share, these sliders deliver completely. The combination of tender rare roast beef that stays juicy, melted cheese that binds everything together, sweet caramelized onions adding complexity, tangy horseradish providing kick, buttery golden-brown rolls offering textural contrast, and that rich, aromatic au jus creating the signature dipping experience makes these absolutely irresistible to guests who inevitably hover around the serving platter grabbing "just one more" until they've disappeared. Once you've watched a platter of these vanish within minutes at a party while guests enthusiastically ask for the recipe, you'll understand why mastering this technique is worth the modest effort required, making you the friend who always brings the most popular dish to every gathering.
Frequently Asked Questions
- → Can I make these sliders ahead of time?
- Yes, you can assemble the sliders up to 4 hours before baking. Keep them covered in the fridge, then add the butter topping and bake when ready to serve.
- → What cheese works best for these sliders?
- Provolone gives a mild, creamy flavor while Swiss adds a slightly nutty taste. Both melt beautifully. You can also try mozzarella or cheddar if that's what you have.
- → Can I use different rolls instead of Hawaiian?
- Hawaiian rolls work best because they're soft and slightly sweet, but you can use slider buns or dinner rolls. Just adjust the baking time slightly if they're smaller.
- → How do I store leftover sliders?
- Store them in an airtight container in the fridge for up to 3 days. Reheat in a 325°F oven covered with foil for about 15 minutes until warmed through.
- → Can I skip the horseradish sauce?
- Absolutely! If you're not a fan of horseradish, just use plain mayo or try a garlic aioli instead. The sliders will still be delicious.
- → What can I serve with French dip sliders?
- These pair great with potato chips, french fries, coleslaw, or a simple green salad. Pickles on the side are also a nice touch.