
 Pin it
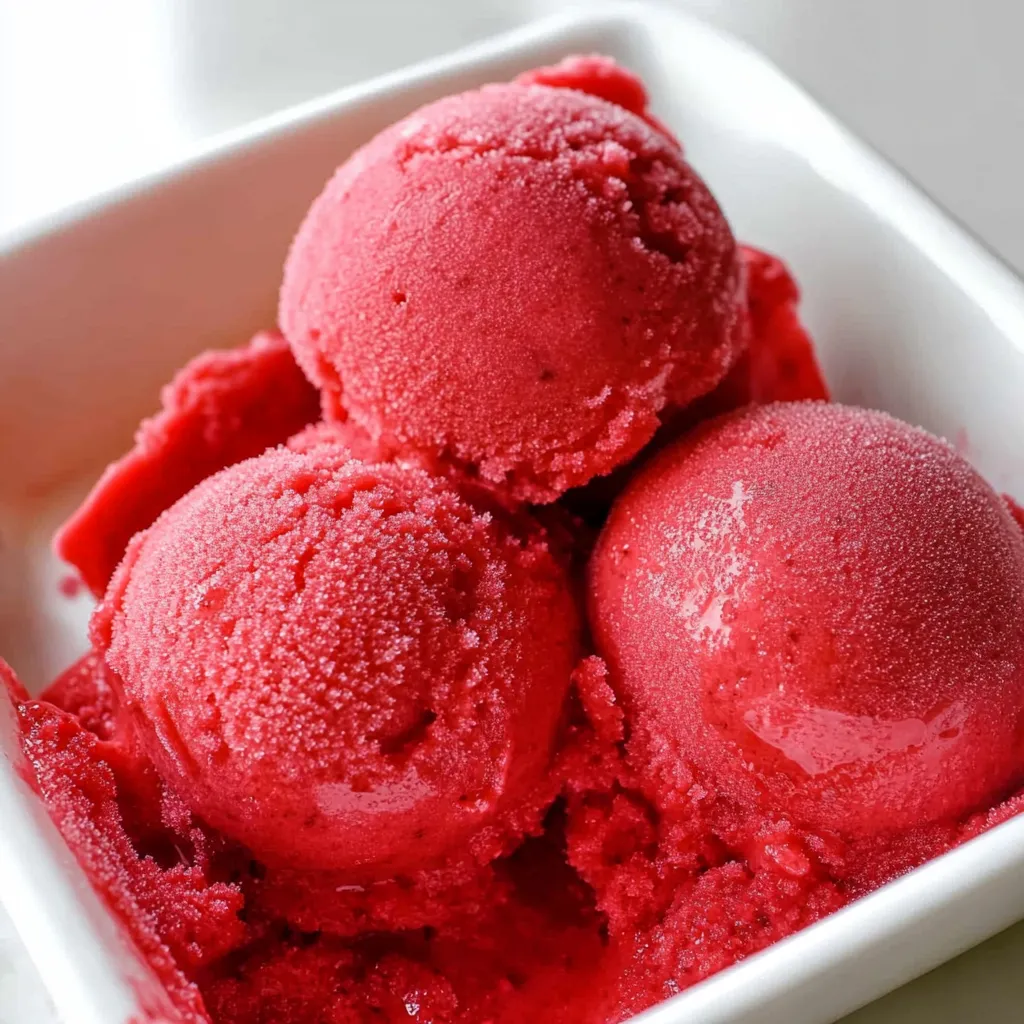
This vibrant raspberry sorbet delivers pure summer bliss in every spoonful, with tart-sweet raspberries creating the most refreshing frozen treat you can imagine. The beautiful ruby-red color makes it as stunning to look at as it is delicious to eat, and the smooth texture melts perfectly on your tongue without any of that heavy feeling you get from rich ice cream.
I've been making this raspberry sorbet for years now, and it never fails to impress guests at dinner parties. My kids absolutely go crazy for it on hot summer afternoons, and I love that I can feel good about serving them something that's basically just fruit with a touch of sweetness. The first time I made it, I was amazed at how something so simple could taste so elegant and restaurant-quality.
Essential Ingredients and Selection Tips
- Fresh or frozen raspberries: Look for berries that are deep red with no white shoulders, and if using frozen, don't thaw them first as they'll puree better when solid
- Granulated sugar: Regular white sugar dissolves cleanly and won't compete with the raspberry flavor like brown sugar might
- Fresh lemon juice: Skip the bottled stuff and squeeze a real lemon for that bright acidity that makes the raspberry taste even more vibrant
The quality of your raspberries makes all the difference here. When I'm at the farmer's market, I always smell the berries first - they should have that sweet, floral raspberry scent that hits you right away. Frozen raspberries actually work beautifully because they break down easily when you puree them, and since you're straining out the seeds anyway, the texture difference doesn't matter at all.
Step-by-Step Instructions
- Prepare the sugar syrup base:
- Pour hot tap water into a medium mixing bowl, then add your granulated sugar and freshly squeezed lemon juice. The hot water is key here because it helps the sugar dissolve much faster than cold water would. Stir this mixture vigorously with a whisk or wooden spoon for about 2-3 minutes until you can't see any sugar granules at the bottom of the bowl. If you're having trouble getting all the sugar to dissolve, let the mixture sit for 5 minutes, then stir again - sometimes the sugar just needs a little time to fully break down in the water.
- Create the raspberry puree:
- Place your raspberries in the bowl of a food processor fitted with the metal blade. If you're using frozen berries, you can add them straight from the freezer without thawing. Process the berries for about 1-2 minutes until they form a completely smooth puree with no visible chunks of fruit remaining. You want this mixture to be as smooth as possible before straining, so don't rush this step.
- Strain out all the seeds:
- Set up a fine-mesh sieve over another bowl and pour the raspberry puree into the sieve. Using the back of a soup ladle or a rubber spatula, press the puree through the mesh, working in circular motions to push as much fruit through as possible while leaving all the seeds behind. This takes some patience - keep pressing and stirring until you've extracted every bit of seedless puree you can get. The seeds left in the sieve should look pretty dry when you're done.
- Combine and chill thoroughly:
- Add your dissolved sugar mixture to the strained raspberry puree and whisk everything together until completely combined. The mixture should be smooth and evenly colored throughout. Cover the bowl tightly with plastic wrap and refrigerate for at least 2 hours, though 4 hours is even better. The mixture needs to be completely cold before churning, or your ice cream maker won't be able to freeze it properly.
- Churn in your ice cream maker:
- Make sure your ice cream maker bowl has been frozen for at least 12-15 hours before you start. Pour the chilled raspberry mixture into the frozen bowl and churn according to your machine's instructions, typically 18-25 minutes. The sorbet is ready when it holds its shape but is still soft enough to scoop easily - it should look like thick soft-serve ice cream at this point.
- Final freezing for perfect texture:
- Transfer the churned sorbet to a freezer-safe container with a tight-fitting lid. Press a piece of plastic wrap directly onto the surface of the sorbet to prevent ice crystals from forming, then cover with the lid. Freeze for at least 2-4 hours before serving to allow it to firm up to the perfect scoopable consistency.
 Pin it
This raspberry sorbet has become my go-to dessert when I want something that feels special but won't leave everyone feeling stuffed after dinner. My grandmother always said that the best desserts let you taste the fruit first and everything else second, and this recipe does exactly that. The kids in my family have declared it better than any store-bought sorbet, and I have to agree with them.
Storage and Serving Secrets
Proper storage makes all the difference with homemade sorbet. Always press plastic wrap directly onto the surface before putting the lid on your container - this prevents those annoying ice crystals that can make your beautiful sorbet taste like freezer burn. I've learned that sorbet actually tastes best within the first week of making it, though it will keep for up to a month in the freezer. If your sorbet gets too hard after being frozen for several days, just let it sit at room temperature for 5-10 minutes before scooping.
Perfect Pairing Ideas
This raspberry sorbet plays wonderfully with other flavors and textures. I love serving small scoops alongside a slice of lemon pound cake or vanilla shortbread cookies for a simple but elegant presentation. For something more sophisticated, try layering it with vanilla ice cream in tall glasses, or serve it as a palate cleanser between courses at dinner parties. The bright acidity cuts through rich foods beautifully, making it perfect after a heavy meal.
Seasonal Variations and Adaptations
While raspberries are the star here, this same technique works brilliantly with other berries when raspberries aren't in season. I've made gorgeous versions using blackberries, strawberries, or even a mix of whatever berries look best at the market. Each berry brings its own personality - blackberries create a deeper, more complex flavor, while strawberries make a sweeter, more delicate sorbet. The key is always tasting your fruit first and adjusting the sugar accordingly.
Make-Ahead Tips for Entertaining
This sorbet is actually better when made a day or two ahead, giving the flavors time to meld and develop in the freezer. When I'm planning a dinner party, I make the sorbet 2-3 days in advance, then store it properly until serving time. About 30 minutes before dessert, I'll scoop portions into chilled bowls and return them to the freezer - this way, serving is quick and elegant when the time comes.
Troubleshooting Common Issues
Sometimes homemade sorbet can turn out too icy or too soft, and both problems usually come down to temperature control. If your sorbet is too icy, your mixture probably wasn't cold enough when you churned it, or your freezer bowl wasn't completely frozen. Too soft usually means not enough sugar or not enough freezing time after churning. The sugar doesn't just add sweetness - it also affects the texture, so don't be tempted to reduce it too much even if you prefer less sweet desserts.
After making this raspberry sorbet countless times over the years, I can honestly say it's one of those recipes that never gets old. There's something so satisfying about transforming simple, fresh ingredients into something that tastes like pure summer sunshine. Every time I make it, I'm reminded why homemade frozen treats beat store-bought versions every single time - the flavor is just so much brighter and cleaner, and you know exactly what went into every spoonful.
Frequently Asked Questions
- → Can I use frozen raspberries instead of fresh?
- Yes, just thaw them completely first and save all the juice that comes out. The juice adds extra flavor to your sorbet.
- → Do I need an ice cream maker for this recipe?
- Yes, an ice cream maker is needed to get the right texture. The churning process creates the smooth, creamy consistency.
- → How long does homemade sorbet last in the freezer?
- It stays good for up to 3 months in the freezer when stored in an airtight container.
- → Why do I need to strain out the raspberry seeds?
- Straining removes the seeds so your sorbet has a smooth texture. Nobody wants crunchy bits in their creamy dessert.
- → Can I reduce the sugar in this recipe?
- You can reduce it slightly, but sugar helps prevent the sorbet from freezing too hard. Start by reducing it by 2 tablespoons max.
- → What if my sorbet is too hard to scoop?
- Let it sit at room temperature for 5-10 minutes before scooping. This softens it up for easier serving.