
 Pin it
These Halloween sugar cookies have become our absolute must-make treat every October. What started as a simple baking project with my kids has turned into our favorite Halloween tradition - we spend an entire Saturday afternoon cutting out spooky shapes and decorating them with colorful buttercream. The cookies come out incredibly soft and tender, nothing like those hard, crunchy cut-out cookies you sometimes get. My secret ingredient is a dollop of sour cream that keeps them perfectly chewy and delicious for days.
Last year, my daughter's teacher asked if I could make these for their Halloween party, and I ended up making triple batches because the other parents kept asking for the recipe. There's something so satisfying about rolling out the dough and watching those fun shapes come together, plus the whole house smells amazing while they're baking.
Ingredients You'll Need
- Unsalted butter (1 cup, softened): leave it out on the counter for a few hours until it gives slightly when pressed but isn't melty
- Granulated sugar (1 cup): regular white sugar works perfectly here, no need for anything fancy
- Large eggs (2, room temperature): take these out when you start softening your butter so they're ready to go
- Vanilla extract (1 teaspoon): pure vanilla tastes so much better than imitation in these delicate cookies
- Almond extract (1/2 teaspoon): this adds an amazing depth of flavor that makes people wonder what your secret is
- Sour cream (1/4 cup): the magic ingredient that keeps these cookies tender and soft for days
- All-purpose flour (3 cups): measure this properly by spooning into your cup and leveling off
- Baking powder (1 teaspoon): makes sure they puff up just enough without being too cake-like
- Baking soda (1/2 teaspoon): works with the sour cream to create the perfect texture
- Salt (1/2 teaspoon): enhances all the other flavors and balances the sweetness
For Buttercream Frosting:
- Unsalted butter (1/2 cup, softened): room temperature butter whips up much fluffier
- Powdered sugar (3 cups): sift this if it's lumpy for the smoothest frosting
- Vanilla extract (1 teaspoon): ties everything together with that classic flavor
- Heavy cream (2-3 tablespoons): adjust this to get your perfect spreading consistency
- Food coloring (orange, yellow, black): gel colors give you more vibrant results than liquid
Step-by-Step Instructions
- Cream the butter and sugar until light and fluffy:
- In your large mixing bowl, beat the softened butter and granulated sugar together for about 3-4 minutes using an electric mixer on medium speed. The mixture should look pale and fluffy, not just combined - this step is crucial for getting tender cookies. Add the eggs one at a time, beating well after each addition, then mix in the vanilla extract, almond extract, and sour cream until everything is completely smooth and well incorporated.
- Combine the dry ingredients separately before mixing:
- In a medium bowl, whisk together the flour, baking powder, baking soda, and salt until evenly distributed. With your mixer on low speed, gradually add the dry ingredients to the wet ingredients, mixing just until the dough comes together. Don't overmix here - as soon as you can't see any dry flour streaks, stop mixing or your cookies will be tough instead of tender.
- Chill the dough for the best results:
- Divide your dough into two equal portions and wrap each tightly in plastic wrap, shaping them into flat discs. Refrigerate for at least 2 hours, but overnight is even better if you have the time. This chilling step is absolutely critical - it firms up the butter so your cookies hold their shape when baking and prevents them from spreading into unrecognizable blobs.
- Roll out the dough to perfect thickness:
- Remove one disc of chilled dough from the refrigerator and let it sit at room temperature for about 10 minutes to soften slightly. On a lightly floured surface or parchment paper, roll the dough to about 1/4 inch thickness, turning it occasionally and adding light dustings of flour to prevent sticking. If the dough gets too soft while you're working with it, pop it back in the fridge for 15 minutes to firm up.
- Cut out your Halloween shapes and transfer carefully:
- Using floured cookie cutters, cut straight down without twisting - twisting can seal the edges and prevent proper rising. Place the cut cookies on parchment-lined baking sheets, leaving about 1 inch between each cookie. Gather up the scraps, re-roll once, and cut more cookies. Try not to re-roll the dough more than once or the cookies can become tough.
- Bake until just set but not browned:
- Preheat your oven to 350°F and bake the cookies for 8-9 minutes, just until the bottoms are barely golden but the tops still look pale. They might look slightly underdone, but they'll continue cooking on the hot pan for a few minutes after you remove them. Let them cool on the baking sheet for 2 minutes, then transfer to a wire rack to cool completely before frosting.
 Pin it
Getting the Perfect Cookie Texture
The key to these incredibly soft cookies is not overbaking them. They should look almost underdone when you take them out - pale on top with just barely golden bottoms. They'll firm up as they cool but stay tender inside. If you bake them until they're golden all over, they'll be crunchy instead of soft.
Making Smooth, Spreadable Buttercream
For the frosting, make sure your butter is properly softened - it should give when you press it but not be melting. Beat it alone first until it's light and fluffy, then gradually add the powdered sugar. The cream helps you get the perfect consistency for spreading - you want it thick enough to hold its shape but thin enough to spread smoothly with a knife.
Creative Decorating Ideas
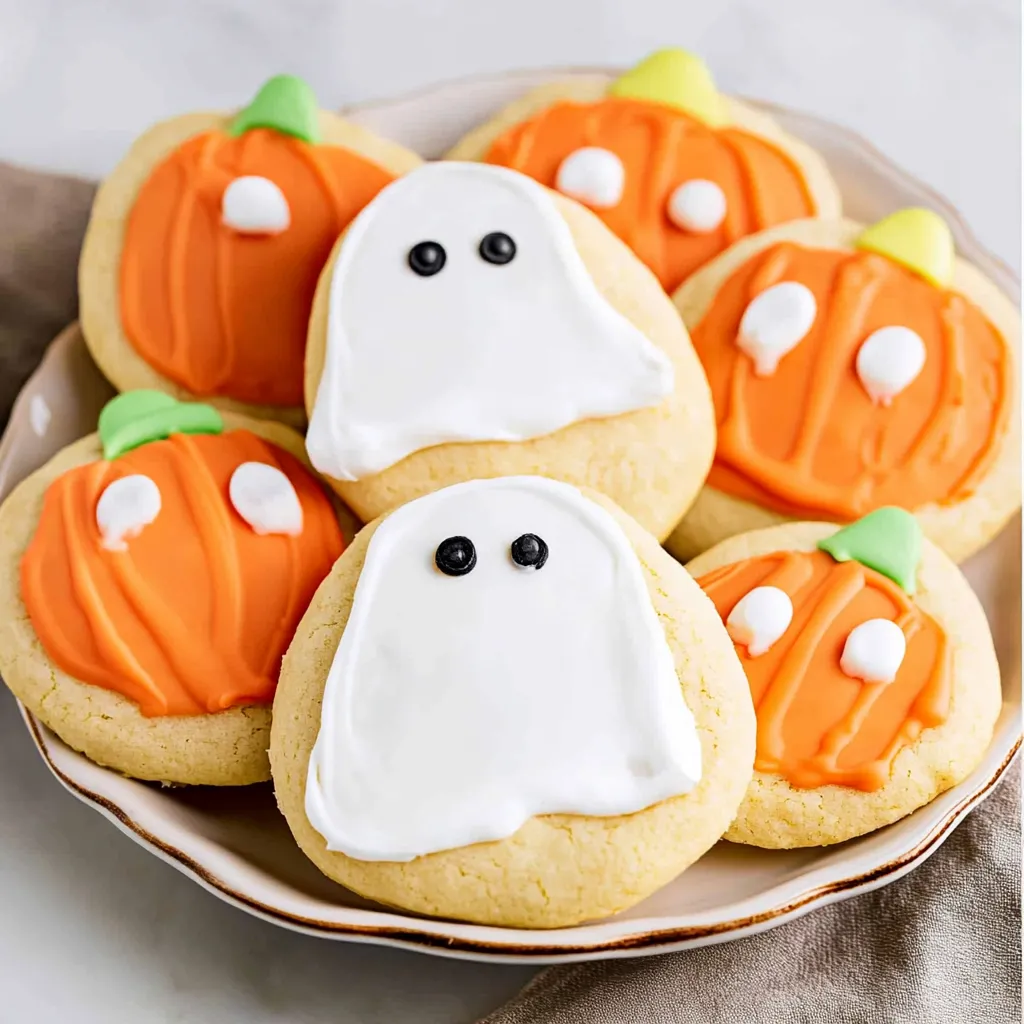
Pumpkin cookies look adorable with orange frosting and a green stem made from a small dab of green frosting. For ghosts, use white frosting and add mini chocolate chips or candy eyes. Candy corn cookies are fun with three layers - white at the tip, yellow in the middle, and orange at the base. Let each color set for a few minutes before adding the next layer.
Working with Food Coloring
Gel food coloring gives you much more vibrant colors than liquid, and you need less of it, so it won't thin out your frosting. Start with just a tiny amount - you can always add more, but you can't take it back. Orange can be tricky to achieve, so start with red and add yellow gradually until you get the shade you want.
Storage and Make-Ahead Tips
These cookies actually improve after a day - the flavors meld together and they become even more tender. Store them in an airtight container with parchment paper between layers if they're frosted. Unfrosted cookies keep for up to a week, while frosted ones are best within 3-4 days. You can also freeze the baked, unfrosted cookies for up to 3 months.
I discovered the sour cream trick by accident when I ran out of milk one year and had to substitute. The cookies turned out so much better than my old recipe that I never went back. My kids' friends always ask if we have any of "those amazing Halloween cookies" when they come over, and I love that they stay soft enough to pack in lunch boxes without turning into hockey pucks.
 Pin it
After years of perfecting this recipe, I've learned that patience really pays off with these cookies. That chilling time feels like forever when you're excited to start cutting shapes, but it's absolutely worth waiting for. The dough handles so much better when properly chilled, and your cookies will look exactly like your cookie cutters instead of abstract blobs. These have become the cookies that everyone requests year after year, and making them has become one of my favorite ways to celebrate the season with my family.
Frequently Asked Questions
- → How long do I need to chill the dough?
- Chill the dough for 1-2 hours until it's firm enough to roll out without sticking.
- → Can I make these cookies ahead of time?
- Yes! Store decorated cookies in a container for up to 3 days or freeze them for longer storage.
- → What if my dough is too sticky to roll?
- Add an extra 1/4 to 1/2 cup of flour when rolling out the dough to prevent sticking.
- → How do I know when the cookies are done?
- Bake for 8-9 minutes until the bottoms are barely golden. Don't overbake or they'll get hard.
- → What frosting works best for decorating?
- The buttercream recipe works great, but you can also use cream cheese frosting or simple cookie icing.
- → Do I need special cookie cutters?
- Halloween-themed cookie cutters work best for pumpkins, ghosts, and other spooky shapes.