
 Pin it
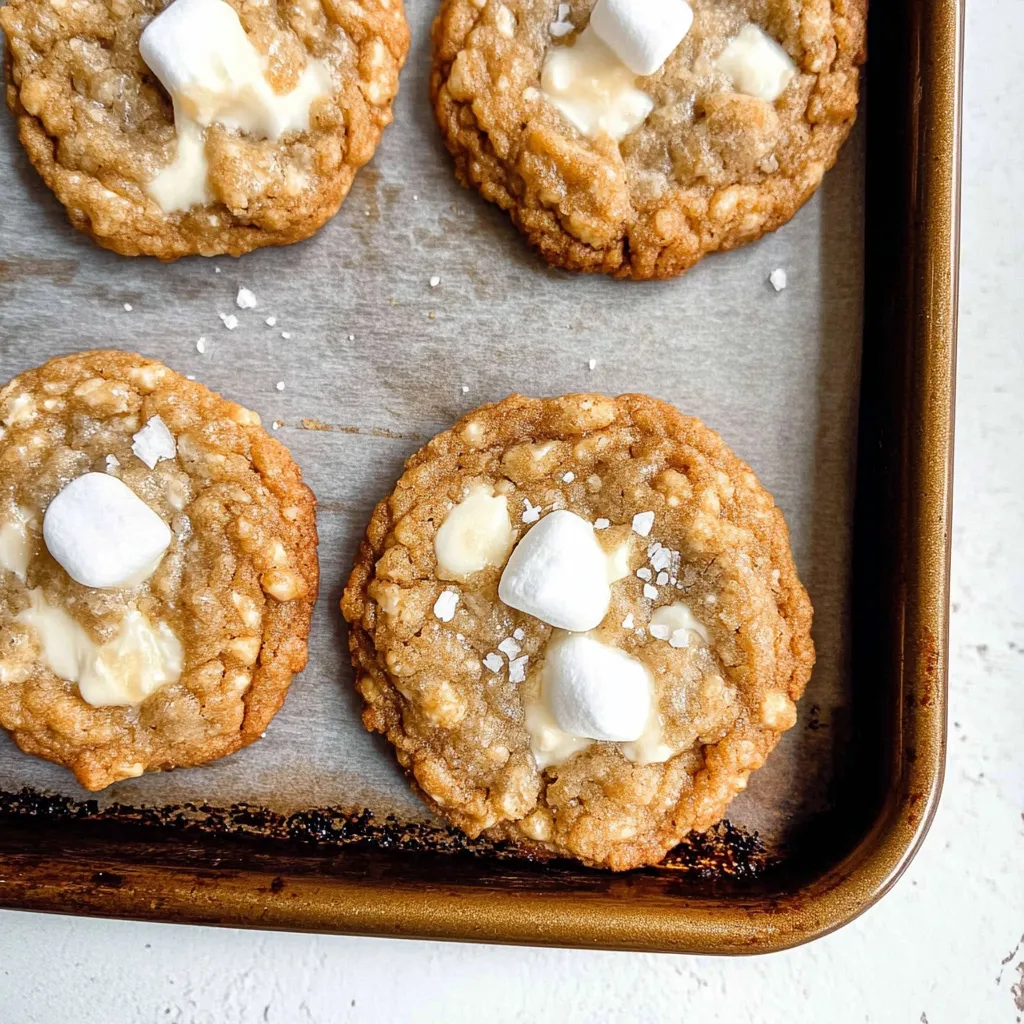
Brown butter transforms ordinary cookies into something memorable, and when you combine that nutty, caramel-like flavor with the nostalgic crunch of Rice Krispies and pillowy mini marshmallows, you end up with cookies that taste like an elevated rice krispie treat. These marshmallow crispy cookies have become somewhat legendary at Costco, where people buy them by the dozen, but making them at home means you get that fresh-from-the-oven warmth and can control exactly how golden and crispy you want the edges. The cookies bake up thin and buttery with crispy edges that give way to chewy centers studded with melted marshmallow pockets. What makes these special is that combination of textures - you get crunch from the cereal, chew from the marshmallows, and that rich brown butter flavor tying everything together. They're surprisingly simple to make with no chilling time required, which means you can go from craving to eating in under thirty minutes.
I tested this recipe seven times before I felt like I'd nailed that Costco version, and my family started complaining that they were getting tired of marshmallow cookies, which I didn't even know was possible. But then I made the final perfected batch and suddenly everyone was fighting over the last cookie again. My daughter, who normally prefers chocolate chip cookies exclusively, admitted these might be her new favorite. Even my husband, who claims he doesn't care about cookies and would rather have pie, kept sneaking extras from the cooling rack when he thought I wasn't looking.
Ingredients and What Makes Them Essential
- Unsalted Butter (½ cup, to be browned): Butter is the star here because you'll be browning it to create those complex, nutty, almost toffee-like flavors that make these cookies special. You need unsalted butter so you can control the salt level in your cookies. When you brown butter, you're cooking the milk solids until they caramelize, transforming simple butter into something much more interesting. Use a light-colored saucepan so you can see the color change as it browns.
- Light Brown Sugar (½ cup, packed): Brown sugar contains molasses which adds moisture and keeps cookies chewy rather than crispy throughout. It also contributes a deeper, more caramel-like sweetness than white sugar alone. Make sure to pack it into your measuring cup so you get the right amount. If your brown sugar has hardened into a brick, microwave it with a damp paper towel for 20 seconds to soften it.
- Granulated Sugar (¼ cup): White sugar helps cookies spread and contributes to that crispy edge texture. Using both brown and white sugar gives you the best of both worlds - chewiness from the brown sugar and crispness from the granulated sugar. The combination also creates better flavor complexity than using just one type.
- Large Egg (1, at room temperature): Eggs bind all the ingredients together and add moisture and richness. Room temperature eggs incorporate more smoothly into your dough than cold eggs. Just leave it on the counter for 30 minutes before you start baking, or place it in a bowl of warm water for 5 minutes to bring it to temperature quickly.
- Vanilla Extract (1 teaspoon): Pure vanilla extract is worth the extra cost over imitation vanilla, especially in a simple recipe like this where every flavor stands out. The vanilla rounds out the sweetness and adds depth. Make sure your bottle isn't ancient because vanilla loses potency over time.
- All-Purpose Flour (1 cup or 120 grams): Standard all-purpose flour provides the structure for these cookies. Measuring flour correctly is crucial - use the spoon-and-level method where you spoon flour into your measuring cup and level it off with a knife rather than scooping directly from the bag, which packs in way too much flour and makes cookies dry and cakey.
- Baking Soda (½ teaspoon): This leavening agent helps the cookies spread and creates a slightly crispy texture. Baking soda needs to be relatively fresh to work properly - if yours is older than six months, it might have lost its potency. You can test it by dropping a bit in vinegar - if it fizzes vigorously, it's still good.
- Salt (½ teaspoon): Salt is essential even in sweet recipes because it balances the sugar and makes all the other flavors pop. Don't skip it or your cookies will taste flat and one-dimensional. Fine sea salt or table salt both work perfectly here.
- Rice Krispies Cereal (2 cups): This is what gives these cookies their signature crunch and rice krispie treat flavor. Use the name-brand Rice Krispies if possible because generic crispy rice cereals can sometimes be stale or have an off flavor. Make sure your cereal hasn't gone soft from humidity - it should be crispy when you add it to the dough.
- Mini Marshmallows (1 ½ cups): Mini marshmallows work better than regular-sized marshmallows because they distribute more evenly throughout the cookies. They melt slightly during baking, creating pockets of gooey sweetness throughout. Don't use marshmallow bits or dehydrated marshmallows - you need the real, fluffy mini marshmallows for the right texture.
- Flaked Sea Salt (for topping, optional but recommended): A sprinkle of flaky salt on top of cookies right when they come out of the oven adds a sophisticated contrast to all that sweetness. Maldon salt or any flaky sea salt works beautifully. This isn't in the original Costco version but it takes these cookies to another level.
Step-by-Step Instructions
- Brown the Butter:
- Place ½ cup of unsalted butter (that's one stick) into a light-colored saucepan - using a light-colored pan is important because you need to see the butter changing color as it browns. Set the pan over medium heat and let the butter melt completely, swirling the pan occasionally. Once melted, the butter will start to foam and bubble as the water content evaporates. Keep cooking, swirling the pan every 15 seconds or so to ensure even cooking. You'll hear the butter crackling and popping. After about 5 to 7 minutes total, the bubbling will start to calm down and you'll notice small brown specks forming at the bottom of the pan - these are the milk solids caramelizing. The butter will smell incredibly nutty and toasted, almost like roasting hazelnuts. This is your signal that it's almost done. Watch it very carefully now because it can go from perfectly golden brown to burnt in less than a minute. Once you see those golden-brown milk solids and smell that nutty aroma, immediately remove the pan from heat and pour the brown butter into a heatproof bowl to stop the cooking process. If you leave it in the hot pan, it will continue cooking and might burn. Place the bowl in the refrigerator or freezer for about 10 minutes to cool it down to room temperature. You want it cool enough that it won't cook your egg when you mix them together, but still liquid, not solidified. If it starts to solidify, that's fine - just let it sit at room temperature for a few minutes until it's soft and spreadable again.
- Mix the Wet Ingredients:
- Once your brown butter has cooled to room temperature and is no longer hot to the touch, transfer it to a medium mixing bowl. Add your ½ cup of packed light brown sugar and ¼ cup of granulated sugar directly to the brown butter. Using a hand mixer on medium speed or a sturdy wooden spoon, beat the butter and sugars together for about 1 minute until they're well combined and slightly fluffy. The mixture should lighten in color slightly and look creamy. Now crack in your room-temperature egg and add 1 teaspoon of vanilla extract. Mix on low speed for about 30 seconds until everything is smooth and completely incorporated. You shouldn't see any streaks of egg or unmixed butter. The mixture will look thick and glossy at this point. Scrape down the sides of the bowl with a spatula to make sure everything is evenly mixed.
- Add the Dry Ingredients:
- In a separate small bowl, whisk together 1 cup of all-purpose flour, ½ teaspoon of baking soda, and ½ teaspoon of salt. This whisking step ensures the leavening and salt are evenly distributed throughout the flour so you don't get pockets of baking soda or salt in your finished cookies. Pour this dry mixture into your bowl with the wet ingredients. Using your mixer on the lowest speed or switching to a wooden spoon or spatula, mix the dry ingredients into the wet ingredients slowly and gently. Mix only until you stop seeing dry flour pockets - this should take maybe 15 to 20 seconds of gentle mixing. Don't overmix or beat the dough at this stage because that develops gluten which makes cookies tough and cakey instead of tender. The dough should look thick and slightly shaggy, and that's perfect.
- Fold in the Mix-ins:
- Add your 2 cups of Rice Krispies cereal to the cookie dough. Using a silicone spatula or wooden spoon, fold them in gently, pressing and folding rather than stirring vigorously. You want to incorporate the cereal throughout the dough without crushing it into dust. Some of the Rice Krispies will break slightly as you fold them in, which is normal, but try to keep most of them intact for that signature crunch. Once the cereal is fairly evenly distributed, add your 1 ½ cups of mini marshmallows. Fold these in gently as well, making sure they're distributed throughout the dough. The marshmallows will be sticky and might clump together a bit, so use your spatula to separate them as you fold. Don't worry if the dough looks very full and packed with mix-ins - that's exactly right. These cookies are more mix-ins than dough, which is what makes them so fun to eat.
- Shape and Arrange the Cookies:
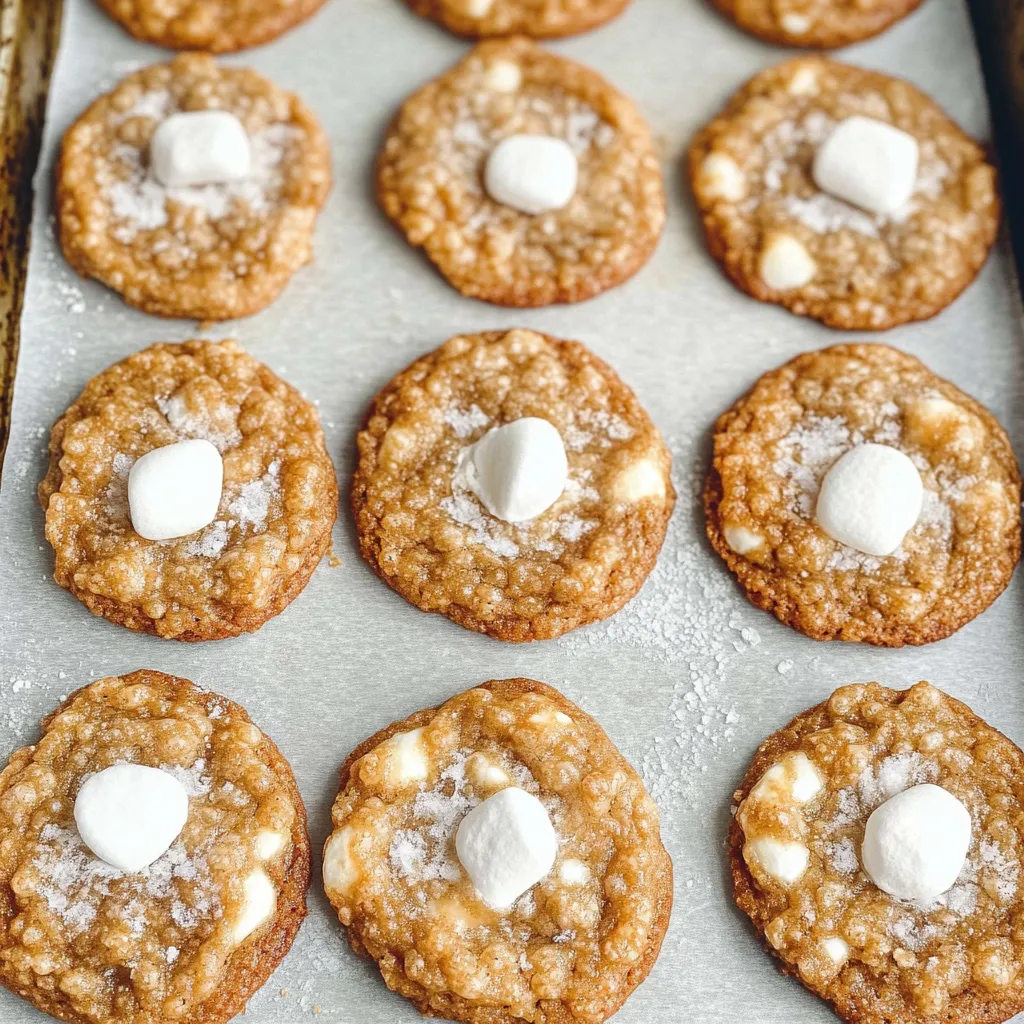
- Preheat your oven to 350°F and line two large baking sheets with parchment paper or silicone baking mats. These cookies spread significantly during baking, so you need to give them plenty of space. Using a 3-tablespoon cookie scoop or a regular spoon, scoop out large portions of dough. If using a spoon, the dough balls should be about the size of a golf ball or slightly larger. Roll each scoop between your palms briefly to make them into balls, though they don't need to be perfectly smooth. Place only 4 to 5 cookie dough balls per baking sheet, spacing them at least 3 inches apart in all directions. If you crowd them, they'll spread into each other during baking and you'll end up with one giant cookie sheet instead of individual cookies. Because these cookies spread so much and bake thin, you want to start with fairly large dough balls so your finished cookies aren't tiny. Don't flatten the dough balls - leave them as rounds and they'll flatten themselves during baking.
- Bake the Cookies:
- Slide one baking sheet into your preheated 350°F oven, placing it in the center rack for even heat distribution. Set a timer for 10 minutes. These cookies bake quickly, so don't walk away - stay nearby and check on them. At the 10-minute mark, open the oven and take a look. You're watching for the edges to turn light golden brown while the centers still look slightly underdone and puffy. The marshmallows will have spread out and might look a bit melted on top. If the edges aren't golden yet, continue baking, checking every minute. The total time will be somewhere between 10 to 13 minutes depending on your oven, but most will be done around 11 minutes. Don't overbake these - they should look like they could use another minute when you take them out. They'll continue baking on the hot pan after you remove them from the oven, and if you wait until they look completely done, they'll end up overdone and crunchy throughout instead of having that chewy center. Remove the baking sheet from the oven and immediately sprinkle the cookies with flaked sea salt while they're still hot so it sticks. Let the cookies cool on the baking sheet for 5 minutes - they'll firm up during this time. Then use a spatula to transfer them to a wire cooling rack. Repeat with the second batch of cookies, making sure your baking sheet has cooled down completely between batches or your cookies will spread too much.
 Pin it
My kids have been begging me to make these cookies non-stop since I perfected the recipe. My youngest, who's usually my pickiest eater, announced these are his "favorite food in the whole world," which I know is dramatic but also pretty much the highest compliment a seven-year-old can give. My teenage daughter made me promise to bake them for her birthday party instead of a traditional cake, and when I served them, her friends literally asked if they could take some home. Even my mother, who's from the generation that thinks store-bought is somehow fancier than homemade, admitted these taste better than the Costco version, and getting her to acknowledge homemade anything is superior to store-bought is basically a miracle.
Understanding Cookie Spread and Thickness
Why some cookies spread thin while others stay thick and puffy comes down to several factors working together. The temperature of your fat is crucial - liquid or soft fat spreads more than cold, solid fat. Using brown butter, which is liquid, means these cookies spread significantly during baking. The ratio of sugar to flour also matters - more sugar creates more spread because sugar melts and liquefies in the heat. These cookies have a high sugar-to-flour ratio, contributing to that thin, crispy texture. Leavening agents play a role too - baking soda causes spread, while baking powder creates lift. Using only baking soda means these cookies spread rather than puff up. The oven temperature affects spread as well - baking at 350°F gives cookies time to spread before the edges set, while higher temperatures set the edges quickly, preventing spread. If you prefer thicker cookies, you can add 2 to 3 tablespoons extra flour, chill the dough for 30 minutes before baking, or bake at 375°F instead of 350°F. Each of these adjustments reduces spread slightly.
The Magic of Brown Butter in Baking
Brown butter deserves its reputation as a flavor upgrade in virtually any baked good. When you heat butter to around 250°F, the milk proteins and sugars in those milk solids undergo chemical reactions that create over 100 new flavor compounds. These compounds taste nutty, toasted, caramel-like, and even slightly savory. The French call brown butter "beurre noisette," meaning hazelnut butter, because of that distinctive nutty aroma. Once you start using brown butter in cookies, it's hard to go back to regular melted butter because the depth of flavor is so much greater. The trade-off is that brown butter requires attention and active cooking - you can't just throw butter in the microwave and walk away. You need to stand at the stove, watch it carefully, and remove it at exactly the right moment. The window between perfectly browned and burnt is small, maybe 30 seconds, so it demands your focus. But that few minutes of attention pays off exponentially in the final flavor of your cookies.
Why Rice Krispies Work Better Than Other Cereals
You might wonder if you could substitute corn flakes, Cheerios, or any other cereal in these cookies, and the answer is that you could, but the results would be significantly different. Rice Krispies have a unique structure created by their puffing process - they're full of tiny air pockets that create an incredibly light, crispy texture when you bite into them. They also have a neutral flavor that doesn't compete with the other cookie ingredients. Corn flakes are denser and have a stronger corn flavor that would dominate. Cheerios would add oat flavor and have a different crunch entirely. Puffed wheat or puffed rice might work similarly to Rice Krispies, but they're harder to find. The size of Rice Krispies is also perfect - they're small enough to distribute evenly throughout the dough but substantial enough that you get that satisfying crunch in every bite. Using a different cereal fundamentally changes what these cookies are, so if you're trying to recreate that Costco flavor and texture, stick with actual Rice Krispies.
The Role of Marshmallows Beyond Sweetness
Marshmallows do more than just add sweetness to these cookies. Their unique composition of sugar, water, and gelatin creates interesting textural effects during baking. As the cookies bake, the marshmallows soften and partially melt, creating pockets of gooey sweetness that stay tender even after the cookies cool. The gelatin in marshmallows provides a chewy texture that's different from the chew you get from brown sugar or eggs. When marshmallows heat up, they also puff slightly before melting, which can create interesting bubbles and texture on the surface of your cookies. Mini marshmallows work better than regular-sized ones because they're already bite-sized and distribute more evenly throughout the dough. If you tried to use regular marshmallows, you'd need to cut them up, and they'd still create larger pockets that might burn on the outside before the cookie is done. The ratio of marshmallow to dough is important too - too many marshmallows and your cookies fall apart, too few and you lose that signature marshmallow flavor and texture.
Storage Methods and Keeping Cookies Fresh
Proper storage makes the difference between cookies that stay delicious for days versus cookies that turn stale or hard overnight. These marshmallow crispy cookies should be stored in an airtight container at room temperature, never in the refrigerator which will dry them out. Layer parchment paper between cookie layers if you're stacking them to prevent sticking. They'll stay fresh and maintain their texture for 2 to 3 days, though honestly, they taste best the day they're baked when that contrast between crispy edges and chewy centers is most pronounced. If you want to keep them longer, freezing is your best option. Place cooled cookies in a single layer in a freezer-safe container or bag, separating layers with parchment paper. Frozen cookies will keep for 2 to 3 months and taste remarkably fresh after thawing at room temperature for about 30 minutes. You can also freeze the cookie dough balls on a baking sheet until solid, then transfer them to a freezer bag. When you want fresh cookies, bake them straight from frozen, adding just 1 to 2 minutes to the baking time. Some people actually prefer baking from frozen because the dough stays cold longer, preventing excessive spreading.
Troubleshooting Common Cookie Problems
When these cookies don't turn out right, there's always a fixable reason. If your cookies spread too thin and turned into lacy, crispy discs with holes, your butter was probably too warm when you mixed it, you used too much butter, or you didn't measure your flour accurately. Make sure the brown butter is cooled to room temperature before mixing, and always use the spoon-and-level method for measuring flour. If the cookies didn't spread at all and stayed in tall domes, your butter might have solidified too much in the fridge or you added too much flour. Next time, make sure the butter is soft and spreadable before mixing. If the marshmallows all melted and disappeared, your oven was too hot or you overbaked them - marshmallows should soften and get gooey but still be visible. If the cookies taste bland, you probably forgot the salt or vanilla, both of which are essential for flavor even though they seem like small amounts. If the Rice Krispies got soggy instead of staying crispy, your cereal might have been stale to begin with, or moisture from humid air softened them - bake and serve these cookies the same day for best texture.
Making These Cookies Your Own
Once you've mastered the basic recipe, these cookies become a template for creativity. You can add ½ cup of chocolate chips along with the marshmallows for a s'mores vibe. Swap the vanilla extract for almond extract for a different flavor profile. Use fruity cereal like Fruity Pebbles instead of Rice Krispies for a colorful, fruit-flavored variation. Add ½ teaspoon of cinnamon to the dough for warmth. Use colored marshmallows for holidays - red and green for Christmas, pastels for Easter. Drizzle melted chocolate over the cooled cookies for extra indulgence. Press a few extra marshmallows on top of each dough ball before baking so they toast and get slightly browned. Mix in ½ cup of peanut butter or cookie butter with the brown butter for nutty richness. The base recipe is flexible enough to handle these additions without falling apart. Just remember that any add-ins increase the volume of mix-ins relative to dough, so if you're adding chocolate chips or other extras, you might need to add 1 to 2 tablespoons more flour to compensate and keep the cookies from spreading into puddles.
 Pin it
After making countless batches of these cookies while perfecting the recipe, I can confidently say they've earned their place among my top five favorite cookies of all time. The brown butter step might seem like extra work compared to just melting butter in the microwave, but those few minutes of active attention create flavor that you simply cannot achieve any other way. The combination of crispy cereal, gooey marshmallows, and that rich brown butter dough hits every texture and flavor note that makes cookies irresistible. They're impressive enough to serve to guests but easy enough to make on a random Tuesday when you're craving something sweet. Whether you're trying to recreate the Costco version at home or just looking for a fun cookie recipe that's different from your usual chocolate chip rotation, these marshmallow crispy cookies deliver every single time. The first bite, where you get that initial crunch from the cereal followed by the chew from the marshmallow and then that buttery, caramel-toned cookie base, is genuinely one of the most satisfying cookie experiences you can have.
Frequently Asked Questions
- → Do I need to chill the dough before baking?
- Nope! You can scoop and bake right away. Just cool the brown butter for 10 minutes and you're good to go.
- → Why are my cookies spreading too much?
- These are meant to be thin cookies that spread. Make sure you're only putting 4-5 per sheet and that your butter has cooled properly before mixing.
- → Can I make these cookies thicker?
- Yes! Add an extra 2 tablespoons of flour to the dough if you prefer a thicker, puffier cookie.
- → How do I know when the butter is properly browned?
- It should turn a golden amber color and smell nutty. Watch it closely because it goes from perfect to burnt quickly. It takes about 5-7 minutes.
- → How should I store these cookies?
- Keep them in an airtight container at room temperature for up to 5 days. They stay crispy on the edges and chewy in the middle.
- → Can I use regular marshmallows instead of mini ones?
- Mini marshmallows work best because they distribute more evenly. If using regular, cut them into smaller pieces first.