
 Pin it
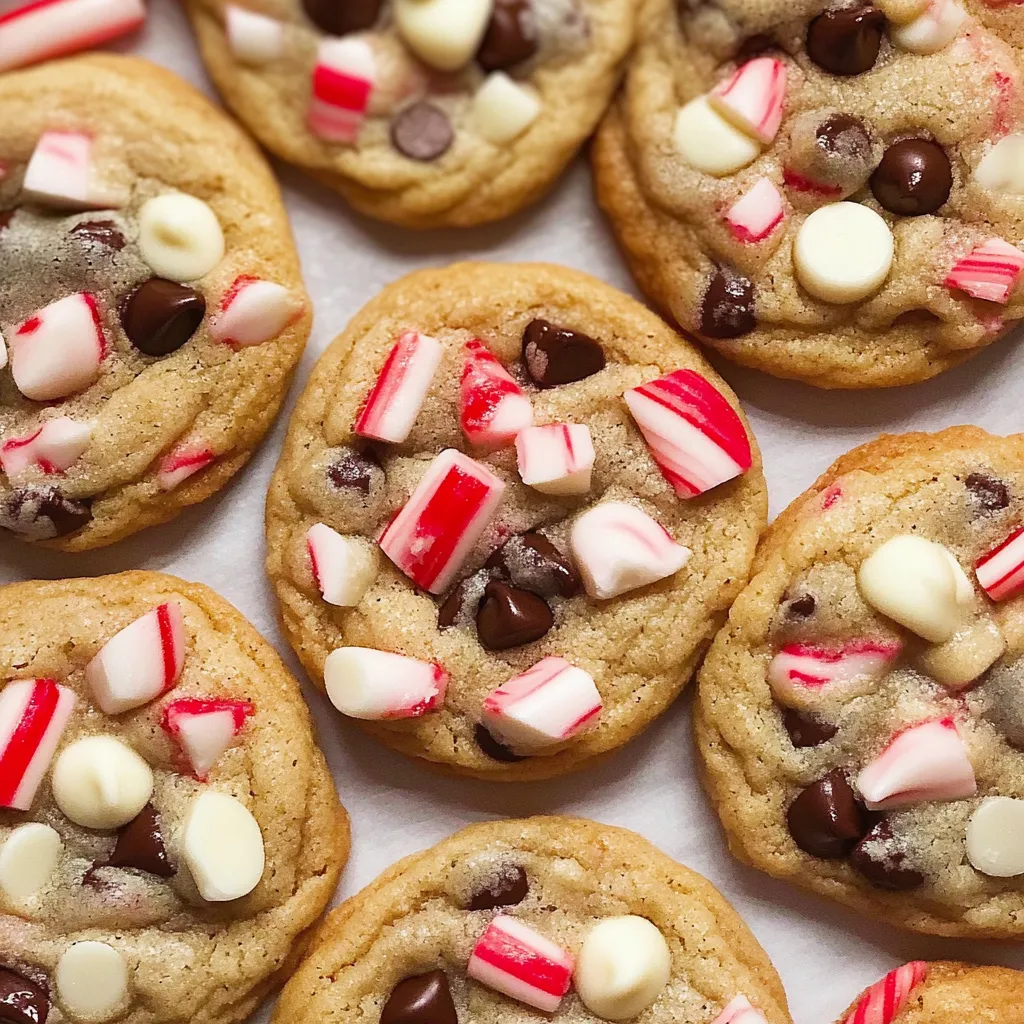
These peppermint chocolate chip cookies have been my most-requested holiday recipe for nearly a decade, and every single time I make them, people ask if I'll share how I got them so perfectly chewy with that amazing candy cane crunch. The combination of chocolate and peppermint just screams Christmas in the best possible way, and watching crushed candy canes melt slightly into the warm cookies creates these beautiful streaks of red and white that look almost too festive to eat. My son gets so excited when I bring out the candy canes to crush that he practically vibrates with anticipation, and honestly, smashing candy canes in a bag with a rolling pin is pretty therapeutic for adults too.
I've brought these to every holiday gathering for the past ten years, and they're always the first cookies to disappear from the platter. Last year at our neighborhood cookie swap, three different people cornered me asking for the recipe, and one woman admitted she ate five of them on her way home because she couldn't stop herself.
Ingredients You'll Need
- Unsalted butter: (softened to room temperature) - Creates that rich, tender cookie base and needs to be soft enough to leave a fingerprint when you press it but not so mushy that it collapses completely; salted butter works if that's all you have, just cut the added salt in half
- Granulated sugar and brown sugar: Using both gives you the best texture with the granulated creating crisp edges while brown sugar adds moisture and chewiness plus a hint of caramel flavor
- Large egg: (room temperature) - Binds everything together and adds structure, and room temperature eggs incorporate more smoothly into the butter mixture without leaving streaks or lumps
- Pure vanilla extract: Enhances all the flavors and adds warmth that balances the cool peppermint beautifully; you can add a quarter to half teaspoon of peppermint extract too if you want even more mint punch
- All-purpose flour: (measured carefully) - Forms the structure of your cookies, and accurate measurement is crucial because too much makes them dense and cakey while too little makes them spread into flat puddles
- Baking soda: (fresh and not expired) - Provides lift and that perfect chewy texture, but old baking soda loses its power and results in flat, disappointing cookies
- Salt: Balances the sweetness and makes all the other flavors pop instead of tasting one-dimensional; if using salted butter, reduce this by half
- Candy canes or peppermint candies: (crushed into small pieces) - This is what makes these special, adding bursts of minty crunch throughout; crush them small to prevent them from melting and running during baking
- Dark chocolate chips and white chocolate chips: The combination looks beautiful and gives you both rich dark chocolate flavor and sweet creamy white chocolate; you can use all one type or substitute milk chocolate or even seasonal peppermint chips
Step-by-Step Instructions
- Cream the butter and sugars until light and fluffy:
- Place your softened butter in the bowl of your stand mixer fitted with the paddle attachment, or in a large mixing bowl if using a hand mixer, and add both the granulated sugar and brown sugar on top. Beat these together on medium speed for a full three minutes, which seems like a long time but is absolutely necessary for creating the right texture. You'll watch the mixture transform from looking grainy and yellow to becoming pale, almost white, and noticeably fluffier as air gets incorporated into the fat. This creaming process is what gives your cookies that perfect lift and tender crumb, so don't rush it or skip it even though your arm might get tired if you're using a hand mixer. The mixture should look light and airy, almost like frosting, with the sugar granules mostly dissolved into the butter.
- Add the egg and vanilla and beat until smooth:
- Crack your room temperature egg directly into the butter mixture, followed by your vanilla extract, then beat everything together on medium speed until the egg is completely incorporated and you have a smooth, uniform mixture with no visible streaks of egg yolk. Stop the mixer halfway through and use a rubber spatula to scrape down the sides and bottom of the bowl, making sure no pockets of unmixed butter are hiding there. The mixture should look creamy and cohesive, with a slightly lighter color than it had before adding the egg, and it should be smooth enough that you can't see any separate ingredients.
- Whisk together your dry ingredients separately:
- In a medium bowl, combine your all-purpose flour, baking soda, and salt, then use a whisk to mix them together thoroughly for about thirty seconds. This whisking step ensures that the baking soda and salt get evenly distributed throughout the flour, which means every cookie will have the same amount of leavening and seasoning instead of some being flat and others over-risen. Breaking up any clumps in the flour now prevents lumps in your finished dough, and aerating the flour by whisking makes it easier to incorporate without overmixing.
- Add dry ingredients to wet ingredients carefully:
- With your mixer on the lowest speed possible, slowly add your flour mixture to the wet ingredients in three or four additions, mixing just until each addition is barely incorporated before adding the next. Once all the flour is added and you can't see any more dry streaks, immediately stop mixing because this is where overmixing becomes a real problem. If you continue beating after the flour is incorporated, you develop too much gluten in the dough, which makes cookies tough, dense, and flat instead of tender and chewy. The dough should look cohesive and slightly shaggy, pulling away from the sides of the bowl but not completely smooth.
- Fold in chocolate chips and crushed candy canes:
- Add your dark chocolate chips, white chocolate chips, and crushed candy canes to the bowl all at once, then use a sturdy spatula or wooden spoon to fold them through the dough manually instead of using the mixer. Folding by hand prevents overmixing and ensures the mix-ins get distributed evenly without breaking them into smaller pieces. Make sure to scrape the bottom of the bowl as you fold because chocolate chips love to hide down there, and you want every cookie to have a good amount of both chips and candy cane pieces throughout.
- Scoop and chill the cookie dough:
- Use a cookie scoop or two spoons to portion out the dough into balls about one and a half inches in diameter, roughly the size of a golf ball, and place them on a plate or small baking sheet. Before you arrange them on your baking sheet, check each ball for large pieces of candy cane sticking out near the edges, and either press those pieces deeper into the dough or pull them out because exposed candy near the edges melts and runs during baking. Cover your portioned dough with plastic wrap and refrigerate for at least thirty minutes, or up to two hours, which solidifies the fats and prevents the cookies from spreading too much in the oven. If you chill them longer than two hours, let them sit at room temperature for about ten minutes before baking so they're not going into the oven rock-hard.
- Arrange on baking sheet and bake until golden:
- Line your baking sheets with parchment paper and arrange your chilled dough balls about two inches apart, giving them room to spread without running into each other. Slide the sheet into your preheated oven and bake for about ten to twelve minutes, watching carefully during the last few minutes to catch them at that perfect moment when the edges just start turning golden brown but the centers still look slightly underdone. They'll continue cooking on the hot pan after you remove them from the oven, so pulling them out when they look barely done ensures they stay soft and chewy instead of becoming hard and crispy.
- Shape and decorate while still warm:
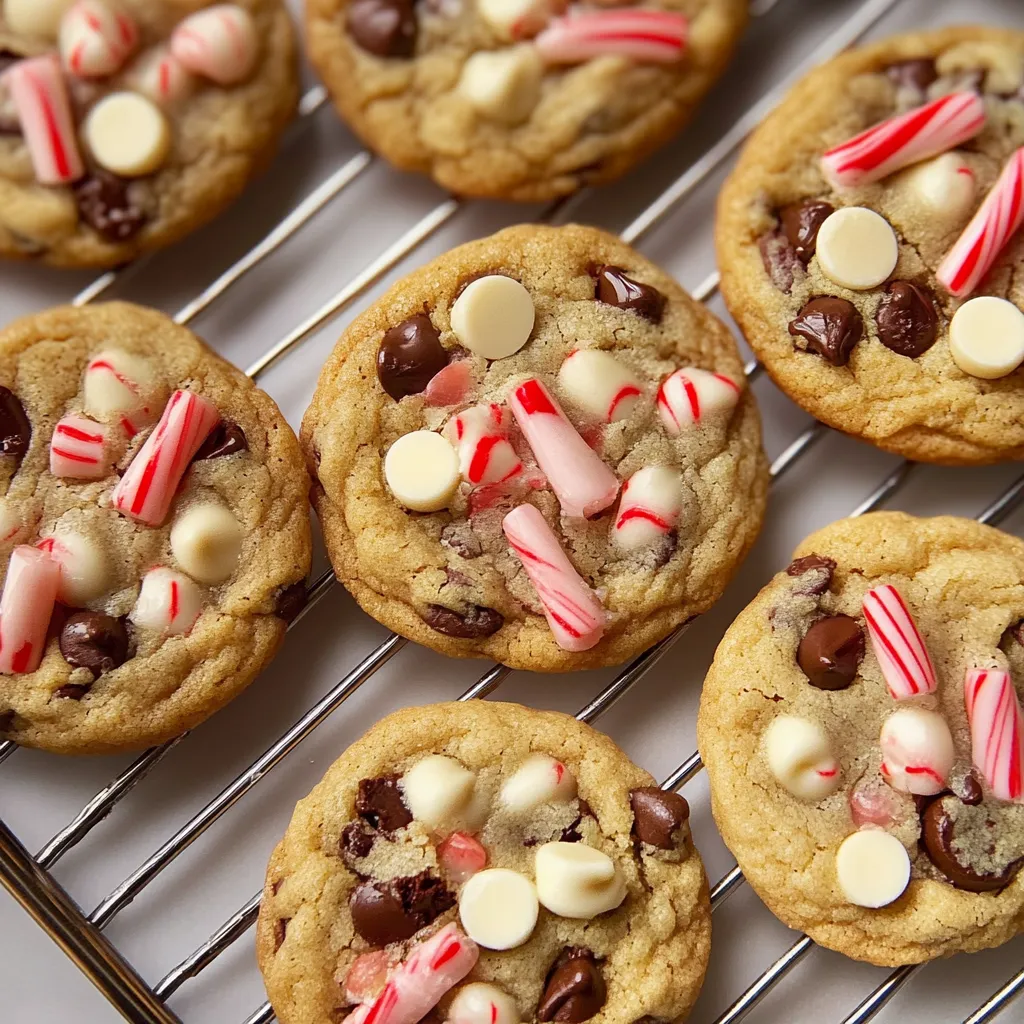
- As soon as the cookies come out of the oven, you can use a large round cookie cutter or wide-mouth jar lid to gently shuffle each cookie in a circular motion, which pushes any uneven edges back into a perfect circle and makes them look professional and bakery-worthy. While they're still hot and the chocolate is melty, press a few extra chocolate chips and small pieces of candy cane into the tops to make them extra pretty and photogenic, which is completely optional but makes them look more impressive. Let the cookies cool on the baking sheet for about five minutes so they firm up enough to move without breaking, then carefully transfer them to a wire cooling rack to cool completely.
 Pin it
My family has made these together every Christmas Eve for years, and the tradition of letting my kids crush the candy canes has become as important as the cookies themselves. Last year my daughter announced she was too old to help with cookies, then showed up in the kitchen the moment she heard the candy canes rattling in the bag because she couldn't resist being part of it.
Understanding Cookie Dough Temperature
The temperature of your dough at every stage dramatically affects how your cookies turn out, which is why so many of the instructions focus on getting temperatures right. When you cream butter and sugar, the butter needs to be soft enough to beat but not so warm that it's greasy, because butter that's too warm won't hold air properly during creaming. Room temperature eggs blend more smoothly and evenly than cold eggs straight from the fridge, preventing streaks and ensuring uniform texture. Chilling the shaped dough before baking gives the flour time to fully hydrate and the fats time to solidify, which means the cookies spread more slowly in the oven and maintain that thick, bakery-style shape instead of becoming thin and flat.
Preventing Candy Cane Meltdown
The biggest challenge with these cookies is controlling how the candy canes behave during baking, and I've learned through many batches exactly how to minimize the melting and running. Crushing them into very small pieces is your first line of defense because large chunks have more surface area to melt and create those sticky puddles around your cookies. Checking each dough ball for exposed candy near the edges before baking prevents most of the running issues, since candy that's tucked inside the dough stays mostly intact while exposed pieces melt. The candy canes that do melt create pretty streaks and add extra peppermint flavor, so even when some running happens, it's not a disaster, just slightly less picture-perfect.
Achieving the Perfect Texture
That ideal soft and chewy texture with slightly crisp edges comes from several factors working together, and understanding them helps you troubleshoot if something goes wrong. Using a combination of granulated and brown sugar gives you the best of both worlds, with brown sugar's moisture keeping centers soft while granulated sugar helps create those crisp edges. Not overbaking is absolutely critical because cookies continue cooking on the hot pan after leaving the oven, so they should look slightly underdone when you pull them out. The chilling step also contributes to texture by giving you thicker cookies that take longer to bake through, which allows the edges to set before the centers overcook.
Customizing Your Chocolate Choices
While I love the combination of dark and white chocolate chips for both flavor and appearance, you can absolutely adjust the chocolate situation to match your preferences or what you have on hand. All dark chocolate gives you a more sophisticated, less sweet cookie that appeals to adults who find white chocolate too sugary. All milk chocolate creates a classic, crowd-pleasing flavor that kids especially love. Those seasonal peppermint chips that appear around the holidays add even more mint flavor and look beautiful scattered throughout. You could even chop up peppermint bark and fold that in for extra texture and visual interest, or press small squares of it into the tops of warm cookies for a dramatic presentation.
Storage and Freezing Strategies
These cookies store beautifully at room temperature in an airtight container, staying soft and chewy for up to five days, though they're honestly at their absolute best within the first two days after baking. If you want to stock up for holiday entertaining or make them ahead for gifts, freezing works perfectly either as baked cookies or as raw dough. For baked cookies, layer them with parchment paper between each layer so they don't stick together, and they'll keep frozen for two months before starting to lose quality. I actually prefer freezing the dough as portioned balls because then I can bake fresh cookies whenever I want without committing to a full batch, and they bake beautifully straight from frozen with just a couple extra minutes in the oven.
Troubleshooting Flat Cookies
Flat cookies are frustrating but usually easy to fix once you identify what went wrong, and the most common culprits are pretty straightforward. Too little flour is the number one cause, which happens when you scoop the measuring cup directly into the flour bag and pack in way more than the recipe intended. Warm dough spreads excessively before the structure sets, so if you skipped the chilling or let the dough sit out too long, your cookies will spread into thin discs. Overmixing the dough after adding flour develops too much gluten and can lead to flat, tough cookies that spread instead of rising. Old baking soda simply won't create the lift your cookies need, leaving them dense and flat no matter what else you do right.
 Pin it
These peppermint chocolate chip cookies have become so intertwined with my family's holiday traditions that December wouldn't feel complete without them filling the house with that incredible smell of chocolate and mint. The combination of being easy enough for kids to help make while still impressive enough for fancy cookie exchanges makes them the perfect holiday cookie, and after ten years of making them annually, I still get excited when that first batch comes out of the oven looking picture-perfect with their candy cane streaks and melty chocolate.
Frequently Asked Questions
- → Can I make the dough ahead of time?
- Yes, you can chill the dough for up to 3 days before baking. Just let it sit out for 10-15 minutes before scooping if it's been in the fridge for more than 2 hours.
- → Why do my cookies spread too much?
- Make sure you chill the dough for at least 30 minutes and cream the butter and sugar for the full 3-4 minutes. If they still spread, add 1-2 tablespoons more flour.
- → How do I keep the candy canes from melting everywhere?
- Crush the candy canes really fine and check the edges of each dough ball before baking. Push any big pieces into the center or remove them from the edges.
- → Can I use regular chocolate chips instead of dark?
- Absolutely! You can use any combination of chocolate chips you like - all dark, all milk chocolate, or all white chocolate works great.
- → How do I store these cookies?
- Keep them in an airtight container at room temperature for up to 5 days. You can also freeze the baked cookies for up to 3 months.
- → Do I have to use a kitchen scale for the flour?
- No, but it helps with consistency. If you're measuring by cups, keep extra flour handy in case your dough seems too wet or sticky.