
 Pin it
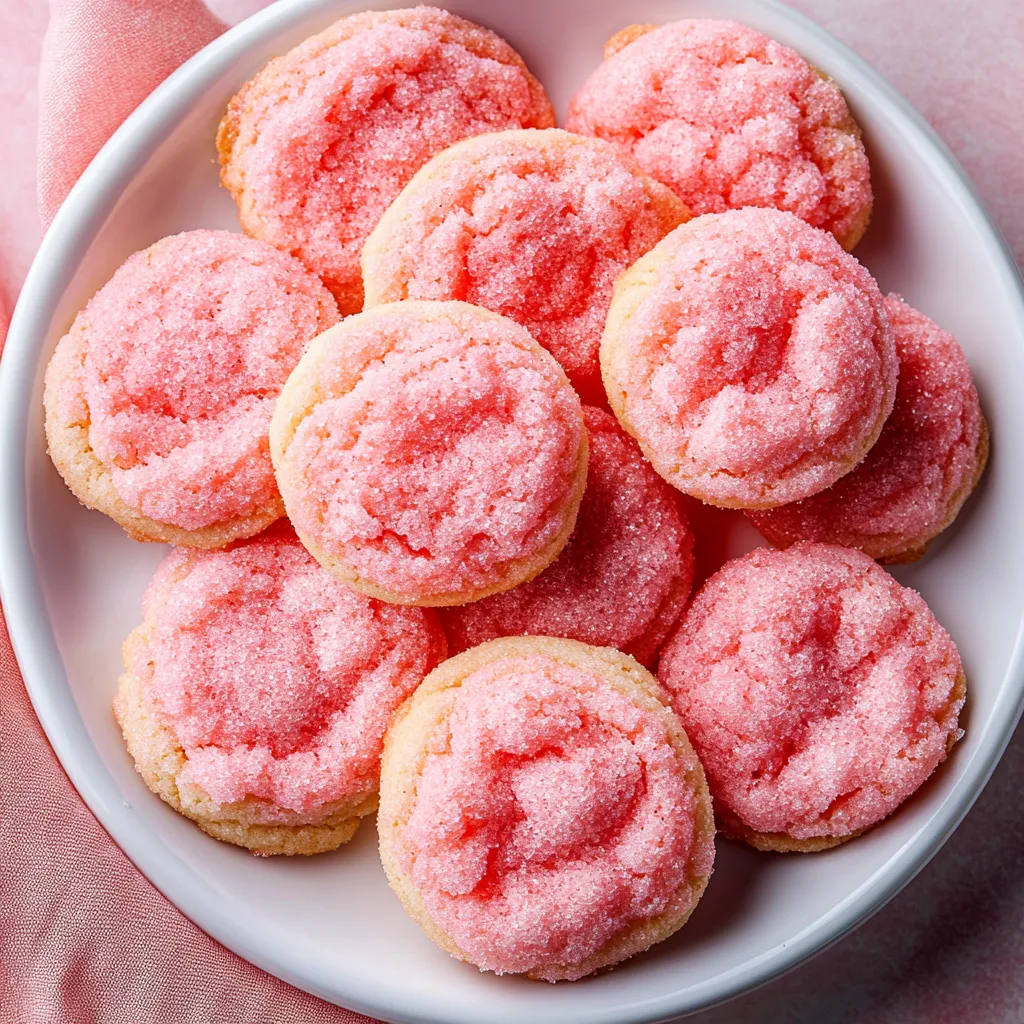
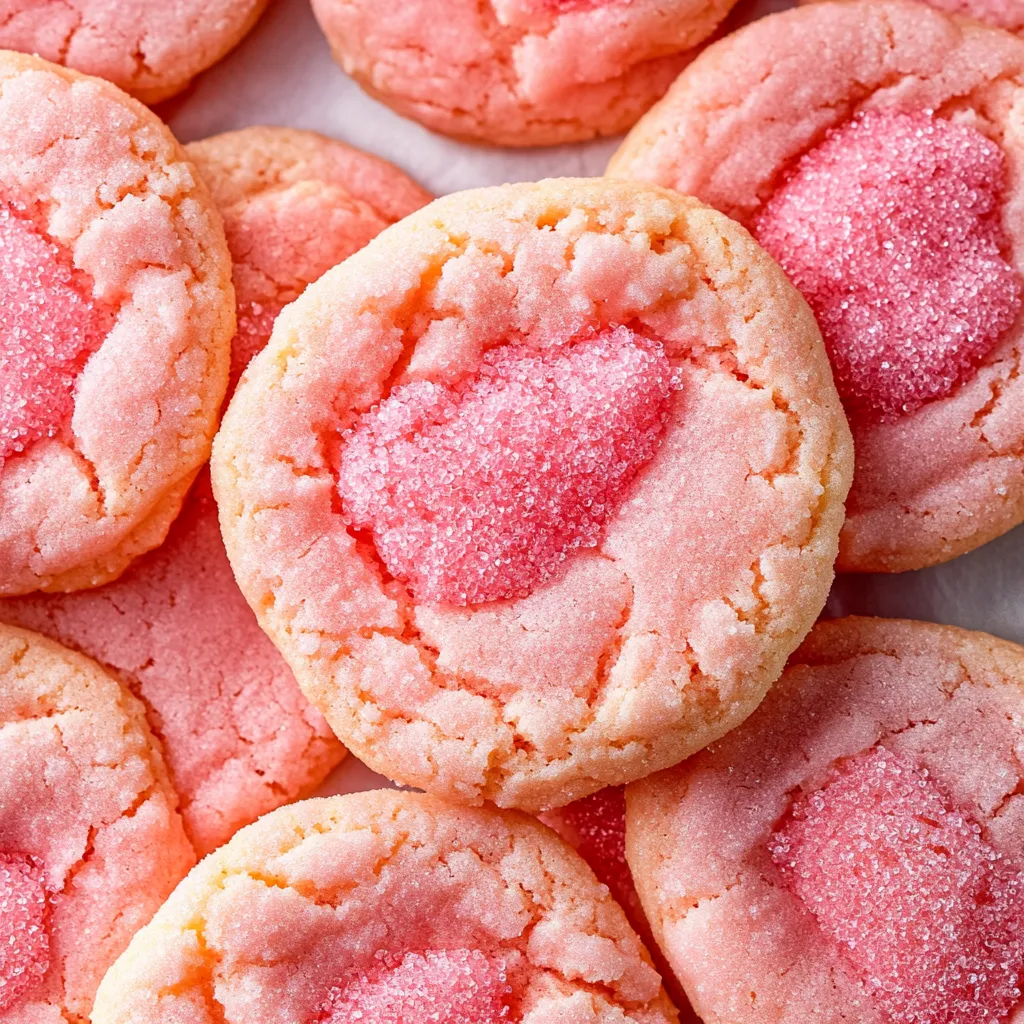
Strawberry sugar cookies are one of those nostalgic childhood treats that seem simple on the surface but require precise technique to get right - the grocery store versions that looked so appealing with their bright pink color and sugar coating taste better in memory than reality once you're an adult with refined palate. These homemade versions capture that visual appeal and nostalgic flavor while actually tasting good, using strawberry extract for consistent fruit flavor without the moisture issues that fresh strawberries would create. The cookies themselves are soft and chewy with slightly crisp edges from rolling in granulated sugar before baking, while a coating of pink decorating sugar adds textural crunch and makes them look festive enough for Valentine's Day or summer parties. What makes these particularly worth making from scratch is how the strawberry flavor tastes authentic rather than artificial, the texture stays soft for days instead of turning hard and cakey, and the bright pink color comes from gel food coloring that won't throw off the dough consistency like liquid food coloring would.
I've been trying to recreate the strawberry sugar cookies from my childhood grocery store for probably fifteen years, testing countless variations that never quite captured that specific flavor and texture I remembered. Some attempts were too cakey, some used strawberry cake mix which tasted wrong, some used freeze-dried strawberries that made the texture grainy. After probably twenty failed batches, I finally figured out that strawberry extract was the key to consistent flavor, and that the dough needed chilling to prevent spreading. Now these taste even better than my childhood memories, which almost never happens when you try to recreate nostalgic foods as an adult.
Ingredients and What Makes Them Essential
- White Granulated Sugar (1½ cups, divided): Sugar sweetens the cookies and creates tender texture by interfering with gluten development. You'll use most of it in the dough and some for rolling the cookies. The sugar coating also creates a slightly crunchy exterior that contrasts with the soft interior.
- Salted Butter (¾ cup, 1½ sticks, room temperature): Butter provides richness, flavor, and creates tender texture. It must be at room temperature - not melted, not cold - so it creams properly with the sugar. If using unsalted butter, add ¼ teaspoon extra salt to the recipe.
- Large Egg (1, room temperature): Egg binds everything together and adds moisture and structure. Room temperature eggs incorporate more smoothly than cold eggs. If your egg is cold, place it in warm water for 5 minutes to warm it up.
- Strawberry Extract (1 teaspoon): Strawberry extract provides concentrated fruit flavor without adding moisture. It's clear or slightly pink and tastes authentically like strawberries. You can find it at grocery stores in the baking aisle or on Amazon. Don't substitute with strawberry flavoring which tastes artificial.
- Pure Vanilla Extract (½ teaspoon): Vanilla enhances all the other flavors and adds aromatic depth. Use pure vanilla extract, not imitation, which tastes chemical and harsh.
- Americolor Deep Pink Gel Food Coloring (1-2 drops): Gel paste food coloring creates vibrant color with minimal liquid that won't affect dough consistency. Americolor is a professional-grade brand that's intense, so you only need one or two drops. If using liquid food coloring, you'll need more and it might make the dough slightly wetter.
- All-Purpose Flour (2¼ cups): Flour provides structure. Use the spoon-and-level method to measure - spoon flour into your measuring cup and level it off with a knife rather than scooping directly, which packs in too much flour and makes cookies dry and dense.
- Baking Soda (½ teaspoon): Baking soda provides leavening and helps cookies spread slightly. It also contributes to browning.
- Baking Powder (¼ teaspoon): Additional leavening ensures the cookies rise properly and have tender texture. The combination of baking soda and baking powder creates the perfect texture.
- Diamond Crystal Kosher Salt (½ teaspoon): Salt enhances all the other flavors and balances sweetness. If using table salt, use only ¼ teaspoon because table salt is finer and more concentrated than kosher salt.
- Pink Decorating Sugar (½ cup, for coating): Coarse decorating sugar adds visual appeal, slight crunch, and extra sweetness. You can find it in the baking aisle or online. If you can't find pink, use plain white sugar or make your own by mixing sugar with a drop of food coloring.
Step-by-Step Instructions
- Cream Butter and Sugar:
- In the bowl of a stand mixer fitted with the paddle attachment, or in a large bowl using an electric hand mixer, combine ¾ cup of room temperature butter and 1 cup of granulated sugar. Beat on medium-high speed for about 3 to 4 minutes until the mixture is light, fluffy, and pale in color. It should look almost white and have increased in volume. Scrape down the sides and bottom of the bowl with a spatula to make sure everything gets incorporated. This creaming process is crucial because it incorporates air into the butter, which helps create tender cookies. Don't rush this step - properly creamed butter and sugar should be noticeably lighter in color and texture than when you started.
- Add Egg and Flavorings:
- Add 1 egg to the creamed butter and sugar mixture and beat on medium speed for about 30 seconds until fully incorporated. Add 1 to 2 drops of Americolor Deep Pink gel food coloring - start with just one drop and add the second if you want deeper color. Add 1 teaspoon of strawberry extract and ½ teaspoon of vanilla extract. Beat on medium speed for another 30 seconds until everything is evenly combined and the dough is uniformly pink. Scrape down the bowl again to make sure the food coloring and extracts are evenly distributed throughout.
- Mix Dry Ingredients:
- In a separate medium bowl, whisk together 2¼ cups of all-purpose flour, ½ teaspoon of baking soda, ¼ teaspoon of baking powder, and ½ teaspoon of kosher salt. Whisk thoroughly to ensure the leavening agents and salt are evenly distributed throughout the flour. This step is important because it prevents pockets of baking soda or salt from creating uneven texture or flavor.
- Combine Wet and Dry:
- With your mixer on low speed, gradually add the flour mixture to the wet ingredients in the bowl. Add it in three or four additions, mixing just until each addition is incorporated before adding more. Once all the flour is added, mix on low speed just until you no longer see any streaks of flour. Don't overmix - as soon as the dough looks uniform, stop mixing. Overmixing develops gluten and makes cookies tough. The dough should be thick, uniform in color, and slightly sticky.
- Chill the Dough:
- Cover the bowl of dough tightly with plastic wrap or transfer the dough to an airtight container. Refrigerate for at least 1 hour, though 2 to 3 hours is even better. You can also make the dough a day ahead and refrigerate it overnight. Chilling is essential for two reasons: it firms up the butter so the cookies maintain their shape instead of spreading thin and flat during baking, and it allows the flour to fully hydrate which improves texture.
- Prepare for Baking:
- When you're ready to bake, preheat your oven to 350°F and position racks in the upper and lower thirds of the oven. Line two large baking sheets with parchment paper or silicone baking mats. Set up your sugar coating station: place ½ cup of granulated sugar in one small bowl and ½ cup of pink decorating sugar in another small bowl.
- Shape and Coat:
- Remove the chilled dough from the refrigerator. Using a cookie scoop or tablespoon, scoop portions of dough about 1½ tablespoons each. Roll each portion between your palms to form a smooth ball. First, roll each dough ball in the bowl of granulated white sugar, coating it completely. Then roll it in the bowl of pink decorating sugar, coating it thoroughly with the coarse pink sugar. The double coating creates better texture and more vibrant color. As you coat each ball, place it on your prepared baking sheet. Space them about 2 to 3 inches apart because they will spread during baking. You should get about 24 cookies total.
- Final Chill:
- Once all your dough balls are shaped, coated, and arranged on the baking sheets, place the entire sheets in the refrigerator for 15 minutes. This final chill right before baking is optional but helps the cookies maintain thickness and prevents excessive spreading. If you're impatient, you can skip this step, but the cookies will be slightly flatter.
- Bake:
- Place both baking sheets in the preheated 350°F oven. Bake for 10 to 12 minutes, rotating the pans and switching their positions (top to bottom, bottom to top) halfway through to ensure even baking. The cookies are done when the edges are set and just starting to turn golden, and the tops look slightly cracked but still soft. They should look slightly underbaked in the center - they'll continue cooking on the hot pan after you remove them from the oven. Don't overbake or they'll be dry and hard instead of soft and chewy.
- Cool:
- Remove the baking sheets from the oven and let the cookies cool on the pans for about 10 minutes. During this time they'll firm up and finish cooking from the residual heat. After 10 minutes, use a spatula to transfer them to a wire cooling rack to cool completely. The cookies will be quite soft when you first take them out but will firm up as they cool to that perfect soft-yet-set texture.
 Pin it
My niece is extremely picky about cookies and usually only eats store-bought ones because she claims homemade cookies "taste weird." When I made these strawberry sugar cookies and brought them to a family dinner without saying they were homemade, she ate three of them before asking where I bought them. When I told her I'd made them myself, she looked genuinely shocked and asked if I could make them for her birthday party. Having the picky eater approve of homemade cookies over store-bought feels like winning an award.
Understanding the Role of Strawberry Extract
Strawberry extract provides consistent fruit flavor without the complications that fresh or freeze-dried strawberries introduce. Fresh strawberries contain significant water that would make cookie dough too wet and require adjusting all the other ingredients. They also vary wildly in sweetness and flavor intensity depending on the season. Freeze-dried strawberries can be ground into powder and added to dough, which some bakers prefer, but they add bulk that affects texture and can create grainy mouthfeel if not ground finely enough. They also absorb moisture from the dough. Strawberry extract, like vanilla or lemon extract, is concentrated flavoring suspended in alcohol. The alcohol evaporates during baking, leaving pure strawberry flavor. It provides consistent results every time regardless of season. The flavor is clean and recognizable without being artificial-tasting like strawberry flavoring or imitation extracts. One teaspoon is sufficient to flavor the entire batch without overwhelming other ingredients.
The Science of Creaming Butter and Sugar
Properly creaming butter and sugar isn't just about mixing them together - it's a crucial step that incorporates air and creates tender texture. When you beat room temperature butter with sugar, the sugar crystals cut into the butter, creating tiny air pockets. Continued beating expands these pockets and incorporates more air, which is why the mixture becomes lighter in color and fluffier in texture. These air pockets act as leavening when the cookies bake - the heat causes the trapped air to expand, helping cookies rise. The creaming also coats flour particles with fat when you add the dry ingredients, which interferes with gluten development and creates tender rather than tough cookies. This is why the butter temperature matters so much - cold butter is too hard for sugar crystals to cut into it effectively, while melted butter contains no air pockets at all. Room temperature butter (about 65-68°F) has the perfect consistency for creaming. The 3 to 4 minute creaming time isn't arbitrary - it takes that long to properly incorporate air and create the right structure.
Why Chilling Cookie Dough Improves Results
Chilling cookie dough before baking serves multiple important purposes that significantly impact the final product. First, it firms up the butter, which means cookies maintain their shape better during the initial minutes of baking before the structure sets. Without chilling, soft butter spreads quickly, creating thin, flat cookies with crispy edges and no soft center. Second, chilling gives flour time to fully hydrate as it absorbs moisture from the wet ingredients. Fully hydrated flour creates better texture and more tender crumb. Third, chilling allows flavors to meld and develop - the extracts distribute more evenly and the overall taste improves. Fourth, cold dough is easier to handle and shape, especially when rolling into balls. The dough is less sticky and holds its shape better. Fifth, chilled dough produces thicker cookies with better texture contrast between crispy edges and soft centers. The minimum chilling time is one hour, but overnight chilling produces even better results. Some bakers chill dough for several days, which creates the most developed flavor.
The Function of Multiple Leavening Agents
Using both baking soda and baking powder in the same recipe might seem redundant, but each serves a specific purpose. Baking soda is a base (alkaline) that requires acid to activate - in this recipe, the slight acidity from the butter and egg activates it. Baking soda works quickly once liquid is added, providing immediate rise, and it also promotes browning through the Maillard reaction. However, baking soda alone can create a slightly metallic taste if used in large amounts. Baking powder contains both a base (baking soda) and acid (usually cream of tartar), so it's self-activating when moistened. It provides slower, more sustained leavening. Using both creates better rise and more tender texture than either alone could achieve. The ratio of baking soda to baking powder is carefully balanced - too much of either creates off flavors or texture issues. This recipe uses ½ teaspoon baking soda and ¼ teaspoon baking powder, which provides gentle leavening without making cookies cakey or causing them to rise too much and then collapse.
Gel Food Coloring Versus Liquid Food Coloring
The type of food coloring you use significantly impacts both the color intensity and the dough consistency. Gel paste food coloring, like Americolor, is highly concentrated - just one or two drops creates vibrant color. It's thick and contains very little liquid, so it won't affect your dough's moisture content. Gel paste also produces more true-to-color results without the muddiness that liquid coloring can create. Liquid food coloring from the grocery store requires many more drops to achieve similar color intensity, and all that extra liquid can make dough too wet, which affects spreading and texture. Liquid coloring also tends to fade more during baking. Gel paste is more expensive upfront but lasts much longer since you use so little. For vibrant pink cookies, start with one drop of deep pink gel paste and add a second if you want more intense color. For liquid coloring, you might need 8 to 10 drops to get similar results, which risks making the dough too wet.
Storage, Freezing, and Make-Ahead Strategies
These cookies store beautifully, making them excellent for advance preparation or keeping around for snacking. Once completely cooled, store them in an airtight container at room temperature for up to one week. The cookies stay soft due to their proper sugar-to-flour ratio and the moisture from the egg and butter. To maintain maximum softness, you can add a slice of bread to the container - the cookies will absorb moisture from the bread, keeping them tender. For longer storage, freeze baked cookies in a freezer bag or container for up to 3 months. Thaw at room temperature for about 30 minutes before eating. You can also freeze the dough - shape it into balls, freeze them on a baking sheet until solid, then transfer to a freezer bag. Bake from frozen, adding 1 to 2 minutes to the baking time. Or freeze the dough in a disk, thaw it overnight in the refrigerator, then shape and bake as directed. For maximum freshness when giving as gifts, bake the cookies the day before and store them airtight overnight.
Variations and Customization Ideas
While the strawberry version is nostalgic and delicious, this sugar cookie base works with countless flavor variations. For lemon cookies, substitute lemon extract for strawberry and use yellow food coloring and yellow decorating sugar. For raspberry cookies, use raspberry extract with deeper pink or red coloring. For vanilla bean cookies, increase vanilla to 1½ teaspoons and use white decorating sugar with vanilla bean specks. For almond cookies, use almond extract and leave them uncolored or use pastel colors. For orange cookies, use orange extract with orange food coloring. For chocolate chip strawberry cookies, fold in ½ cup of mini chocolate chips after mixing the dough. For sandwich cookies, make them slightly smaller and sandwich two together with buttercream or cream cheese frosting. For holiday versions, change the colors and decorating sugar to match - red and green for Christmas, pastels for Easter, orange for Halloween. The basic technique remains the same regardless of flavor or color variations.
Troubleshooting Common Cookie Problems
When these cookies don't turn out right, there's usually a fixable cause. If they spread too flat, your butter was too warm, you didn't chill the dough long enough, or you overmeasured the butter - use room temperature (not softened/melted) butter, chill properly, and measure accurately. If they're too hard, you overbaked them or used too much flour - remove them when edges just set and measure flour carefully using spoon-and-level method. If they're too cakey, you undermixed the butter and sugar or added too much flour - cream properly for 3 to 4 minutes and measure flour accurately. If the color is uneven or streaky, you didn't mix the food coloring thoroughly - add it early and mix well. If they taste bland, you didn't use enough extract or salt - measure extracts carefully and don't skip salt. If they're tough, you overmixed after adding flour - mix just until combined once flour goes in. Most problems relate to ingredient temperature, measurement accuracy, or mixing technique, all correctable with attention to detail.
 Pin it
After perfecting this strawberry sugar cookie recipe through probably twenty-five batches and countless failed attempts, I'm confident these are as good as or better than the childhood grocery store cookies I was trying to recreate. The strawberry flavor tastes authentic without being artificial, the texture is exactly right - soft and chewy with slight crisp around the edges - and the bright pink color makes them festive and appealing. I appreciate how the recipe is flexible enough to work with different flavor extracts if you want to experiment, but reliable enough that it turns out consistently well every time. These have become my go-to sugar cookies for any occasion where I want something colorful and fun that both kids and adults enjoy. They represent exactly what I want from nostalgic baking - capturing the essence of something you loved as a child while improving on it with better ingredients and technique so it still tastes good to your adult palate.
Frequently Asked Questions
- → Can I skip chilling the dough?
- Chilling is really important. It keeps the cookies from spreading too much and makes them easier to handle. Just 30 minutes makes a big difference.
- → How do I store these cookies?
- Keep them in an airtight container at room temperature for up to 5 days. You can also freeze them for up to 3 months.
- → Can I use unsalted butter instead?
- Yes, just add an extra pinch of salt to the dough to make up for it.
- → Why are my cookies spreading too much?
- Make sure you chill the dough and don't skip that step. Also check that your butter isn't too soft or melted.
- → Can I make the dough ahead of time?
- Absolutely. You can make the dough and keep it in the fridge for up to 2 days before baking.
- → What if I don't have strawberry extract?
- You can use raspberry extract or add more vanilla. The cookies won't have the strawberry flavor but they'll still taste good.