
 Pin it
This ube mochi delivers that distinctive chewy, tender, almost bouncy texture that makes butter mochi irresistible, enhanced with the beautiful purple color and subtle sweet, nutty flavor of ube that transforms it from classic Hawaiian treat into something even more special. Based on traditional Hawaiian butter mochi but infused with Filipino ube extract, this creates a stunning purple dessert with moist, sticky-chewy texture that's completely unique - not quite cake, not quite brownie, but something wonderfully in between that you can't stop eating. What makes this recipe so brilliant is its simplicity: everything goes into one bowl, you stir it together with no special techniques required, pour it into a pan, and bake for forty-five minutes to create thirty-six chewy bars perfect for potlucks, parties, or just keeping in your kitchen for whenever you need a sweet, satisfying treat. The combination of mochiko (sweet rice flour) with coconut milk creates that signature elastic, pleasantly sticky texture, while butter adds richness and the ube extract contributes that gorgeous color and distinctive flavor that makes these instantly recognizable and crave-worthy.
The first time baking with mochiko flour and experiencing that transformation from liquid batter to chewy, elastic mochi is genuinely exciting - watching it puff up slightly in the oven, then settle into that dense, tender texture as it cools reveals how different this is from typical Western baking. Cutting into the cooled pan and seeing that perfect purple interior, then biting into a bar and experiencing that distinctive chew that's simultaneously tender and bouncy makes you understand why mochi has devoted fans who crave this texture. Having a pan of these sitting on your counter means constantly walking past and sneaking "just one more piece" because they're so satisfying and unlike anything else.
Ingredients - What You Need and Why
- Unsalted butter: provides richness, moisture, and that characteristic "butter mochi" flavor that distinguishes this from plain mochi; melted butter incorporates easily into the batter; use real butter rather than margarine for best flavor; you'll need about three-quarters cup (one and a half sticks); salted butter works if that's what you have, just reduce added salt slightly
- Granulated sugar: sweetens while helping create proper texture; about one and three-quarters cups provides sweetness that balances the subtle ube flavor without being cloying; the sugar also contributes to that slightly crispy top surface that contrasts with the chewy interior
- Large eggs: bind everything together while adding richness and structure; you'll need four eggs at room temperature for best incorporation; eggs also contribute to that tender texture rather than rubbery consistency
- Ube extract: the star ingredient providing that signature purple color and distinctive sweet, vanilla-coconut-like ube flavor; this is concentrated extract, not ube jam or powder, which don't substitute properly in this recipe; about one to two tablespoons depending on desired intensity; find it at Asian grocery stores or online; McCormick and other brands make reliable versions
- Mochiko sweet rice flour: the essential ingredient that creates that characteristic chewy, bouncy mochi texture; this is glutinous rice flour made specifically from mochigome short-grain rice; Mochiko brand (blue box) is widely available and produces consistently excellent results; you'll need one pound (about two and three-quarters cups); despite "glutinous" in the name, this flour is completely gluten-free
- Baking powder: provides slight rise and lighter texture; just two teaspoons creates subtle lift without making this cakey; ensures the mochi isn't too dense and heavy
- Full-fat evaporated milk: adds creaminess and richness that makes the texture more tender; the concentrated milk proteins and fats create luxurious mouthfeel; one 12-ounce can is the perfect amount; don't use low-fat or skim versions which produce less rich results
- Full-fat coconut milk: contributes tropical flavor, moisture, and helps create that tender-chewy texture; use coconut milk (thinner, pourable) not coconut cream (very thick) which makes mochi oily; one 13.5-ounce can; shake well before opening to recombine separated liquid and solids
How to Make Ube Mochi - Step by Step
- Prepare pan and preheat oven:
- Begin by positioning a rack in the center of your oven and preheating it to 350 degrees Fahrenheit. While the oven heats, prepare your 9x13-inch baking pan. The best approach is lining the entire pan with parchment paper, leaving overhang on two opposite sides that will act as handles for lifting the baked mochi out later. To do this easily, cut a piece of parchment paper larger than your pan. Press it into the bottom and up the sides, creasing it at the corners so it sits flat. The overhang makes removing the mochi so much easier than trying to cut it in the pan. Alternatively, you can grease the pan thoroughly with butter or cooking spray, though parchment ensures the easiest removal and cleanup. Set your prepared pan aside. Mochi batter is very liquid and pourable, so make sure your parchment is pressed down well without any gaps where batter could seep underneath. Having everything ready before you start mixing ensures smooth, efficient baking without scrambling to prepare the pan while batter sits waiting.
- Cream butter and sugar together:
- Melt your three-quarters cup of butter - you can do this in the microwave in thirty-second bursts, stirring between each one, or melt it gently in a saucepan on the stove over low heat. Let the melted butter cool for about five minutes so it's warm but not hot - if butter is too hot, it will start cooking the eggs when you add them. Pour the melted butter into a large mixing bowl. Add your one and three-quarters cups of granulated sugar to the butter. Using an electric hand mixer on medium speed (or a stand mixer with the paddle attachment), beat the butter and sugar together for about two to three minutes. You're looking for the mixture to become lighter in color and slightly fluffy as you incorporate air. The sugar will partially dissolve into the butter, creating a smooth, uniform mixture. Scrape down the sides and bottom of the bowl with a rubber spatula to ensure everything mixes evenly. This creaming step, while not as crucial as in traditional cakes, still helps create a more uniform batter with better texture in the final mochi. The mixture should look pale yellow and relatively smooth when properly combined.
- Incorporate eggs and ube extract:
- Crack your four eggs into a separate small bowl first to check for shell pieces, then add them to your butter-sugar mixture one at a time. After adding each egg, beat on medium speed for about thirty seconds until that egg is completely incorporated before adding the next one. This gradual addition ensures proper emulsification and prevents the mixture from looking curdled or separated. After all four eggs are incorporated, the mixture should look smooth, glossy, and pale yellow. Now add your ube extract - start with one tablespoon if you want subtle ube flavor and color, or use up to two tablespoons for more intense purple and stronger ube taste. Beat on medium speed for about one minute until the ube extract is thoroughly distributed throughout the batter. You'll see the color transform from pale yellow to a beautiful lavender or purple shade, depending on how much extract you used. The mixture should smell distinctly of ube at this point - that sweet, vanilla-like, slightly nutty aroma that's characteristic of the purple yam. Scrape down the bowl again to ensure even color distribution with no pale streaks remaining.
- Add dry ingredients and mix:
- Add your entire pound of mochiko flour (about two and three-quarters cups) to the bowl all at once, along with two teaspoons of baking powder. Using your mixer on low speed or stirring by hand with a wooden spoon or spatula, mix the flour into the wet ingredients. The batter will become very thick and almost dough-like at this stage, which is completely normal. Mix until the flour is about eighty to ninety percent incorporated - you should still see a few streaks of flour or small lumps, which is fine. Don't worry about overmixing at this stage because mochiko contains no gluten, so you literally cannot develop tough texture by mixing too much. This is one of the beauties of working with mochiko - you can mix freely without the fear of creating tough, rubbery baked goods that comes with overmixing wheat flour. The lack of gluten is what allows mochi to achieve that characteristic chewy, elastic texture. Continue mixing until the flour is mostly incorporated but the batter is very thick and difficult to stir. This thickness is temporary and will resolve when you add the liquids in the next step.
- Incorporate liquids until perfectly smooth:
- Open your can of evaporated milk - you'll need the entire 12-ounce can. Also open your can of coconut milk and shake or stir it well before measuring, as the thick coconut cream separates from the thinner liquid and you want them combined. Pour the entire can of evaporated milk and the entire can of coconut milk into your thick batter. Now mix on medium speed with your electric mixer, or stir vigorously by hand if mixing manually. At first, the batter will look broken and lumpy as the thick flour mixture starts absorbing the liquids. Keep mixing for about two to three minutes, and you'll see the transformation happen - the lumpy mixture will become smooth, pourable, and completely uniform. Continue mixing until absolutely no lumps remain and the batter is the consistency of thick pancake batter or melted ice cream. It should pour easily off your spatula in a steady stream. The color should be uniform throughout with no streaks of darker or lighter purple. Scrape down the sides and bottom of the bowl one final time, then give it a few more stirs to ensure everything is perfectly combined. The finished batter should be quite liquid and pourable, completely smooth, and a beautiful purple color.
- Pour, bake, and cool properly:
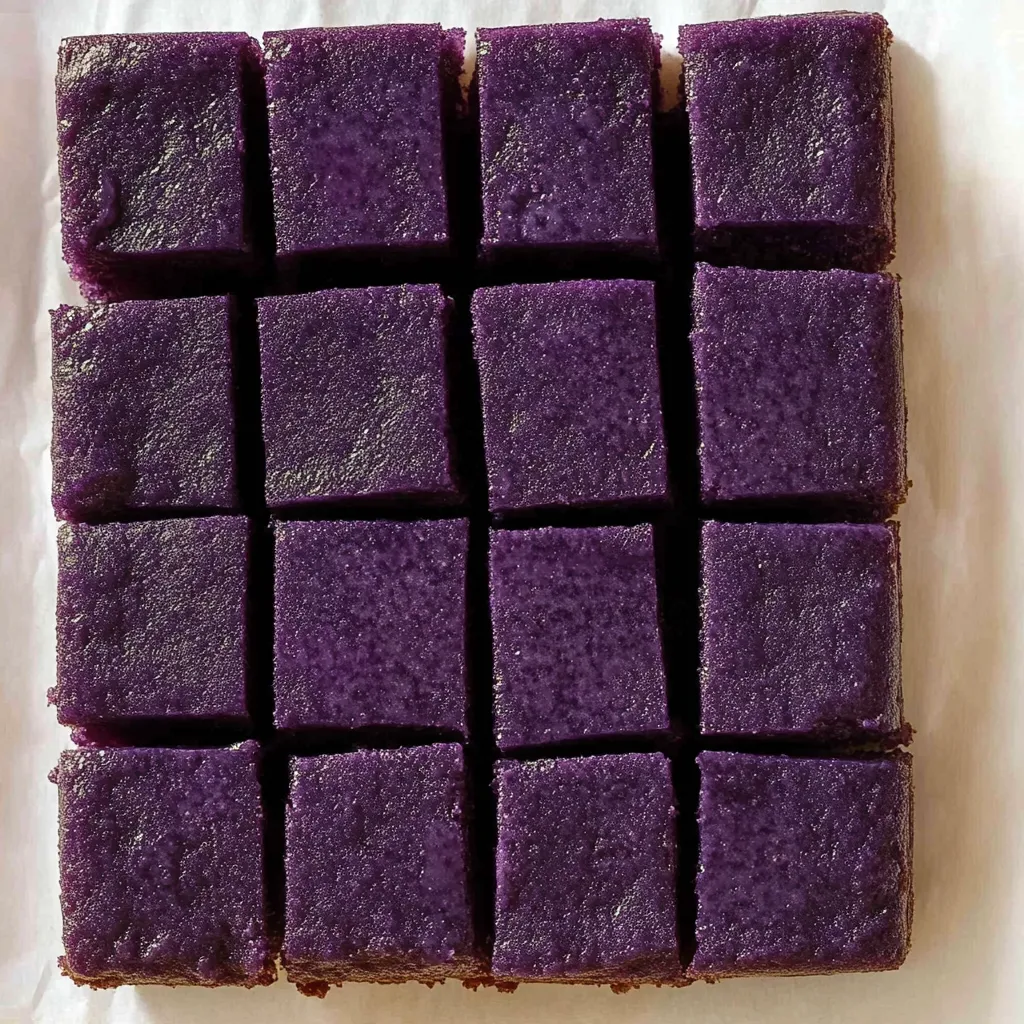
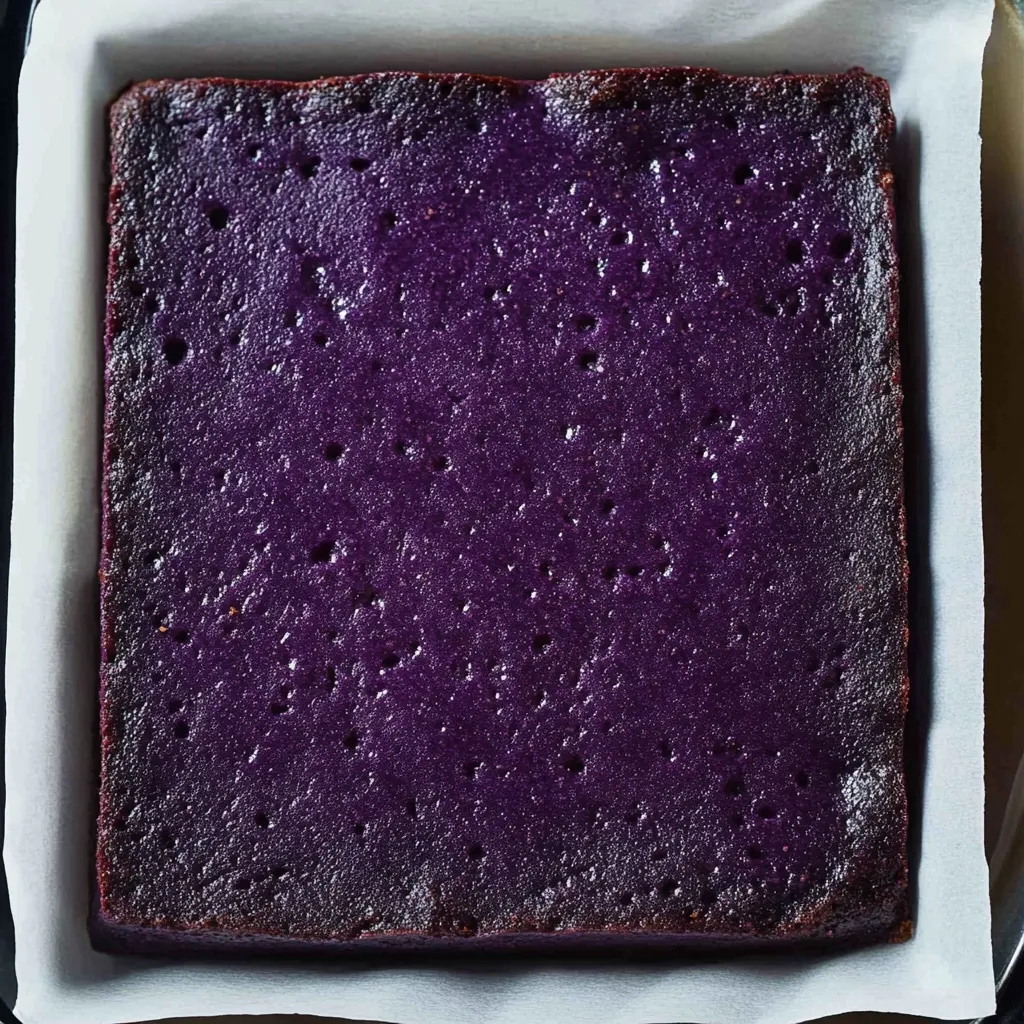
- Pour your smooth batter into the prepared 9x13-inch pan. The liquid batter will level itself out naturally, but you can use a spatula to spread it evenly into the corners and smooth the top surface if needed. Carefully transfer the pan to your preheated 350-degree oven, taking care not to slosh the liquid batter. Set a timer for forty-five minutes. As it bakes, the mochi will puff up slightly and the surface will begin to crack a bit, which is normal and expected. The top will become golden brown in spots. Check for doneness at the forty-five-minute mark by inserting a toothpick or cake tester into the center - it should come out with minimal dry crumbs clinging to it, but not completely clean like you'd want for regular cake. The sides should be pulling away slightly from the pan edges and feel firm when gently pressed. The center will still jiggle slightly when the pan is moved, which is exactly right - as it cools, it will firm up to that perfect chewy texture. Remove from the oven and place the pan on a wire cooling rack. Now comes the hard part - waiting for it to cool completely. This takes at least two to three hours at room temperature. Resist the urge to refrigerate it, as chilling changes the texture dramatically, making it too firm and less pleasantly chewy. Once completely cool to the touch, use the parchment paper overhang to lift the entire slab out of the pan onto a cutting board. Use a sharp knife to cut into thirty-six squares, or whatever size you prefer. For the cleanest cuts, wipe your knife with a damp cloth between cuts to prevent the sticky mochi from building up on the blade.
 Pin it
Mochi texture is genuinely unique in the dessert world - that distinctive elastic, bouncy chew that's nothing like cake, brownies, or cookies creates an eating experience that people either instantly love or find unusual at first but grow to crave. The way it springs back slightly when you bite into it, how it's tender but also has resistance, creates sensory interest that makes you want another piece to experience that texture again. Ube contributes its subtle but distinctive flavor that's hard to describe - somewhere between vanilla and coconut with nutty undertones, plus that gorgeous purple color that makes these visually stunning.
Understanding Mochiko and Sweet Rice Flour
Mochiko flour deserves deeper explanation since it's the essential ingredient that creates mochi's distinctive texture and understanding it helps you use it successfully in this and other recipes. Mochiko is made from mochigome, a specific variety of short-grain glutinous rice that's higher in amylopectin (a type of starch) and lower in amylose than regular rice. This starch composition is what creates that characteristic sticky, elastic texture when cooked. To make mochiko, mochigome rice is washed, soaked, steamed until cooked, then dried and ground into fine powder. The result is a superfine flour that feels almost like cornstarch when rubbed between your fingers. The most widely available brand in the U.S. is Mochiko (blue and white box) made by Koda Farms, though other brands like Blue Star also work well. Sometimes you'll see it labeled as "sweet rice flour" or "glutinous rice flour" - these are the same product. Store mochiko in an airtight container in a cool, dry place where it keeps for months, or refrigerate or freeze for even longer storage. The flour has a very neutral taste on its own, taking on flavors from other ingredients you combine it with. When mixed with liquid and baked or steamed, it creates that signature chewy, bouncy texture that's completely different from wheat flour baked goods. Mochiko also works as a thickener for sauces and a coating for fried foods, creating extra-crispy results.
Exploring Hawaiian Butter Mochi Traditions
Understanding the cultural context of butter mochi helps you appreciate this dessert beyond just another recipe, connecting you to Hawaiian food traditions. Butter mochi originated in Hawaii, where Japanese immigrants adapted traditional mochi-making techniques using local ingredients like coconut milk and butter that were readily available. This fusion created something distinctly Hawaiian rather than purely Japanese - the addition of butter was particularly innovative, adding richness that traditional Japanese mochi doesn't have. In Hawaii, butter mochi is a beloved potluck staple, bake sale favorite, and home kitchen regular that appears at gatherings, celebrations, and everyday snacking. Every family has their own version with slight variations - some add more coconut milk for tropical flavor, others incorporate vanilla or almond extract, some top with shredded coconut. The texture can range from softer and more cake-like to denser and chewier depending on ratios. This ube version represents a more recent innovation, combining Hawaiian butter mochi with Filipino ube (purple yam) that's also extremely popular in Hawaii due to the large Filipino population. The fusion of Japanese technique, Hawaiian adaptation, and Filipino ingredient creates something uniquely reflective of Hawaii's multicultural food landscape. When making this, you're participating in that ongoing tradition of culinary adaptation and fusion that defines Hawaiian cuisine.
Creating Different Flavor Variations
Once you've mastered the basic ube mochi recipe, exploring variations keeps things interesting while using the same fundamental technique and ratios. For classic Hawaiian butter mochi without ube, simply omit the ube extract and add one to two teaspoons of vanilla extract for subtle flavor and pale yellow color. Chocolate butter mochi incorporates one-third cup of cocoa powder mixed with the mochiko, creating rich chocolate flavor with that signature chewy texture. Matcha mochi adds two tablespoons of culinary-grade matcha powder for earthy, slightly bitter green tea flavor and beautiful green color. Pandan mochi uses pandan extract instead of ube for that distinctive Southeast Asian flavor and natural green color. For tropical variations, add one cup of shredded sweetened coconut to the batter for coconut mochi, or fold in one cup of diced mango for fruity pockets throughout. Ube coconut combines ube extract with shredded coconut for double tropical impact. Black sesame mochi incorporates ground black sesame paste for nutty, sophisticated flavor. Pumpkin mochi adds pumpkin puree and warm spices like cinnamon and nutmeg for fall-flavored version. Each variation maintains the essential mochiko base and technique while exploring different flavor directions that show how versatile this recipe truly is.
Troubleshooting Common Mochi Problems
Even with a foolproof recipe, sometimes results aren't quite right, but understanding what went wrong helps you fix it next time. If your mochi comes out too dense and heavy rather than tender-chewy, you either didn't mix the batter until completely smooth (leaving lumps that create dense spots), or you overbaked it, cooking out too much moisture - make sure batter is perfectly smooth and pull mochi from oven when the tester has minimal crumbs, not completely clean. When mochi is rubbery and tough rather than pleasantly chewy, it was definitely overbaked - next time reduce baking time by five minutes and check earlier. If the texture is gummy and almost raw in the center while the edges are done, your oven temperature is too high causing the outside to set before the center cooks through - use an oven thermometer to verify accurate temperature. Mochi that's too oily with grease pooling on top means you used coconut cream instead of coconut milk (cream has much higher fat content), or you used too much butter - follow measurements carefully. When mochi won't come out of the pan cleanly and sticks everywhere, you didn't line with parchment or grease thoroughly enough - parchment paper is truly the best solution. If the color is pale grayish-purple instead of vibrant purple, you didn't use enough ube extract or the extract is old and has lost potency - use at least one tablespoon, preferably two for bold color. Mochi that cracks excessively on top isn't necessarily a problem (some cracking is normal and attractive), but excessive cracking means the oven was too hot or you baked too long.
Storage Methods for Maximum Freshness
Proper storage keeps butter mochi fresh and maintains that ideal chewy texture for days, making this excellent for advance preparation or enjoying over time. Once completely cooled and cut into bars, store mochi in an airtight container at room temperature for up to five days. Place parchment paper between layers if stacking to prevent pieces from sticking together. Room temperature storage maintains the best texture - the mochi stays tender-chewy and pleasant to eat. Refrigeration is possible and extends shelf life to about one week, but understand that chilling firms up the texture significantly, making mochi much chewier and less tender. Some people actually prefer this firmer texture, while others find it too tough. If you do refrigerate, let mochi come to room temperature for about thirty minutes before eating to soften slightly. For longer storage, mochi freezes beautifully for up to three months. Wrap individual pieces in plastic wrap, then place in a freezer bag, squeezing out air. To serve frozen mochi, thaw at room temperature for about an hour, or microwave individual pieces for fifteen to twenty seconds until warmed through - the microwave actually refreshes the texture nicely, making cold mochi tender again. Some people enjoy frozen mochi straight from the freezer when it has an almost ice-cream-like quality, though the texture is quite firm. For gifting, package cooled mochi bars in clear cellophane bags tied with ribbons, or arrange in decorative tins with parchment between layers.
Serving Suggestions and Presentation Ideas
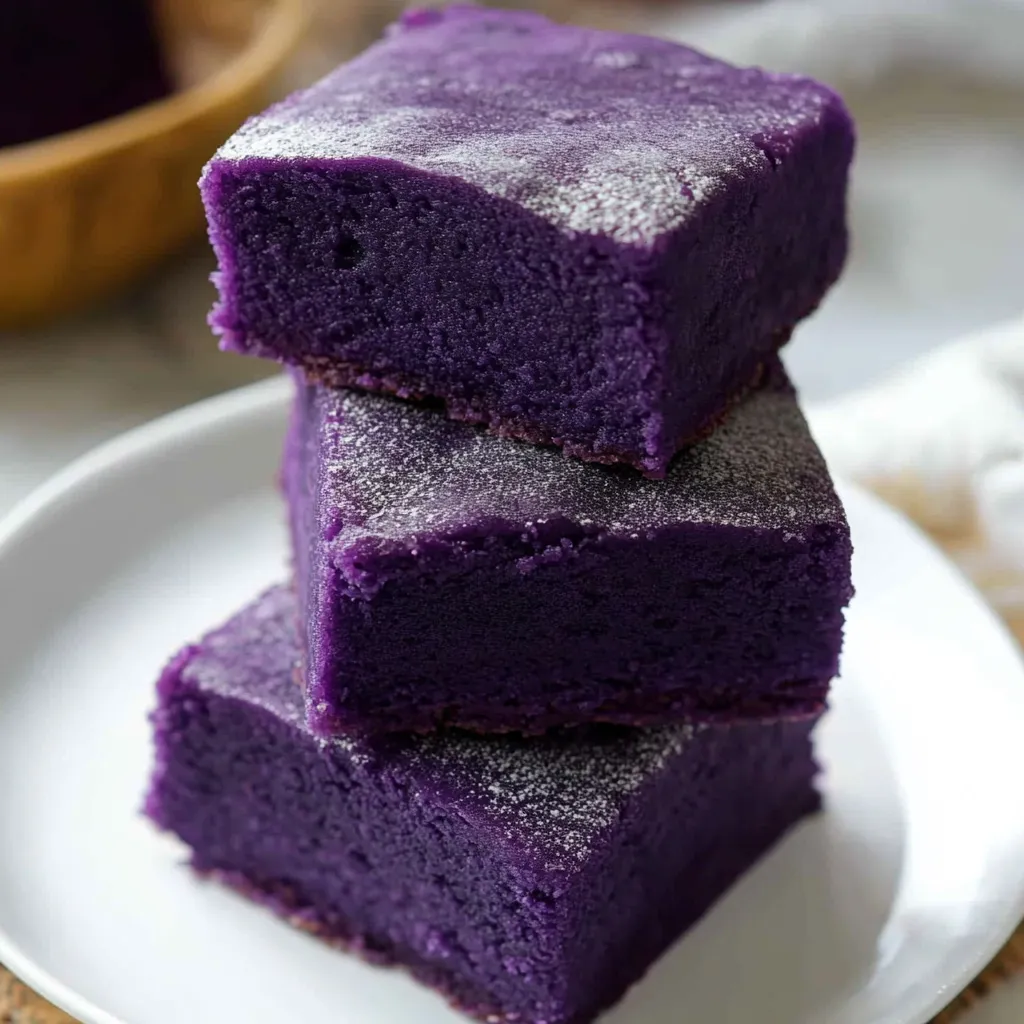
While mochi is delicious eaten plain as a snack or dessert, understanding different serving approaches creates more interesting presentations and flavor combinations. For casual eating, simply cut into bars and serve on a plate - the vibrant purple color makes them attractive without any embellishment. For more elegant presentation, dust with powdered sugar through a fine-mesh sieve just before serving for contrast against the purple. Serve with a scoop of vanilla ice cream or coconut ice cream for temperature and texture contrast - the cold, creamy ice cream against chewy, room-temperature mochi is wonderful. Drizzle with white chocolate or dark chocolate ganache for extra indulgence. Top with whipped cream and fresh berries for a dressed-up dessert. For tropical flair, serve with mango slices, passion fruit pulp, or pineapple chunks. Toasted coconut flakes sprinkled on top add textural contrast and reinforce the coconut flavor from the coconut milk in the batter. For parties, cut into smaller, bite-sized pieces and serve on a platter as finger food desserts that guests can grab easily. At Hawaiian-themed parties or luaus, present mochi alongside other tropical desserts like haupia (coconut pudding) or pineapple upside-down cake. For afternoon tea or coffee, mochi makes an excellent accompaniment that's not too sweet but still satisfying. The relatively neutral sweetness level means it pairs well with both coffee and tea without being cloying.
The Science Behind Mochi's Unique Texture
Understanding the chemistry that creates mochi's distinctive texture helps explain why certain steps and ingredients matter. Mochiko's high amylopectin content is key - this highly branched starch molecule absorbs water readily and creates viscous, sticky texture when heated. Unlike amylose (the other type of starch in rice), amylopectin doesn't retrograde (recrystallize) as much when cooled, which is why mochi stays relatively soft and chewy rather than becoming hard like bread. When you mix mochiko with liquids and bake it, the starch granules absorb moisture and swell, then gelatinize (cook and thicken) in the oven's heat. This gelatinization creates the characteristic elastic, bouncy texture. The eggs provide structure through protein coagulation while adding richness. The fats from butter, coconut milk, and evaporated milk coat the starch molecules, lubricating them and contributing to tender texture while preventing the mochi from being too sticky. The sugar interferes slightly with starch gelatinization, helping create more tender texture while also contributing moisture-retaining properties that keep mochi from drying out. The slight leavening from baking powder creates a few air bubbles that lighten the texture slightly without making it fluffy like cake. All these components work together to create that perfect balance of chewy but tender, dense but not heavy, sweet but not cloying.
Teaching Children and Beginners to Bake
Ube mochi serves as an ideal recipe for introducing children or nervous beginners to baking because of its forgiving nature and straightforward steps. The one-bowl method means less cleanup and fewer chances for mistakes. Young children can help measure ingredients, pour them into the bowl, and watch the mixing process. The dramatic color change when you add ube extract delights kids and demonstrates how ingredients transform. Older children and teens can handle most of the recipe independently with supervision, learning to cream butter and sugar, incorporate eggs properly, and judge when batter is smooth. The fact that you cannot overmix removes the most common baking anxiety and allows confident mixing. Pouring batter into the pan and watching it transform in the oven teaches about how heat changes food. The recipe builds confidence because it almost always turns out well, encouraging continued baking experimentation. Cutting the cooled mochi into bars teaches knife skills and the satisfaction of portioning homemade treats. Children take pride in serving something they made, especially when it's as visually impressive as vibrant purple mochi. The unique texture often converts kids who claim they don't like regular cake, expanding their palate and food experiences.
Adapting for Dietary Restrictions
While butter mochi isn't the healthiest dessert, understanding modifications helps accommodate various dietary needs so more people can enjoy it. For dairy-free or vegan versions, replace the butter with equal amounts of coconut oil (melted) or vegan butter, which works surprisingly well. Use full-fat coconut cream instead of evaporated milk for richness while staying dairy-free. Replace eggs with flax eggs (one tablespoon ground flaxseed mixed with three tablespoons water per egg, left to sit five minutes) - the texture will be slightly different but still good. For refined sugar-free versions, replace granulated sugar with coconut sugar or date sugar, though the texture may be slightly less smooth. The recipe is naturally gluten-free when made with pure mochiko, making it safe for celiac disease and gluten intolerance. For lower sugar versions, you can reduce sugar by up to one-quarter cup without dramatically affecting texture, though the mochi will be noticeably less sweet. Nut-free is inherently achieved as the recipe contains no nuts. For people avoiding soy, ensure your ube extract doesn't contain soy lecithin as a filler ingredient. Each modification changes the final result somewhat, but the fundamental mochi texture and ube flavor remain recognizable and delicious.
Economic Considerations and Batch Baking
Understanding the economics of making ube mochi helps you appreciate its value as an affordable dessert that feeds many people. One pound of mochiko costs about five to eight dollars and makes one full batch. Butter, eggs, sugar, and milks are basic staples you likely have, adding maybe another five to eight dollars total. Ube extract is the most expensive ingredient at about eight to twelve dollars per bottle, but you use only one to two tablespoons per batch and the bottle lasts for many batches. Total cost for thirty-six bars works out to roughly thirty to forty cents per serving - far less than buying individual mochi desserts or comparable treats. For even more economical baking, make double batches using two 9x13 pans simultaneously, as you're already gathering ingredients and cleaning equipment. Mochi freezes so well that making large batches and freezing portions for future needs is highly efficient. For bake sales or fundraisers, mochi is profitable - low ingredient cost and high yield create good margins while the unique purple color and chewy texture make them popular items that sell quickly. The recipe scales easily - double or triple all ingredients proportionally for multiple pans.
Cultural Appreciation and Respect
When making and serving ube mochi, understanding and acknowledging its cultural origins demonstrates respect and appreciation rather than mere appropriation. This dessert represents the fusion of Japanese mochi-making techniques brought to Hawaii by immigrants, adapted with Hawaiian ingredients like coconut, and more recently enhanced with Filipino ube. Each culture contributed essential elements that create this specific treat. When serving to others or posting on social media, mentioning these origins educates people about the multicultural roots and shows respect for the traditions. Supporting Asian-owned businesses by buying mochiko, ube extract, and other ingredients from Asian grocery stores rather than only mainstream supermarkets (when possible) puts money back into these communities. Learning about the broader context of mochi in Japanese culture and ube in Filipino cuisine enriches your appreciation beyond just the recipe. Understanding that food fusion isn't just trendy but reflects actual demographic patterns and cultural exchange in places like Hawaii makes the dessert more meaningful. This respectful approach to cooking and sharing dishes from cultures other than your own fosters appreciation and learning rather than casual consumption without context.
 Pin it
This ube mochi recipe represents the perfect example of how food traditions evolve through cultural exchange and adaptation, creating something new that honors multiple heritages while being delicious in its own right. What makes this recipe genuinely valuable is how it delivers that unique, addictive mochi texture that's impossible to replicate with any other flour or technique, while the ube adds visual drama and subtle flavor that transforms simple butter mochi into something special and memorable. The one-bowl, foolproof method makes this accessible to anyone regardless of baking experience, while the impressive results make you look like a skilled baker who spent far more time and effort than the reality. Whether you're introducing people to ube and mochi for the first time, bringing a stunning purple dessert to gatherings, satisfying your own cravings for that distinctive chewy texture, or exploring Hawaiian and Asian dessert traditions through hands-on baking, this recipe delivers completely. Once you've experienced how easy it is to make and how different that bouncy, elastic, tender-chewy texture is from any other dessert, you'll likely find yourself making batch after batch, experimenting with variations, and introducing everyone you know to the joys of homemade butter mochi. The way people's eyes light up when they see those vibrant purple squares, then taste that first bite and experience that unique texture they've never encountered before, makes the minimal effort completely worthwhile and spreads appreciation for the multicultural food traditions that created this wonderful treat.
Frequently Asked Questions
- → What does ube mochi taste like?
- Ube mochi has a mild, sweet flavor with hints of vanilla and a slightly nutty taste from the purple yam. The texture is soft, chewy, and bouncy like traditional mochi.
- → Can I use regular flour instead of mochiko?
- No, you need mochiko or sweet rice flour to get that signature chewy mochi texture. Regular flour won't give you the same bouncy, stretchy result.
- → How do I store leftover ube mochi?
- Keep the mochi bars in an airtight container at room temperature for up to 3 days, or refrigerate them for up to a week. They'll firm up in the fridge but soften at room temp.
- → Why is my mochi hard and not chewy?
- Your mochi might be overbaked. It should still look slightly jiggly in the center when you take it out. It firms up as it cools, so don't bake it until completely solid.
- → Can I freeze ube mochi bars?
- Yes! Wrap individual bars in plastic wrap, then store them in a freezer bag for up to 3 months. Thaw at room temperature for about 30 minutes before eating.
- → Where can I buy ube extract?
- You can find ube extract at Asian grocery stores, especially Filipino markets, or order it online from Amazon or specialty food sites.