
 Pin it
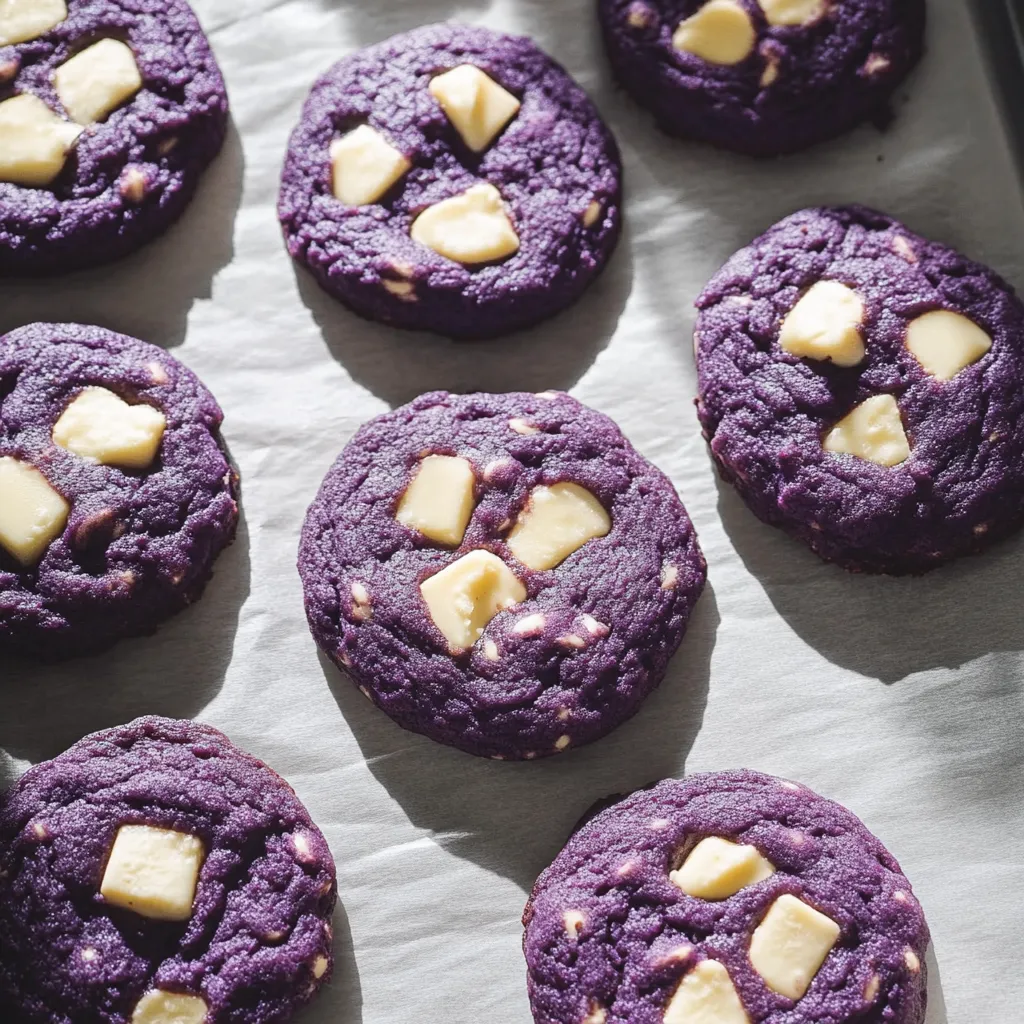
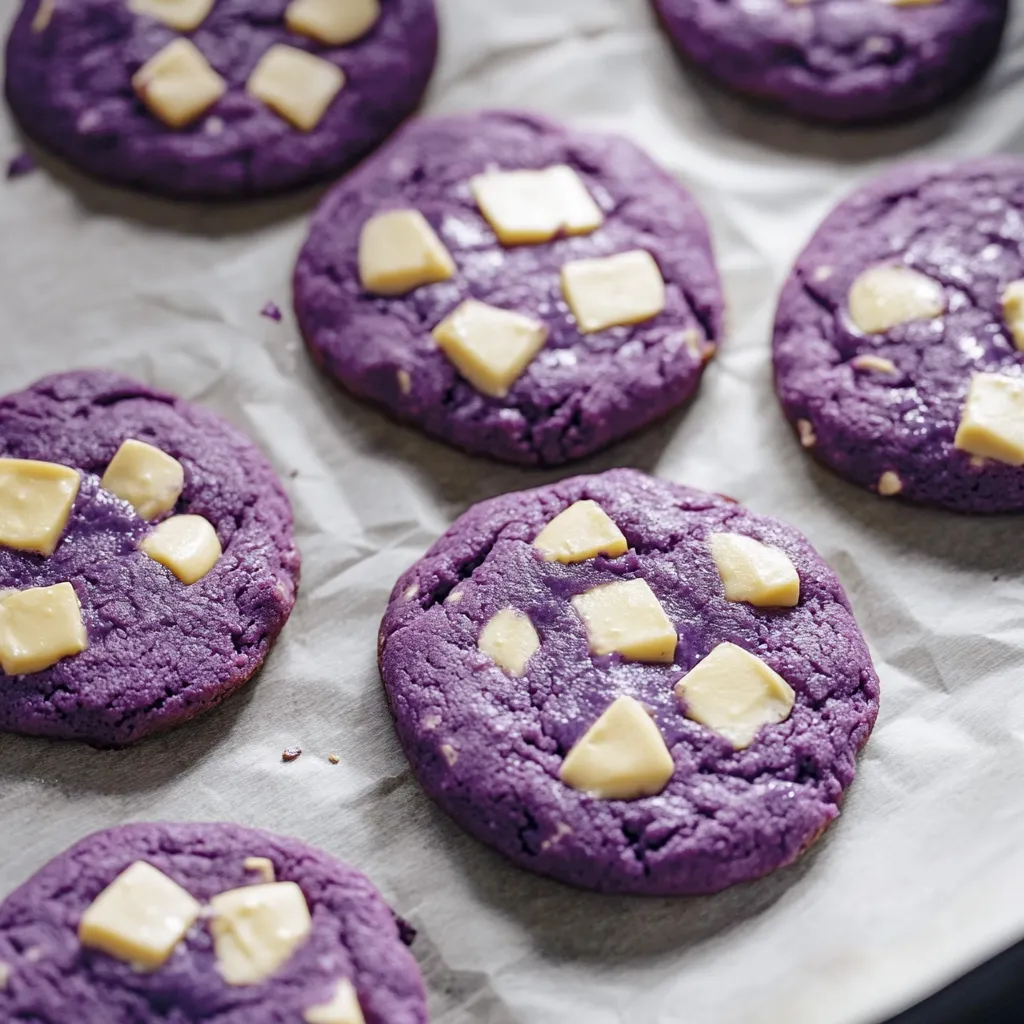
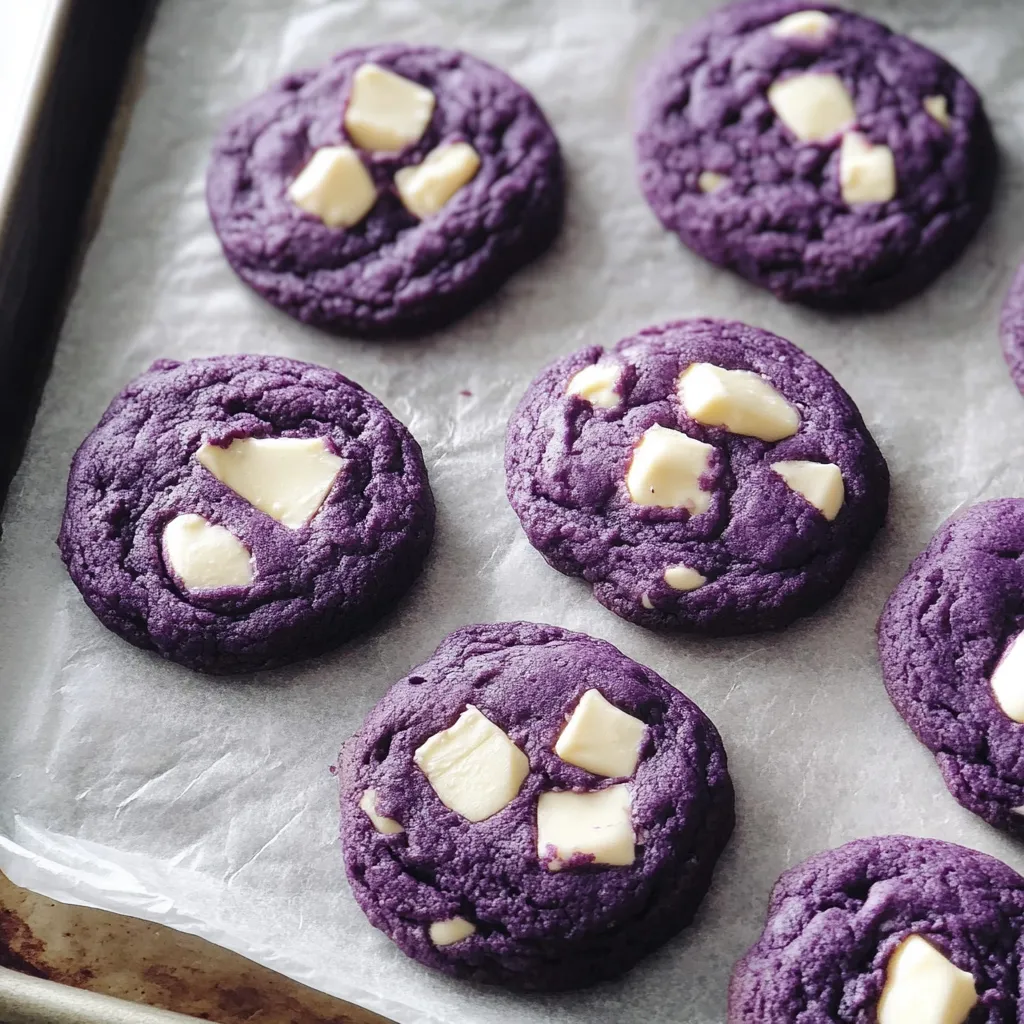
These soft and chewy ube cookies showcase the distinctive purple yam flavor that's beloved in Filipino desserts, combining both ube halaya jam and concentrated ube extract to create vibrant purple cookies with genuine ube taste rather than just colored dough. The white chocolate chunks studded throughout provide sweet, creamy contrast against the nutty, vanilla-like notes of the ube, melting into pockets of richness that make each bite interesting. What sets these cookies apart from basic chocolate chip variations is that unique ube flavor - earthy and slightly floral with hints of coconut and vanilla that you can't quite place if you've never tasted it before, all wrapped up in cookies that have the perfect texture with crispy edges giving way to soft, almost cakey centers. The striking purple color makes them visually stunning and conversation-starting, while the combination of ube halaya for moisture and ube extract for concentrated flavor ensures the purple yam taste comes through clearly even after baking.
The first time baking with ube opens up this whole world of flavors that's completely different from typical Western dessert ingredients. That gorgeous purple dough mixing together in the bowl, deepening in color as you add the extract, creates this excitement about trying something new and special. The smell while these bake fills the kitchen with this sweet, slightly nutty aroma that's hard to describe but absolutely wonderful. Watching people try ube cookies for the first time and seeing their faces light up with surprise at how good that unique flavor is - not quite vanilla, not quite coconut, but something distinctly its own - makes sharing these cookies particularly satisfying.
Ingredients - What You Need and Why
- All-purpose flour: provides the structure and body that turns wet ingredients into actual cookies rather than puddles; measure carefully using the scoop-and-level method, as too much creates dry, cakey cookies while too little makes them spread thin and greasy; about two cups gives you the right texture
- Baking powder and baking soda: these two leavening agents work together to create lift and that slightly puffy texture; baking soda provides spread and browning, while baking powder adds rise; using both creates better results than either alone; make sure both are fresh and not expired
- Salt: just a half teaspoon enhances all the other flavors and prevents the cookies from tasting flat or one-dimensionally sweet; it brings out the ube flavor more effectively than you'd expect from such a small amount
- Unsalted butter: contributes rich, creamy flavor and creates tender texture; it must be softened to room temperature so it creams properly with sugar; cold butter won't incorporate air, while melted butter changes the texture completely; you'll need one stick (half cup)
- Granulated sugar: sweetens while also affecting texture through the creaming process; when beaten with butter, sugar crystals cut into the fat and trap air, creating lighter, fluffier cookies than you'd get without proper creaming; three-quarters cup provides sweetness without being cloying
- Large egg: binds ingredients together while adding richness and helping create that chewy texture; use a room-temperature egg so it incorporates smoothly without causing the butter to seize up; cold eggs can make the mixture curdle and affect final texture
- Ube halaya: this purple yam jam or spread provides authentic ube flavor, natural purple color, and moisture that keeps cookies tender; it's made from mashed ube combined with condensed milk and butter; you'll need about half a cup; find it at Asian or Filipino grocery stores or order online
- Ube extract: concentrated artificial flavoring and coloring that amplifies the ube taste and creates that vibrant purple color; ube halaya alone has mild flavor that gets lost in baking, so extract is essential for pronounced ube presence; just one to two teaspoons makes a huge difference; McCormick and other brands make it
- Pure vanilla extract: enhances and rounds out all the other flavors without being distinctly identifiable; even though ube is the star, vanilla plays an important supporting role; one teaspoon provides background depth
- White chocolate: creates sweet, creamy pockets throughout the cookies that complement ube's subtle flavor perfectly; chop a bar or use chunks rather than chips for bigger melty pockets; about one cup chopped gives you chocolate in every bite; save some pieces for pressing on top before baking for picture-perfect presentation
How to Make Ube Cookies - Step by Step
- Prepare oven and gather ingredients:
- Begin by positioning a rack in the center of your oven and preheating it to 350 degrees Fahrenheit. While the oven heats, line one or two large baking sheets with parchment paper or silicone baking mats - parchment prevents sticking and makes cleanup effortless while also helping cookies bake more evenly. If you only have one baking sheet, you'll bake in batches, which is perfectly fine. Before you start mixing, make sure your butter and egg are at room temperature - this is crucial for proper creaming and even mixing. If you forgot to take them out of the fridge ahead of time, cut the butter into small pieces and let it sit for fifteen to twenty minutes, or gently microwave it in five-second bursts, checking constantly to ensure it softens without melting. For the egg, place it in a bowl of warm (not hot) water for about five minutes to bring it to room temperature. Have all your other ingredients measured and ready before you begin mixing so the process flows smoothly without interruption.
- Mix dry ingredients together:
- In a medium bowl, combine two cups of all-purpose flour, one teaspoon of baking powder, half a teaspoon of baking soda, and half a teaspoon of salt. Using a whisk or fork, stir these dry ingredients together thoroughly for about thirty seconds, making sure everything is evenly distributed with no clumps of baking powder or soda. This mixing is important because you want the leavening agents spread uniformly throughout so every cookie rises and bakes consistently rather than some being dense and others overly puffy. Set this bowl aside - you'll add it to your wet ingredients later, and having it pre-mixed ensures quick incorporation when the time comes. The combination of baking powder and baking soda might seem redundant, but they actually serve different purposes - the baking soda helps cookies spread and develop golden-brown color through browning reactions, while the baking powder provides additional lift that creates that slightly cakey interior texture that makes these cookies so satisfying.
- Cream butter until fluffy:
- Place your softened butter - it should be soft enough that your finger leaves an indent when pressed but not greasy or melting - in a large mixing bowl. If using a stand mixer, attach the paddle attachment; if using a hand mixer, make sure you're working in a large enough bowl that ingredients won't fly out when mixing. Turn the mixer to medium speed and beat the butter alone for about one to two minutes until it becomes very smooth, creamy, and noticeably paler in color than when you started. This step might seem unnecessary, but beating the butter alone before adding sugar makes a significant difference in final texture. You're warming the butter slightly through friction while making it extra fluffy and receptive to incorporating air when sugar is added. Scrape down the sides of the bowl with a rubber spatula to make sure all the butter gets evenly beaten. Once the butter looks light, fluffy, and almost white, add your three-quarters cup of granulated sugar all at once. Turn the mixer back to medium speed and cream the butter and sugar together for a full three minutes - time it, because it's longer than you think. You're looking for the mixture to become very light and fluffy, almost doubled in volume, with the sugar crystals mostly dissolved into the butter. The color should be pale and the texture should look whipped and airy rather than dense and pasty.
- Add egg and ube ingredients:
- Once your butter and sugar are properly creamed and fluffy, crack your room-temperature egg into a small bowl first to check for shell pieces, then add it to your butter mixture. Beat on medium speed for about one minute until the egg is completely incorporated and you can't see any streaks of yellow yolk. The mixture might look slightly curdled at first, but keep mixing and it will come together into a smooth, homogeneous mixture. Stop and scrape down the bowl to make sure everything is mixing evenly. Now add your ube ingredients - half a cup of ube halaya, one to two teaspoons of ube extract (start with one if you're not sure how strong you want the flavor, knowing you can add more), and one teaspoon of vanilla extract. The ube halaya is thick and paste-like, so you'll need to really mix well to break it up and incorporate it throughout the butter mixture. Beat on medium speed for about two minutes, stopping to scrape down the bowl as needed. You'll see the mixture transform from pale yellow to a beautiful vibrant purple as the ube halaya and extract get thoroughly mixed throughout. The color should be uniform with no pale streaks remaining. The mixture will look slightly looser than before because you've added moisture from the ube halaya, which is normal and expected.
- Incorporate dry ingredients and white chocolate:
- Add your bowl of pre-mixed dry ingredients - the flour, baking powder, baking soda, and salt - all at once to your purple butter mixture. Here's where technique becomes crucial - instead of using your electric mixer which would overmix the dough and make it tough, switch to a rubber spatula or wooden spoon. Gently fold the flour mixture into the wet ingredients using broad strokes, scraping from the bottom of the bowl up and over, turning the bowl as you work. Mix just until you can barely see a few streaks of flour remaining - this should take no more than fifteen to twenty strokes. Don't be tempted to keep mixing until completely smooth or you'll develop too much gluten and end up with dense, tough cookies. While those last flour streaks are still visible, add your chopped white chocolate (save a handful for topping if desired). Fold gently just until the chocolate is distributed throughout and the last bits of flour disappear. The dough should look thick, cohesive, and studded with white chocolate pieces. It will be softer and more purple than typical cookie dough, which is exactly right.
- Portion and bake cookies:
- Using a large cookie scoop - a four-tablespoon size works perfectly and creates bakery-style cookies - scoop portions of dough and release them onto your prepared baking sheet. If you don't have a cookie scoop, use about three tablespoons of dough per cookie, roughly shaping them into balls with your hands. Space them about two inches apart in all directions to allow for spreading during baking - you'll probably fit six to eight cookies per standard baking sheet depending on size. The dough doesn't chill before baking, so these cookies will spread somewhat, though not excessively. If you saved some white chocolate chunks, now is when you can press a few pieces into the top of each dough ball for a prettier presentation when baked. Place the baking sheet in your preheated 350-degree oven and set a timer for ten minutes. After ten minutes, check the cookies - they're done when the edges look set and slightly darker purple, while the centers still look soft and might even seem slightly underdone. The cookies will continue cooking on the hot pan after you remove them, so pulling them at ten to twelve minutes when they look almost done rather than fully baked ensures they stay soft and chewy. If you want to add white chocolate to the tops, pull the tray out after about eight minutes, quickly press extra chocolate pieces onto each cookie, then return to the oven for the remaining two to four minutes.
- Shape and cool for best results:
- Immediately after removing cookies from the oven while they're still soft and pliable, you have the option to perfect their shape. Take a round cookie cutter or bowl that's slightly larger in diameter than your cookies - about four inches works well - and place it over one cookie. Gently swirl the cutter in a circular motion, which pushes any irregular edges inward and creates a perfect circle. This technique is completely optional and purely aesthetic, but it creates those Instagram-worthy cookies with flawless round shapes. Work quickly while cookies are hot, as they firm up rapidly as they cool. Once shaped (or if you skip this step), let the cookies cool on the baking sheet for five to ten minutes. They're very soft when first out of the oven and will fall apart if you try to move them immediately. After five to ten minutes, they'll have set enough to transfer with a spatula to a wire cooling rack to finish cooling completely. Or enjoy them still slightly warm, when the white chocolate is melty and the texture is at its absolute peak. If baking multiple batches, let your baking sheet cool completely before arranging the next batch of dough, as a hot pan causes cookies to spread too much before the oven heat can set their structure.
 Pin it
Ube has become increasingly popular in Western baking over the past few years as more people discover this ingredient that's been beloved in Filipino cuisine for generations. The flavor is genuinely unique and difficult to compare to anything else - people often describe it as somewhere between vanilla, coconut, and sweet potato, but that doesn't quite capture its essence. Working with ube halaya and extract for the first time reveals how different they are despite both being ube products. The halaya is thick, spreadable, and subtly sweet with a pleasant but mild flavor, while the extract is intensely concentrated with an almost artificial quality when smelled directly from the bottle. Together though, they create cookies that taste authentically of purple yam without being overwhelming or weird. Having a batch of these in the house means reaching for something purple and beautiful when the cookie craving hits, which never fails to brighten the day.
Sourcing Ube Products and Understanding Quality
Finding ube halaya and ube extract has become easier as ube's popularity has grown, though knowing where to look and what to choose helps ensure you get quality products. Asian grocery stores, particularly Filipino or Southeast Asian markets, almost always carry both products in their dessert or baking sections. Major chains like H Mart or 99 Ranch typically stock them as well. Online retailers including Amazon and specialty Filipino food websites offer numerous brands with shipping to your door. When selecting ube halaya, look for brands like Good Shepherd, Ramar Foods, or Magnolia which are well-regarded for authentic flavor and quality. The halaya should be thick and paste-like, deep purple in color, and list ube as the primary ingredient along with condensed milk and butter. Avoid products that are primarily food coloring and artificial flavor with minimal actual ube content. For ube extract, McCormick makes a widely available version that's reliable and consistent, while Filipino brands like Butterfly or Castillo offer more concentrated options. The extract is essentially artificial flavoring and coloring, which might seem less authentic, but it's actually standard practice in Filipino baking where getting that vibrant purple and pronounced ube taste requires the extract's concentration. Store opened ube halaya in the refrigerator where it keeps for several months, and keep extract in a cool, dark place where it lasts for years. If you absolutely cannot find ube products, you can make purple sweet potato puree as a substitute for halaya, though the flavor will be different and you'll need purple food coloring to achieve that signature color.
Creating Different Flavor Combinations
Once you've mastered the basic ube cookie recipe, experimenting with different mix-ins and variations keeps things interesting while showcasing ube's versatility. For a tropical twist, add shredded coconut to the dough along with macadamia nuts instead of white chocolate, creating cookies that taste like a Filipino vacation. Ube and matcha pair beautifully - swirl matcha-flavored dough with ube dough for stunning marbled cookies with complementary earthy flavors. Dark chocolate chunks instead of white create a more sophisticated, less sweet version where the cocoa's slight bitterness highlights ube's subtle complexity. For extra texture and flavor, fold in toasted coconut flakes and crushed freeze-dried strawberries or raspberries, creating pink and purple speckles throughout. Cream cheese frosting piped between two cookies turns them into sandwich cookies that are absolutely decadent. A simple glaze made from powdered sugar, milk, and a drop of ube extract drizzled over cooled cookies adds extra ube intensity and visual appeal. For holidays, press purple and white sprinkles onto the cookies before baking, or use colored sanding sugar that sparkles. Coffee and ube is a surprisingly good combination - add a tablespoon of instant espresso powder to the dough for mocha ube cookies that coffee lovers will adore. Each variation maintains that signature soft, chewy texture while exploring different flavor profiles that complement the purple yam.
Understanding Cookie Texture and How to Control It
The texture of these cookies - soft and almost cakey in the center with slightly crisp edges - results from specific ratios and techniques that you can adjust based on your preferences. The combination of butter and sugar creamed together extensively incorporates air that creates lift and tenderness. The ube halaya adds moisture that keeps cookies soft, while the ratio of flour to wet ingredients determines whether they're more cake-like or chewy. Using all granulated sugar rather than including brown sugar creates a crisper texture, while brown sugar would make them chewier with a bit more moisture. Baking at 350°F rather than higher temperatures allows cookies to bake through without over-browning on the edges. The slight underbaking when centers still look soft ensures they stay tender rather than becoming hard and dry. If you prefer flatter, chewier cookies, press the dough balls down slightly before baking and bake a minute longer. For taller, cakier cookies, don't flatten them at all and remove from the oven when they still look quite underdone in the centers. Adding an extra tablespoon of flour makes cookies more cake-like and structured, while reducing flour by a tablespoon creates softer, more tender results. Chilling the dough for an hour before baking (which this recipe doesn't require) would reduce spread and create thicker, chewier cookies if that's your preference.
Troubleshooting Common Ube Cookie Issues
Even straightforward cookie recipes sometimes don't turn out quite right, but understanding what went wrong helps you fix it next time. If your cookies spread into flat puddles rather than staying thick and puffy, several factors could be at fault - your butter may have been too soft or melted, your oven temperature might be too low, or you didn't cream the butter and sugar long enough to incorporate sufficient air. Make sure butter is only softened (leaving an indent when pressed) not melted, and cream it with sugar for a full three minutes. When cookies come out hard and dry instead of soft and chewy, they were either overbaked or the dough contained too much flour. Remove cookies when they still look slightly underdone in the centers, and make sure you're measuring flour correctly using the scoop-and-level method. If the ube flavor is weak or barely detectable, you either didn't use enough ube extract or the extract is old and has lost potency - don't be shy with the extract, as you need at least one full teaspoon for noticeable flavor. Cookies that are pale grayish-purple instead of vibrant purple didn't have enough ube extract, which provides most of the color. When cookies have a strange chemical or artificial taste, you used too much ube extract - while you need enough for color and flavor, more than two teaspoons can taste overwhelming. If the texture is dense and heavy rather than light and tender, you either didn't cream the butter and sugar long enough, overmixed after adding flour, or your leavening agents are expired and didn't work properly.
Storage and Keeping Cookies Fresh
Proper storage keeps these cookies as close to fresh-baked quality as possible, though like most cookies, they're truly at their best within the first day or two. Store completely cooled cookies in an airtight container at room temperature for up to three days, placing parchment paper between layers if stacking to prevent them from sticking together. Don't refrigerate cookies unless your kitchen is very hot, as refrigeration actually dries them out faster and makes them stale. The cookies will gradually become drier and less tender over several days as moisture evaporates. To combat this, try the classic baker's trick of adding a slice of fresh white bread to the container - the cookies will absorb moisture from the bread, staying softer while the bread becomes hard and stale. Replace the bread slice every day or two. For longer storage, freezing works beautifully. Let cookies cool completely, then freeze them in a single layer on a baking sheet until solid. Transfer frozen cookies to a freezer bag or container with parchment between layers, where they'll keep for up to a month. Thaw at room temperature for about twenty minutes, or warm briefly in the microwave for that fresh-baked texture. You can also freeze unbaked cookie dough balls, which is incredibly convenient for fresh cookies anytime. Scoop dough onto a tray, freeze until solid, then transfer to a freezer bag. Bake from frozen, adding one to two extra minutes to the baking time.
The Cultural Significance of Ube in Filipino Cuisine
Ube holds special cultural importance in Filipino food traditions, where it's been used for generations in countless desserts that are central to celebrations, holidays, and everyday treats. Traditional Filipino desserts featuring ube include halo-halo (a shaved ice dessert with ube ice cream and various toppings), ube halaya eaten on its own or spread on bread, bibingka (rice cakes with ube), puto (steamed cakes), and countless variations of cakes, pastries, and frozen treats. The vibrant purple color is instantly recognizable and associated with Filipino identity and pride. For Filipino people, ube desserts often carry nostalgic weight, reminding them of home, childhood, family gatherings, and their cultural heritage. The recent surge in ube's popularity in Western markets and mainstream coffee shops has been met with mixed feelings in the Filipino community - appreciation that their traditional ingredient is gaining recognition alongside concerns about cultural appropriation when non-Filipino companies profit from ube without acknowledging its origins or hiring Filipino creators. When making ube desserts, it's worth understanding and respecting this cultural context, learning about Filipino food traditions, supporting Filipino-owned businesses where possible, and giving credit to the culture that has treasured this ingredient for centuries. Baking with ube as a non-Filipino person can be an act of cultural appreciation and curiosity when approached with respect and proper attribution.
Teaching Baking Fundamentals Through This Recipe
These ube cookies provide an excellent opportunity to learn or teach fundamental baking techniques that apply far beyond this single recipe. The proper creaming method - beating butter until fluffy, then creaming with sugar until pale and airy - is a cornerstone technique used in countless cakes, cookies, and frostings. Understanding why ingredients need to be room temperature and what happens when they're not teaches the science behind baking success. Learning to incorporate dry ingredients with a light hand using folding motions rather than aggressive mixing demonstrates how to develop proper texture and avoid toughness. The recipe shows why you shouldn't overmix after adding flour, teaching about gluten development and its effects on tenderness. Recognizing when cookies are done - when edges are set but centers still look soft - builds the instincts for proper baking that only come with experience. Using a cookie scoop creates uniform portions that bake evenly, demonstrating the importance of consistency in baking. The optional technique of shaping cookies with a round cutter after baking teaches professional finishing touches that elevate homemade to bakery-quality. These fundamental skills transfer to other recipes, making someone who masters this cookie recipe a more competent baker overall. For teaching children or beginners, the vibrant purple color makes the process fun and engaging while building confidence through achievable, impressive results.
Scaling the Recipe and Batch Baking
This recipe yields about twelve to sixteen cookies depending on size, which is perfect for a small batch but sometimes you need more for parties, gifts, or serious cookie cravings. The recipe doubles easily - simply multiply all ingredients by two and follow the exact same method, though you may need to cream the butter and sugar slightly longer when working with larger quantities. Triple batches work too, though at that point you might want to mix in two separate bowls or use a stand mixer with a large capacity bowl. When baking multiple batches, organization becomes crucial. Have all ingredients measured and ready before starting, mix one large batch of dough rather than multiple small batches which is more efficient, and have multiple baking sheets ready so you can prep the next batch while one bakes. If you only have one or two baking sheets, arrange unbaked dough balls on pieces of parchment paper cut to fit your sheets. When cookies come out of the oven, slide the entire parchment off onto a cooling rack, let the pan cool for a minute, then slide a new parchment with raw dough onto the pan and continue baking. This rotation system keeps things moving efficiently. For gift-giving, bake cookies and package them in clear cellophane bags tied with ribbon, or arrange in decorative tins with parchment between layers. The stunning purple color makes them particularly gift-worthy, and including a small note about what ube is educates recipients about this special ingredient.
 Pin it
These ube cookies represent the perfect intersection of traditional Filipino flavors and familiar Western-style baking, creating something that feels both exotic and comforting at the same time. What makes this recipe genuinely valuable is how it demystifies working with ube by putting it in the accessible format of chocolate chip-style cookies that everyone understands and loves. The soft, chewy texture and melty white chocolate provide familiar comfort, while the purple yam flavor and stunning color add excitement and novelty that makes these cookies special and memorable rather than just another sweet treat. Once you've tasted how delicious ube is in cookies, you'll likely find yourself wanting to explore it in cakes, ice cream, bread, and other applications, discovering a whole category of flavors that deserves much more attention in Western baking. The recipe also teaches important techniques about proper creaming, gentle folding, and recognizing doneness that improve your overall baking skills beyond just this single recipe. Whether you have Filipino heritage and want to connect with traditional flavors, you're simply curious about trying new ingredients, or you just love beautiful purple cookies that taste amazing, this recipe delivers satisfaction on every level. The combination of that unique ube flavor - nutty, vanilla-like, slightly floral - with sweet white chocolate and tender cookie texture creates something truly craveable that keeps you reaching for another cookie until suddenly the entire batch has disappeared and you're already thinking about making more.
Frequently Asked Questions
- → What does ube taste like?
- Ube has a mild, slightly nutty and vanilla-like flavor. It's sweet but earthy, kind of like a cross between sweet potato and vanilla. Not overpowering at all.
- → Can I skip the ube extract?
- You can, but the extract really boosts the purple color and ube flavor. Without it, your cookies will be lighter in color and have a milder taste.
- → Where do I buy ube halaya?
- Check Asian grocery stores, especially Filipino markets. You can also find it online on Amazon or specialty food websites. It usually comes in jars.
- → How do I store these cookies?
- Keep them in an airtight container at room temperature for up to 5 days. They stay soft and chewy. You can also freeze them for up to 3 months.
- → Can I use dark chocolate instead?
- Sure! Dark or milk chocolate works fine, but white chocolate really complements the ube flavor nicely and looks pretty against the purple color.
- → Why are my cookies flat?
- Make sure your butter isn't too soft or melted. Also, don't skip the chilling step if your dough feels too warm. Cold dough spreads less.