
 Pin it
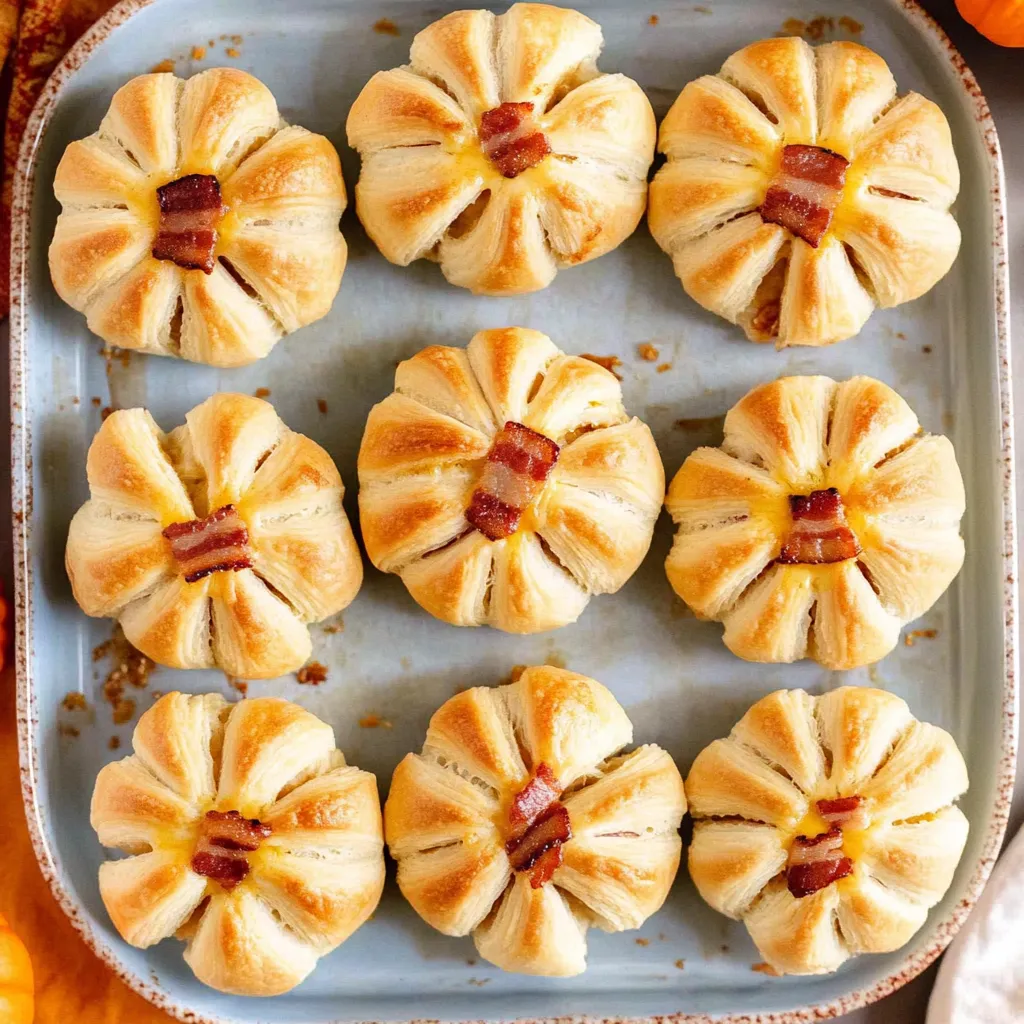
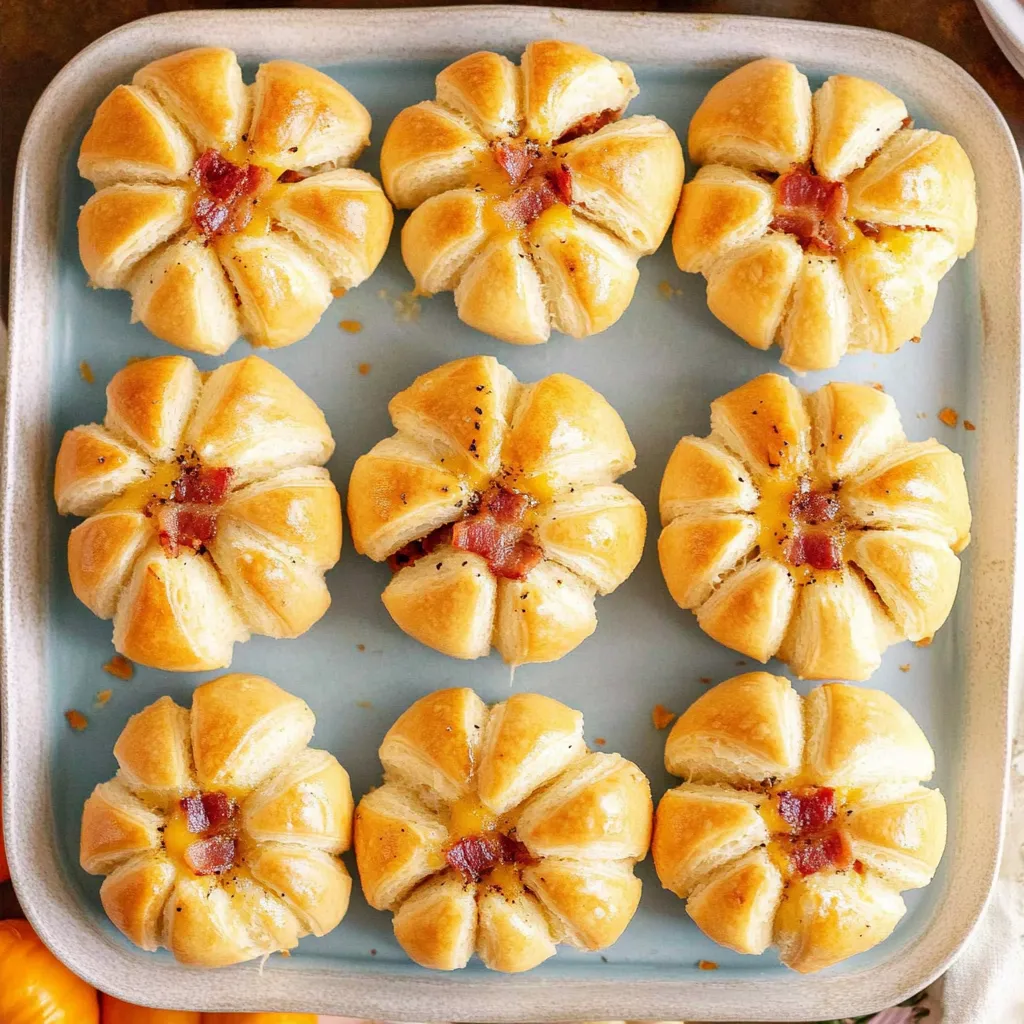
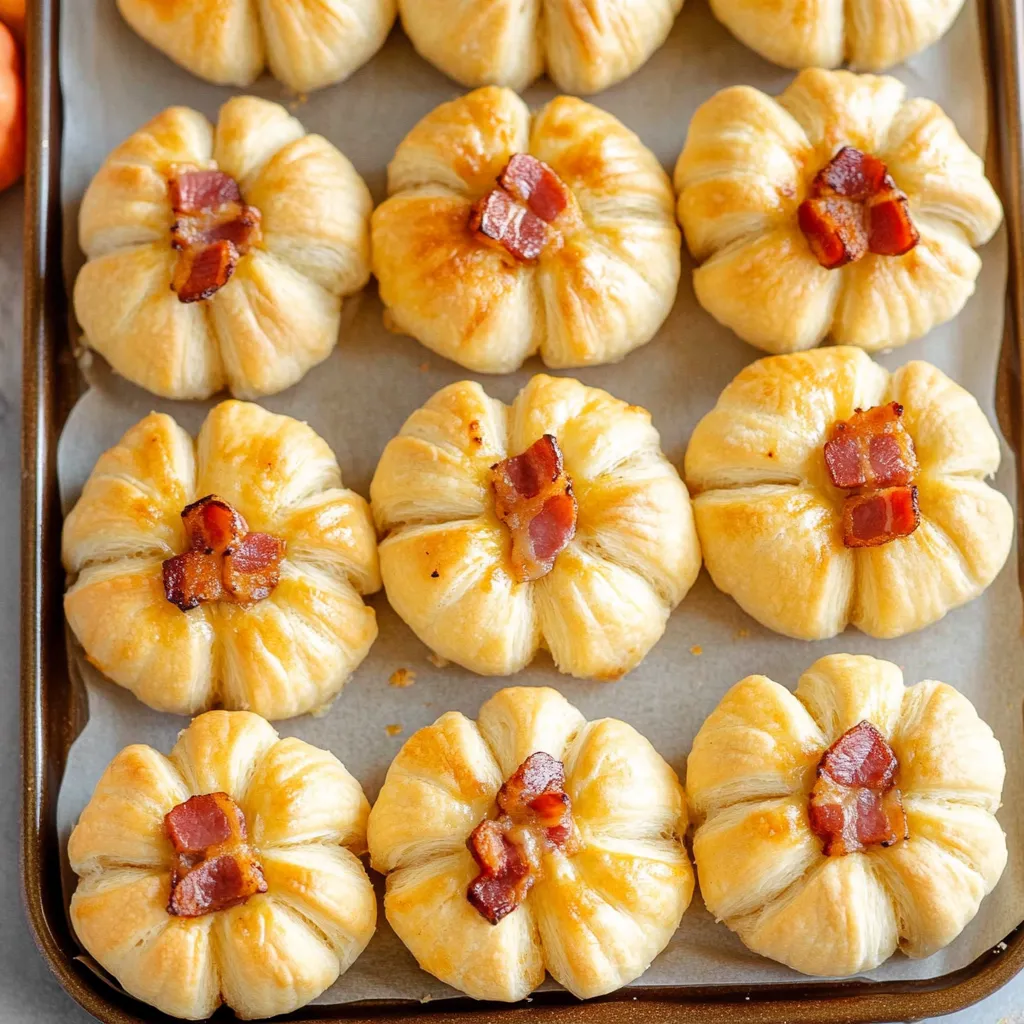
Shaping store-bought biscuit dough into pumpkins stuffed with bacon and cheese creates appetizers that look like you spent hours when the actual work takes maybe 20 minutes. Kitchen twine tied around the filled dough creates those signature pumpkin ridges, and a piece of bacon stuck on top becomes the stem. The biscuits bake up golden and flaky on the outside while melted cheddar and crispy bacon hide inside, making these disappear faster than you can arrange them on a serving platter. These work perfectly for Halloween parties, Thanksgiving appetizers, or any fall gathering where you want food that tastes good and looks impressive without complicated techniques.
These pumpkin rolls started as football-shaped appetizers I made for a Super Bowl party, but I realized the same concept would work for fall if I just changed the shape. The first batch came out looking more like lumpy potatoes than pumpkins because I tied the string too tight, but adjusting to looser wrapping solved that problem immediately. My kids now request these specifically for Halloween parties at school, and other parents always ask how I made them. When I explain it's just canned biscuits, cheese, and bacon with string tied around them, they're always surprised something so simple creates such dramatic results.
Ingredients and Why They Matter
- Refrigerated Grand biscuits: 1 can, 8 biscuits - The larger Grand size provides enough dough to wrap around filling comfortably; regular-sized biscuits work but create smaller pumpkins
- Cheddar cheese: 4 ounces cut into ½-inch cubes - Pre-cut cheese cubes save time, or cut your own from a block; sharp cheddar has more flavor than mild
- Cooked bacon: 6-8 slices, crumbled plus 2 whole pieces for stems - Crispy bacon adds salty, smoky flavor; cook ahead to save time, making sure to drain grease well
- Baking twine: kitchen string - Food-safe cotton twine withstands oven heat; regular craft string isn't food-safe and shouldn't be used
- Melted butter: 2-3 tablespoons - Brushed on before and after baking for golden color and rich flavor
- Dried oregano: ½ teaspoon, optional - Sprinkled on top adds herbal notes; Italian seasoning substitutes easily or skip entirely
- Dipping sauce: ranch, marinara, or your choice - Served alongside for extra flavor; optional but enhances the experience
How To Make It
- Prepare all components:
- Turn your oven to 400°F and let it preheat completely. Line two baking sheets with parchment paper to prevent sticking and make cleanup easier. Take your bacon and cook it until crispy if you haven't already done this - I usually cook mine in the oven on a baking sheet at 400°F for about 15-20 minutes. Set aside two whole strips for making stems later, then chop or crumble the remaining bacon into small pieces. If your cheese isn't already cut into cubes, cut it now into ½-inch pieces - you'll need two cubes per roll, so 16 cubes total for 8 rolls. Remove the can of biscuits from the refrigerator and let it sit at room temperature for about 5 minutes, which makes the dough easier to work with and less likely to tear. Arrange all your prepped ingredients on the counter within easy reach so you can work efficiently through the assembly process.
- Flatten and fill the biscuits:
- Take one biscuit from the can and place it on a clean work surface. Use your hands to gently press and stretch it into a flat disc about ¼ inch thick and roughly 4-5 inches across. Don't roll it with a rolling pin because that compresses the layers too much - just use your palms and fingers to flatten evenly. Place two cheese cubes in the center of the flattened dough, stacking them or placing them side by side. Top the cheese with a generous pinch of crumbled bacon pieces, maybe a tablespoon or so. Don't overfill or you won't be able to seal the dough properly. Carefully pull the edges of the dough up and around the filling from all sides, gathering them at the top like closing a drawstring bag. Pinch the gathered dough together firmly at the top, sealing it completely so no cheese or bacon shows and nothing can leak out during baking. Roll the filled dough gently between your palms to create a smooth, round ball shape. Set it aside and repeat this entire process with the remaining seven biscuits until all are filled, sealed, and shaped into rounds.
- Cut and position the twine:
- Cut sixteen pieces of kitchen twine, each about 12 inches long - you need two pieces per pumpkin roll. Having them pre-cut and ready makes the next step much smoother. Take one filled dough ball and place it in the center of one piece of twine. Bring the ends of the string up over the top of the ball and cross them, then rotate the ball 90 degrees so the string now forms a cross or plus sign when viewed from above. The string should divide the ball into four sections. Don't pull the string tight yet - leave it somewhat loose because the dough needs room to expand during baking. If you tie it too tight, the string will cut into the dough or prevent proper rising.
- Complete the pumpkin shape:
- With that first string in place creating four sections, take a second piece of twine and position it perpendicular to the first string, essentially dividing each of those four sections in half. You're creating eight equal sections around the ball that will look like pumpkin ridges after baking. Cross the ends on top just like you did with the first string, keeping tension loose enough that the dough has expansion room. Tie the string off with a simple knot on top of the roll, then trim the excess string, leaving just enough to remove later. The tied ball should look like it has eight distinct sections or wedges. Repeat this entire tying process with all remaining filled rolls. The first few might feel awkward, but by the third or fourth one, the motion becomes natural and quick.
- Prepare for baking:
- Arrange your tied rolls on the prepared baking sheets, spacing them at least 2 inches apart because they'll expand during baking. Melt about 2 tablespoons of butter in the microwave and use a pastry brush to lightly coat the top of each tied roll. This butter helps them brown beautifully and adds rich flavor. If using oregano or Italian seasoning, sprinkle it lightly over the buttered tops now. The herbs add visual interest and subtle flavor, but skipping them doesn't hurt anything if you prefer plain or don't have them on hand.
- Bake until golden:
- Slide the baking sheets into your preheated 400°F oven on the center rack. Set a timer for 12 minutes, then check on them. You're looking for the dough to turn golden brown all over with slightly darker color on the highest points. The tied sections should have created visible ridges that look like pumpkin segments. If they're still pale after 12 minutes, continue baking and check every minute until they reach that golden color. Total baking time usually runs 12-15 minutes depending on your oven and how thick you made the dough. When done, the rolls should feel firm when gently pressed and the bottoms should be golden when you lift one slightly to peek.
- Remove strings and add stems:
- Take the baking sheets out of the oven and let the rolls cool for about 5 minutes. They'll be too hot to handle immediately and the cheese inside will be molten. Once cool enough to touch, use scissors or just pull with your fingers to cut and remove all the kitchen twine from each pumpkin. The string should come off easily without tearing the dough. Brush the tops with a bit more melted butter for shine and extra flavor. Take those two pieces of bacon you set aside earlier and break off small pieces about 1 inch long that look like little stems. Press one bacon stem gently into the center top of each pumpkin, pushing just hard enough that it sticks but not so hard that you squish the roll or break the bacon. If the bacon keeps breaking, use a small knife to cut a tiny slit in the top first, then insert the stem into that opening.
 Pin it
Cheddar cheese became my default choice after testing these with multiple varieties because it melts beautifully without getting too oily or stringy. My husband prefers pepper jack for a spicy kick, which works great if your crowd likes heat. Swiss cheese tastes good too but doesn't provide the same visual contrast against the golden dough that orange cheddar does. Kids at parties always seem to prefer cheddar over fancier cheese options anyway, so I stick with what I know will get eaten.
The String Technique Explained
Tying kitchen twine around these rolls intimidates people initially, but breaking it down into steps makes it manageable. The key is remembering you're just making a cross pattern, then adding another cross pattern perpendicular to the first. Think of it like drawing a plus sign, then drawing an X through it to divide the circle into eight sections. Keeping the string loose feels counterintuitive because you want defined ridges, but the dough's expansion during baking creates those ridges naturally. Tied too tight, the string either cuts through the dough or leaves deep grooves that make the rolls look strange. Practice on one or two first if you're nervous - once you understand the motion, the rest go quickly.
Filling Variations
While bacon and cheddar creates the classic combination, countless other fillings work using the same basic method. Cooked sausage crumbles replace bacon for a different meat flavor. Pepperoni and mozzarella make these taste like pizza rolls. Ham and Swiss create a breakfast-style version. For vegetarian options, skip meat entirely and use a mix of cheeses with some sautéed mushrooms or spinach. Cream cheese mixed with herbs spreads easily and adds tangy creaminess. Jalapeño and pepper jack cater to spice lovers. The biscuit dough provides a neutral canvas that complements virtually any savory filling you can imagine.
Size Adjustments
Using regular-sized biscuits instead of Grand makes smaller pumpkins perfect for party appetizers where people want just a bite or two. You'll get 8 smaller pumpkins but might want to use only one cheese cube and less bacon per roll since there's less dough. Homemade yeast roll dough or crescent roll dough also works if you prefer from-scratch options, though this adds significant time and effort. Cut homemade dough into circles roughly the same size as a Grand biscuit would flatten to. The technique stays identical regardless of dough source - flatten, fill, seal, tie, bake.
Make-Ahead Strategy
These work beautifully for advance preparation, which reduces party-day stress. Assemble completely up to the point of baking - filled, sealed, tied, and arranged on baking sheets. Cover tightly with plastic wrap and refrigerate for up to 8 hours. When ready to bake, remove from refrigerator, brush with butter, and bake as directed, possibly adding 2-3 minutes to account for starting cold. You can also freeze unbaked rolls on a baking sheet until solid, then transfer to freezer bags for up to a month. Bake directly from frozen, adding 5-7 minutes to the baking time. Make the bacon stems fresh rather than doing them ahead since they stay crispier.
Serving Suggestions
These pumpkin rolls work in multiple contexts depending on how you present and serve them. At parties, arrange them on a platter with small bowls of ranch dressing and marinara sauce for dipping. For dinner sides, serve 2-3 per person alongside soup or salad. As appetizers before a larger meal, one per guest usually suffices. Kids love these in lunchboxes at room temperature. Create a festive display by arranging them on a bed of fall leaves or around a small decorative pumpkin. They look especially cute lined up on a wooden board with autumn-themed decorations scattered around.
Reheating Leftovers
Properly reheating these maintains quality rather than turning them soggy or dry. The best method involves placing cold rolls on a baking sheet in a cold oven, then turning it to 350°F and letting them warm as the oven preheats. This gradual heating warms them through without overcooking the dough. They're ready when the oven reaches temperature and the rolls feel warm throughout, usually about 10-12 minutes total. Microwave reheating works for speed but makes the dough slightly rubbery - if using this method, wrap in a damp paper towel and heat in 15-second intervals. Air fryers also reheat these nicely at 325°F for about 3-4 minutes.
 Pin it
These cheese-stuffed pumpkin rolls represent the kind of recipe I love sharing because they deliver maximum impact with minimal skill required. The wow factor comes from the shape created by simple string, not from complex techniques or hard-to-find ingredients. When you set a platter of these on the table and watch people's faces light up before they've even tasted them, you know you've made something special. The fact that they also taste delicious - warm, flaky biscuits with melted cheese and bacon - just confirms that impressive-looking food doesn't have to sacrifice flavor for appearance. Sometimes the best party food is whatever gets people talking and reaching for seconds, which these pumpkin rolls accomplish every single time.
Frequently Asked Questions
- → Can I make these pumpkin rolls ahead of time?
- Yes, you can assemble them a few hours before baking. Keep them covered in the fridge, then bake when ready. They also reheat well for up to a week.
- → What kind of cheese works best for these rolls?
- Cheddar is great, but you can use any cheese that melts well. Try mozzarella, pepper jack, or even a combination of your favorites.
- → Do I have to use kitchen twine?
- Kitchen twine works best because it's oven-safe. Don't use regular string or anything plastic-based as it won't hold up in the heat.
- → Why is my cheese leaking out during baking?
- This usually happens when the dough isn't sealed properly. Make sure to pinch all the edges together tightly and check for any holes before tying with twine.
- → Can I make these without bacon for vegetarians?
- Absolutely! Just skip the bacon and add extra cheese, or try adding sautéed mushrooms or diced peppers for more flavor.
- → What temperature should I reheat leftover pumpkin rolls?
- Put them in a cold oven, set to 350 degrees, and let them warm up as the oven heats. This prevents the dough from getting too brown or dry.