
 Pin it
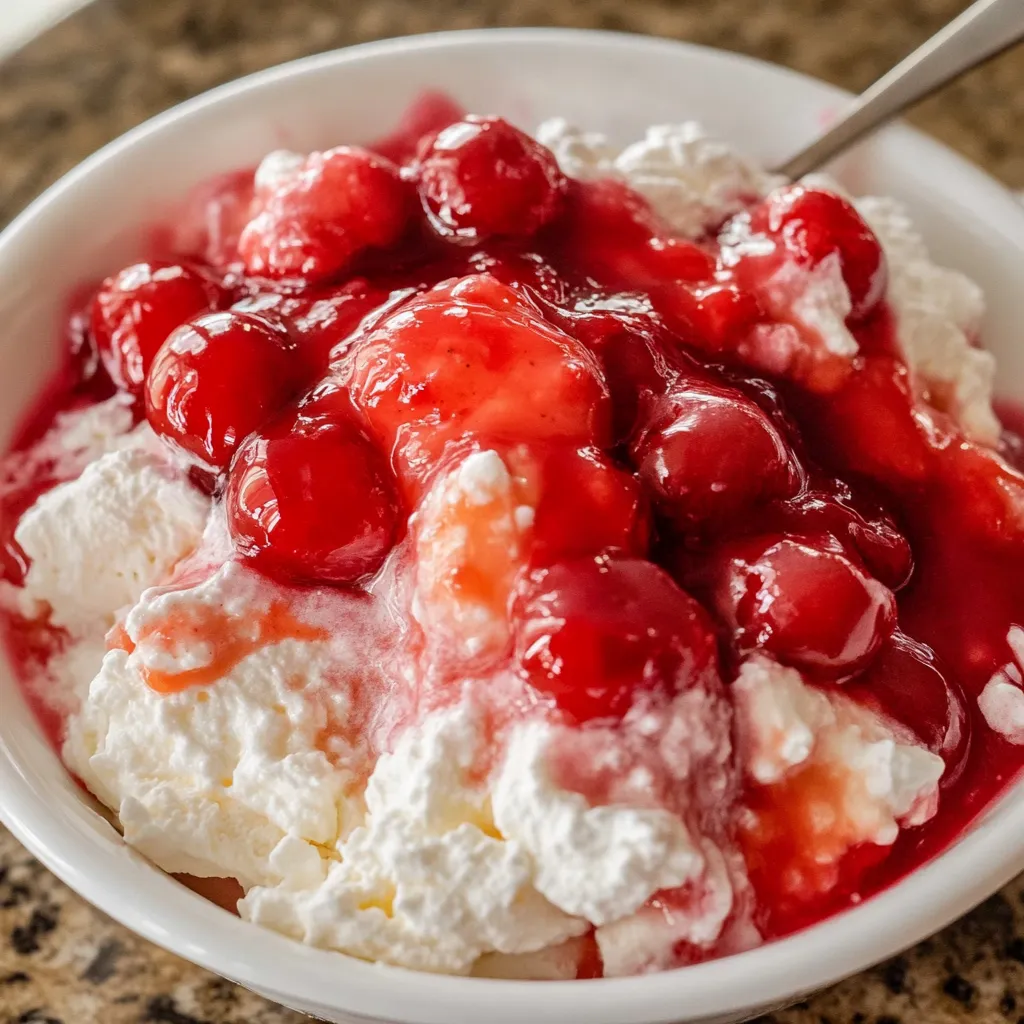
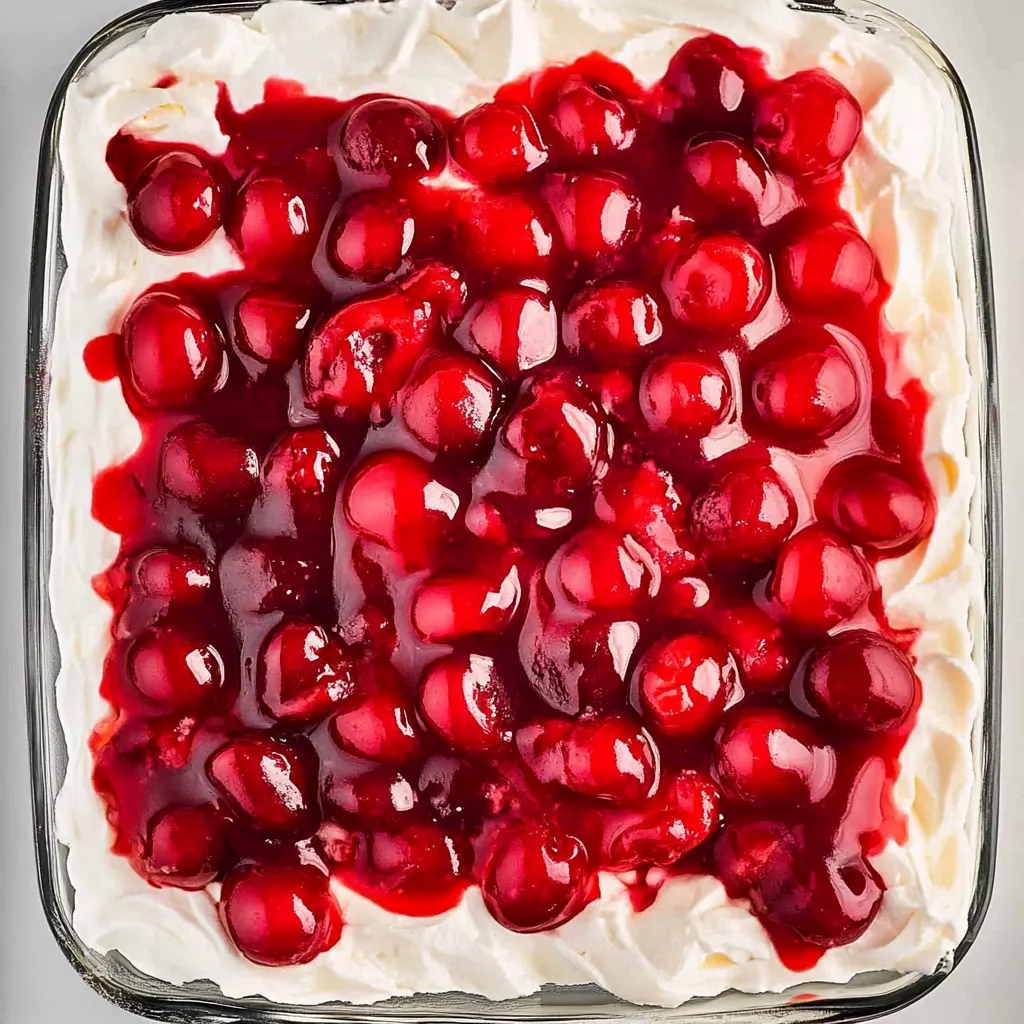
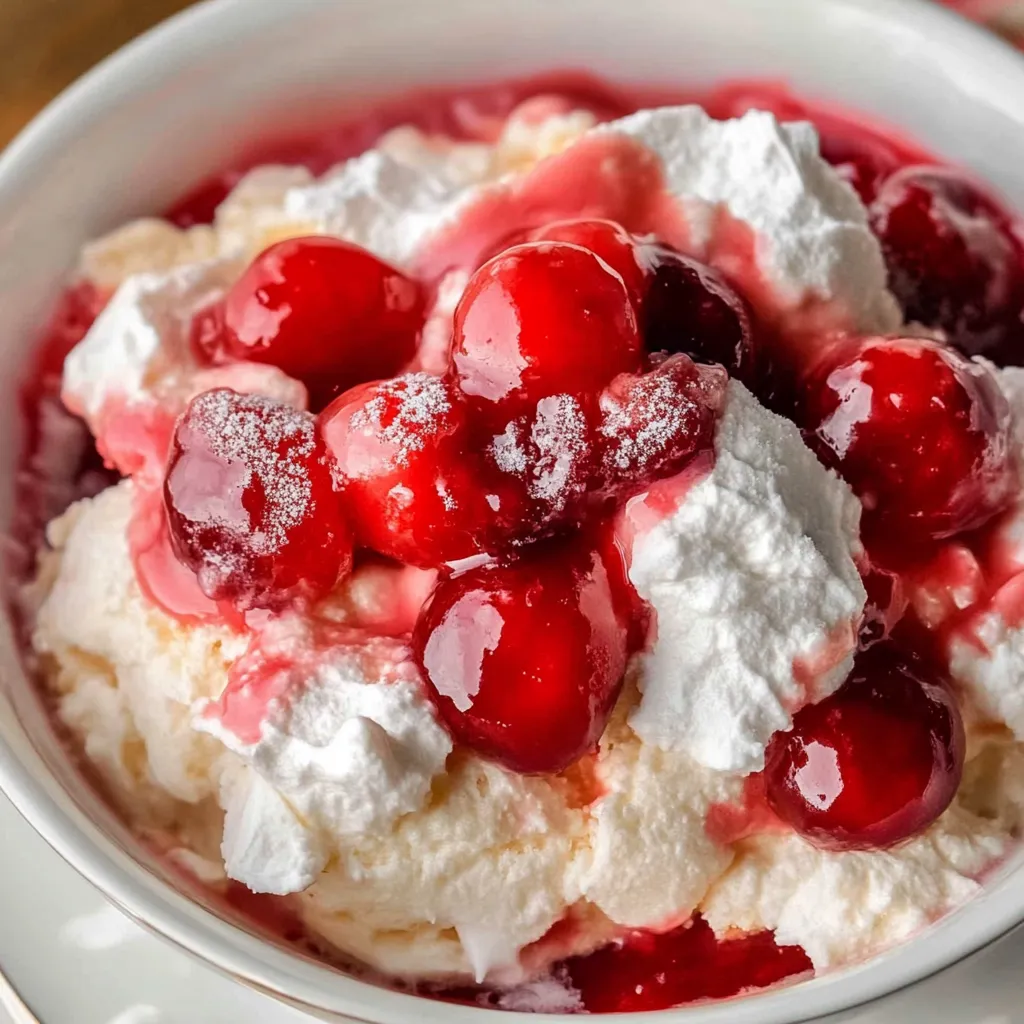
This cherries in the snow delivers everything you want from vintage potluck dessert - light, fluffy store-bought angel food cake (that ultra-airy, spongy, white cake with almost marshmallow-like texture made primarily from egg whites) torn into bite-sized pieces creating soft, cloud-like base, folded into sweet-tangy cream cheese mixture (softened cream cheese whipped with powdered sugar until fluffy then thinned with milk for spreadability and lightened with Cool Whip creating mousse-like texture that's richer than plain whipped cream but airier than cheesecake filling), all spread into glass baking dish creating substantial white layer that justifies the "snow" in the name, then crowned with vibrant red cherry pie filling (preferably "more fruit" versions packed with actual cherries rather than just gelatinous red goo) creating dramatic color contrast and tart-sweet fruit component that cuts through the richness. What makes this retro dessert so brilliant is how it requires literally zero baking, zero cooking, and just twenty minutes of hands-on time making it the ultimate stress-free entertaining dessert when you need something impressive-looking that won't heat up your kitchen or require any actual baking skills beyond operating a hand mixer, while the make-ahead friendly nature (actually improves after sitting overnight as flavors meld and cake softens further absorbing some of that creamy mixture) means you can prepare it the day before your event and just pull it from the fridge when dessert time arrives. The genius is in the textural and flavor contrasts - the ethereally light angel food cake that practically dissolves on your tongue, the rich-but-fluffy cream cheese layer that tastes almost like no-bake cheesecake filling, and those tart-sweet cherries providing fruity brightness and visual drama, while the presentation in clear glass dish (trifle bowl or 9x13 baking dish) showcases those pretty layers making this look far more complicated and fancy than the simple assembly process actually is.
The first time making this reveals how easily the angel food cake tears into pieces and how it almost melts into the cream cheese mixture creating cohesive dessert rather than distinct cake chunks. That moment when you spread the cherry pie filling over the white layer and see that dramatic red-and-white contrast creates satisfaction knowing this looks impressive. Tasting that first spoonful where you get light cake, creamy filling, and tart cherries all together creates understanding of why vintage potluck desserts like this have endured for decades - they're easy, crowd-pleasing, and deliver genuine satisfaction despite simple preparation.
Ingredients - What You Need and Why
- Full-fat cream cheese: 8 ounces (one standard block) softened to room temperature provides the rich, tangy base for the creamy layer; full-fat is essential rather than reduced-fat which can be watery and less flavorful; the cream cheese should be very soft (leave at room temperature for at least one hour or microwave in ten-second intervals) so it whips smoothly without lumps; this creates the "cheesecake-adjacent" flavor that makes this more special than just whipped cream
- Powdered sugar (confectioners' sugar): about 1 cup provides sweetness while dissolving completely into the cream cheese without graininess that granulated sugar would create; powdered sugar's fine texture integrates smoothly creating silky mixture; the amount can be adjusted to taste - start with three-quarters cup if you prefer less sweet
- Milk: half a cup (whole milk preferred for richness, though 2% works) thins the cream cheese mixture to proper consistency making it spreadable and foldable; without milk, the cream cheese would be too thick and dense; the milk also helps the Cool Whip incorporate smoothly; add it gradually to control consistency
- Cool Whip (frozen whipped topping): one 8-ounce container thawed provides the light, airy texture that makes this dessert fluffy rather than dense; Cool Whip's stability (doesn't deflate or weep like real whipped cream) makes it ideal for make-ahead desserts; lite or fat-free Cool Whip substitutes for lower calories; freshly whipped heavy cream (1½ cups whipped to stiff peaks) substitutes for more natural option though it's less stable for advance preparation
- Store-bought angel food cake: one 10-inch round cake (about 10-12 ounces) provides the light, airy base that defines this dessert; angel food cake's unique spongy texture (made primarily from egg whites, no butter or oil) stays soft and fluffy even when mixed with the cream cheese layer; store-bought saves tremendous time though homemade angel food cake can be used if you're ambitious; the cake should be plain white (not chocolate or flavored) to maintain the "snow" visual
- Cherry pie filling: two 21-ounce cans provide the tart-sweet fruit topping and vibrant red color; look for brands labeled "more fruit" or "premium" with visible cherry pieces rather than gelatinous red gloop; the canned pie filling is essential rather than fresh cherries which would be too tart and release too much liquid; other pie fillings (blueberry, raspberry, strawberry, apple) substitute for different flavors and colors
How to Make Cherries in the Snow - Step by Step
- Make the fluffy cream cheese mixture:
- Ensure your cream cheese is completely softened to room temperature - this is crucial for smooth mixing without lumps. Cut the 8-ounce block of cream cheese into smaller chunks and place in a large mixing bowl. Add 1 cup of powdered sugar (or start with three-quarters cup if you prefer less sweet). Using a hand mixer (or stand mixer with paddle attachment), beat the cream cheese and powdered sugar on medium speed for about two to three minutes until the mixture is light, fluffy, and completely smooth with no lumps visible. Stop and scrape down the sides of the bowl as needed. The mixture should look pale and creamy, almost like frosting. With the mixer running on low speed, slowly pour in one-quarter cup of the milk. Beat until completely incorporated and smooth - the mixture will thin slightly and become more spreadable. Add the remaining one-quarter cup of milk and beat again until smooth. The consistency should now be like thick, pourable cream - not as thick as frosting but not as thin as milk. Taste and adjust sweetness if needed. Now add the entire 8-ounce container of thawed Cool Whip (make sure it's fully thawed, not frozen or icy). Using a rubber spatula, gently fold the Cool Whip into the cream cheese mixture using broad, sweeping motions from bottom to top. Fold gently rather than stirring vigorously - you want to maintain the Cool Whip's airiness. Continue folding for about one to two minutes until the mixture is uniform in color and texture with no streaks of white Cool Whip or cream cheese visible. The final mixture should be light, fluffy, mousse-like, and pale in color. Set aside while you prepare the cake.
- Tear cake and fold into creamy mixture:
- Remove your store-bought angel food cake from its packaging. Using your hands (this is a tactile, hands-on step - no knife needed), tear the cake into bite-sized pieces roughly one to two inches in size. Don't worry about uniform pieces - irregular chunks are fine and actually create nice texture variation. As you tear pieces, place them directly into the bowl with the cream cheese mixture. Once all the cake is torn and added, use your rubber spatula to gently fold the cake pieces into the creamy mixture. Use the same gentle folding motion as before - you want to coat every piece of cake with the mixture without crushing or compressing the delicate angel food cake. Continue folding for about two to three minutes until the cake and cream mixture are thoroughly combined. The mixture should look cohesive with white cake pieces suspended throughout the fluffy cream - not with cake pieces sitting separately or pools of unmixed cream. The cake will absorb some of the moisture from the cream mixture and soften slightly, which is perfect. Transfer this entire mixture into your serving dish - either a 9x13-inch clear glass baking dish (so you can see the layers from the sides) or a trifle bowl for more elegant presentation. Using your spatula, spread the mixture evenly across the bottom of the dish, smoothing the top to create level surface. The layer should be relatively thick - about two to three inches depending on your dish depth.
- Top with cherry filling and refrigerate:
- Open both cans of cherry pie filling. Pour the contents evenly over the white cake-cream layer, spreading with a spoon or spatula to cover the entire surface edge to edge. Try to distribute the cherries evenly so every serving will get fruit. The red cherry layer provides beautiful contrast against the white "snow" beneath - this is the visual moment that makes the dessert impressive. Cover the dish tightly with plastic wrap (or use a baking dish with a fitted lid) and refrigerate for at least two to three hours, though overnight is better. During this refrigeration time, the flavors meld, the cake continues absorbing moisture from the cream becoming even softer and more integrated, and the dessert firms up slightly making it easier to serve neat portions. When ready to serve, remove from refrigerator, uncover, and scoop portions using a large spoon making sure to get some of each layer in every serving. The dessert can sit at room temperature for about thirty minutes before serving if you prefer it less cold, though most people enjoy it straight from the fridge for maximum refreshment.
 Pin it
Understanding that this represents "icebox dessert" category - no-bake refrigerated desserts popular mid-20th century - helps you appreciate this as part of broader American dessert tradition rather than random recipe.
Understanding Vintage Icebox Desserts and Mid-Century American Food Culture
Cherries in the snow belongs to category of "icebox desserts" (now called refrigerator desserts) that proliferated in American home cooking from 1940s-1970s. These no-bake desserts emerged alongside widespread refrigerator ownership (before that, only wealthy homes had iceboxes) and availability of convenience products like Cool Whip (introduced 1967), angel food cake mixes, and canned pie fillings. The recipes appeared in community cookbooks, church recipe collections, and promotional materials from food companies encouraging use of their products. These desserts solved practical problems: they didn't heat up kitchens in summer (before air conditioning was universal), required minimal skill (no tempering chocolate, no precise oven temperatures, no delicate pastry work), used shelf-stable ingredients available at any grocery store, and could be made ahead for potlucks and church suppers. The aesthetic emphasized bright colors, clear glass serving dishes showing off layers, and names evoking imagery ("Cherry Delight," "Heavenly Hash," "Strawberry Dream"). The specific combination of angel food cake with cream cheese mixture has various names across regions - "Angel Lush," "Cherry Angel," "Better Than Sex Cake" (various desserts claim this provocative name) - but the formula remains consistent. The "snow" reference plays on the white cream layer resembling snow with red cherries like holly berries or a Christmas scene. Understanding this context helps appreciate that these recipes weren't considered low-effort shortcuts but rather modern, efficient cooking embraced by busy homemakers juggling families and outside employment. The desserts remain popular at potlucks, church dinners, and family gatherings particularly in Midwest and South where these food traditions persist strongly, representing continuity with mid-century American foodways.
Creating Flavor Variations and Creative Additions
While classic cherries in the snow is delicious as written, exploring variations honors different fruit preferences while maintaining the fundamental no-bake layered dessert format. For blueberry version, substitute blueberry pie filling creating patriotic blue-and-white presentation perfect for Fourth of July or summer gatherings. Strawberry cherries in the snow uses strawberry pie filling for softer pink color and sweeter, less tart flavor appealing to those who find cherries too sharp. Mixed berry variation combines half cherry and half raspberry or blackberry filling for more complex fruit flavor. Chocolate angel food cake version uses chocolate angel food cake instead of white for chocolate-cherry pairing reminiscent of Black Forest cake. Pineapple dream uses crushed pineapple (well-drained) and adds shredded coconut to cream cheese layer for tropical twist. Lemon version adds two tablespoons of lemon zest and juice to cream cheese mixture with blueberry topping creating lemon-blueberry combination. Peach cobbler style uses peach pie filling with cinnamon added to cream cheese layer for Southern-inspired variation. Apple pie version uses apple pie filling with pumpkin pie spice mixed into cream cheese creating fall-appropriate dessert. Raspberry white chocolate adds white chocolate chips to cream cheese layer with raspberry filling. Almond extract variation includes one teaspoon of almond extract in cream cheese mixture complementing cherry flavor beautifully. Trifle presentation layers half the cream mixture, then pie filling, then remaining cream mixture in clear trifle bowl creating more dramatic multi-layer appearance. Individual parfaits portion into small glasses or mason jars for personal servings perfect for parties or meal prep. Each variation maintains the no-bake simplicity while exploring different flavor profiles suitable for various occasions and preferences.
Troubleshooting Common No-Bake Dessert Problems
Even with straightforward assembly, sometimes layered desserts don't turn out perfectly, but understanding solutions prevents disappointment and improves results. If the cream cheese mixture has lumps rather than being smooth, your cream cheese was too cold when mixed or you didn't beat it long enough - ensure cream cheese is room temperature (leave out at least one hour), beat for full two to three minutes until completely smooth, and if lumps persist, microwave mixture briefly (ten seconds) then beat again. When the dessert is too runny and won't set, you either used too much milk thinning it excessively, used low-fat cream cheese which has higher water content, or didn't refrigerate long enough - reduce milk to one-third cup if mixture seems thin, always use full-fat cream cheese, and refrigerate minimum four hours or overnight. If the dessert tastes too tangy or sour, you used too much cream cheese relative to Cool Whip and sugar, or the pie filling is unusually tart - increase Cool Whip to 12 ounces or add more powdered sugar to balance, and taste pie filling before using (some brands are much tarter than others). Dessert that's too sweet used too much powdered sugar or very sweet pie filling - reduce sugar to three-quarters cup, use "lite" pie filling, or add squeeze of lemon juice to cream mixture for balance. When the layers don't look distinct and everything mushes together, you either stirred too vigorously deflating the mixture, added cherry filling while cream layer was still warm, or served too soon before it set - fold gently maintaining airiness, ensure cream layer is well-chilled before adding fruit, and refrigerate minimum three hours. If the top dries out and forms skin, it wasn't covered properly during refrigeration - always cover tightly with plastic wrap pressed directly on surface or use container with tight-fitting lid. Dessert that tastes flat and boring needs more flavor - add vanilla or almond extract to cream mixture, use flavored angel food cake, or add citrus zest for brightness. When cake pieces are too large creating chunky texture rather than integrated dessert, you didn't tear them small enough - aim for one to two-inch pieces maximum allowing them to distribute throughout mixture and soften properly. If it's difficult to serve neat portions because everything falls apart, the mixture was too loose or you didn't refrigerate long enough - ensure proper cream cheese to Cool Whip ratio and refrigerate minimum four hours or overnight for best sliceable texture.
Complete Meal Planning and Serving Suggestions
Understanding what to serve alongside cherries in the snow creates complete meals leveraging this dessert's versatility and lightness. For summer BBQ and cookouts, serve this as refreshing finish after grilled burgers, hot dogs, ribs, or chicken where its cold, light nature provides perfect contrast to heavy, smoky meats. Potluck dinners feature this as crowd-pleasing dessert that travels well in its baking dish and serves many without requiring cutting or plating - guests can scoop their own portions. Holiday meals (Christmas, Easter, Fourth of July) showcase the dramatic red-and-white color scheme appropriate for festive occasions where presentation matters. Birthday celebrations offer this as alternative to traditional cake for people who prefer lighter desserts or don't like frosting-heavy cakes. Bridal and baby showers present this in trifle bowl for elegant afternoon dessert alongside tea and finger sandwiches. Church suppers and community dinners rely on desserts like this that are economical, feed crowds, and require no on-site preparation beyond refrigeration. Family reunions feature this as nostalgic dessert that multiple generations appreciate - older folks remember it from their youth while younger people enjoy discovering "new" vintage recipes. Picnics pack this in insulated cooler with ice packs keeping it cold and refreshing on hot days. For complete meal planning, serve after hearty main courses like lasagna, pot roast, fried chicken, or casseroles where the light dessert prevents uncomfortable fullness. Pair with coffee or iced tea rather than adding more richness. Some people serve with additional whipped cream dolloped on individual portions though the dessert already contains plenty of creamy element. The key is recognizing this works best as finish to substantial meals providing refreshing contrast, or as star of dessert tables at gatherings where its visual appeal and crowd-pleasing flavor shine.
Storage, Freezing, and Make-Ahead Strategies
Understanding proper storage and advance preparation maximizes convenience while maintaining optimal quality and food safety. Freshly assembled cherries in the snow should be refrigerated immediately and kept cold until serving - the cream cheese and Cool Whip require refrigeration for food safety. Store covered tightly with plastic wrap or in container with fitted lid refrigerated for up to three to four days - the dessert remains perfectly good throughout this time though the angel food cake continues softening becoming more pudding-like in texture (some people prefer this ultra-soft texture, others like it fresher with more cake structure). For best results, make this one to two days ahead allowing flavors to meld and texture to develop properly - day-old cherries in the snow tastes better than freshly made. The dessert can be assembled up to three days before your event stored refrigerated, though add the cherry topping only one day ahead if you want the white layer to stay pristine white (cherry juice eventually bleeds slightly into cream layer creating pink tinge, which is fine but less dramatic visually). Don't freeze assembled cherries in the snow - Cool Whip separates and becomes grainy when frozen and thawed, cream cheese can become crumbly, and angel food cake's texture is destroyed by freezing. However, you can freeze components separately: angel food cake freezes well wrapped tightly for three months, cherry pie filling freezes for six months, and Cool Whip comes frozen. The cream cheese mixture doesn't freeze well so make it fresh. For transporting to potlucks or parties, keep dessert in insulated cooler with ice packs maintaining temperature below 40°F for food safety - cream cheese and dairy-based products require cold holding. If serving outdoors in summer heat, keep the dish in cooler until just before serving and return any leftovers to refrigeration within two hours maximum (one hour if temperature exceeds 90°F) to prevent bacterial growth. Individual parfait portions can be made one to two days ahead in small jars with lids, stored refrigerated, making grab-and-go desserts for parties or meal prep.
The Science of No-Bake Desserts and Food Safety
Understanding the chemistry and food safety of refrigerated desserts helps explain why technique and storage matter for optimal and safe results. No-bake desserts rely on cold temperature and specific ingredient properties rather than heat to achieve structure. In this recipe, several stabilizing mechanisms work together: (1) Cream cheese's protein structure (casein proteins) provides body and richness while its fat content contributes to mouthfeel; (2) Cool Whip contains stabilizers (usually including vegetable gums and emulsifiers like polysorbate 60) that prevent deflation and weeping unlike unstabilized whipped cream which deflates within hours; (3) Powdered sugar dissolves completely creating smooth sweetness while its cornstarch content (added to prevent caking in the package) contributes slight thickening; (4) Angel food cake's unique structure (made from whipped egg whites with no fat) is extremely porous and absorbent, soaking up moisture from the cream mixture while maintaining some structural integrity. The refrigeration serves multiple purposes beyond just chilling: it firms the fats in cream cheese and Cool Whip making the dessert more scoopable, allows the cake to continue hydrating and softening, gives flavors time to meld, and crucially maintains food safety. Cream cheese is dairy product requiring refrigeration below 40°F to prevent bacterial growth - leaving this dessert at room temperature for extended periods (over two hours) creates food safety risk particularly concerning Listeria, Salmonella, or Staphylococcus aureus which can grow in protein-rich dairy products. The high sugar content provides some preservation effect by binding water and reducing water activity, but isn't sufficient alone to make this shelf-stable. Understanding these principles explains why proper refrigeration, covered storage, and prompt serving from cold are essential for both quality and safety.
Teaching Fundamental Cooking Skills
This recipe provides excellent opportunity to learn techniques that transfer across countless preparations even though it's technically not "cooking." Learning to properly soften cream cheese teaches patience and planning - ingredients at proper temperature make dramatic difference in results, applicable to all baking and cooking requiring room temperature ingredients. The skill of using hand mixer effectively - proper speed selection, scraping down bowl sides, knowing when mixture is adequately combined - applies to all recipes requiring electric mixing from frosting to batters. Understanding how to fold ingredients gently maintaining airiness rather than stirring vigorously teaches delicate handling technique essential for soufflés, mousses, whipped cream-based desserts, and any preparation where maintaining incorporated air matters. The technique of layering components strategically for visual appeal teaches presentation principles applicable to trifles, parfaits, lasagna, and any layered dish. Learning to adjust sweetness by tasting and modifying teaches that recipes are starting points requiring your judgment based on ingredient variability and personal preference. Understanding how make-ahead preparation works - which components can be prepped when, how flavors develop over time, proper storage methods - teaches planning skills essential to efficient cooking and stress-free entertaining. Working with convenience products (Cool Whip, store-bought cake, canned filling) without shame teaches that "from scratch" isn't always necessary or superior when quality convenience products produce excellent results while saving time. For absolute beginners intimidated by any kitchen work, this recipe builds tremendous confidence because it's nearly impossible to fail - even imperfect technique produces edible, enjoyable dessert - yet the results look impressive proving that cooking ability is achievable. Success with simple recipes like this encourages attempting more ambitious projects.
The Economics of Homemade Versus Bakery No-Bake Desserts
Understanding cost comparisons reveals savings while achieving results equal to or better than commercial versions. Homemade cherries in the snow costs: cream cheese (two to three dollars), powdered sugar (one dollar), milk (minimal, maybe twenty-five cents), Cool Whip (two to three dollars), store-bought angel food cake (four to six dollars), two cans cherry pie filling (six to eight dollars) - total approximately fifteen to twenty-one dollars for 9x13 pan serving twelve to sixteen people, or about one dollar to one dollar seventy-five per serving. This seems reasonable, but consider bakery alternatives: individual no-bake desserts at bakeries or dessert shops (four to seven dollars per serving), grocery store bakery trifles or layered desserts (twelve to twenty dollars for container serving six to eight, or two to three dollars per serving), or similar refrigerated desserts at restaurants (six to ten dollars per slice). Making at home saves one to five dollars per serving. More significantly, homemade allows customization (use organic ingredients, adjust sweetness, choose preferred fruit flavors) and generous portions. The "per serving" cost is particularly favorable for entertaining - making dessert for twelve costs about twenty dollars versus spending seventy to one hundred forty dollars buying equivalent individual bakery desserts. For people who regularly entertain or attend potlucks requiring dessert contributions, learning to make economical crowd-pleasers like this saves hundreds of dollars annually. The time investment (twenty minutes active work) is minimal considering the quantity produced and zero cooking skill required. Beyond monetary savings, homemade provides satisfaction of creating something yourself, flexibility to accommodate dietary restrictions (use sugar-free pudding mix, fat-free Cool Whip, etc.), and the social currency of bringing "homemade" dessert to gatherings where that's valued.
Understanding Regional American Dessert Traditions
Cherries in the snow and similar no-bake layered desserts occupy specific place in American regional food culture, particularly Midwest, South, and church-social traditions. These desserts thrive where potluck culture is strong - church suppers, family reunions, community gatherings, covered dish dinners - requiring desserts that travel well, serve crowds, and don't require reheating or special serving equipment. The recipes often appear in community cookbooks (fundraisers for churches, schools, volunteer organizations) compiled from home cooks' personal collections representing authentic local food rather than restaurant trends or food media influence. Generational transmission happens through handwritten recipe cards, church cookbook collections, and family gatherings where aunts and grandmothers teach younger generations "easy desserts everyone loves." The desserts use brands available nationally (Cool Whip, Duncan Hines, Jell-O, Eagle Brand) creating consistency across regions unlike recipes relying on local specialties or artisanal ingredients. The aesthetic prioritizes abundance, color, sweetness, and ease over sophistication or restraint - more is better, bright colors attract attention at dessert tables, unabashedly sweet flavors please crowds, and recipes shouldn't require special skills or equipment. This differs dramatically from coastal urban dessert culture emphasizing restraint, ingredient quality, and technical execution. Neither is superior - they serve different contexts and communities. Understanding these traditions helps appreciate that desserts like cherries in the snow aren't unsophisticated or lowbrow but rather represent distinct food culture with different values and purposes. They're optimized for community gathering contexts where feeding many people economically while ensuring universal appeal matters more than impressing with culinary technique or unusual flavors. This is social food designed to bring people together rather than showcase individual cooking prowess.
 Pin it
This cherries in the snow recipe represents the perfect intersection of vintage American dessert tradition and contemporary appreciation for simple, stress-free entertaining, proving that sometimes the most valuable recipes aren't those requiring extensive technique or exotic ingredients but rather humble preparations that have reliably delighted crowds for decades through straightforward assembly of quality convenience products creating results that taste homemade despite minimal effort. What makes this recipe genuinely valuable is how it demonstrates that impressive desserts don't require baking skills, professional equipment, or culinary training when you understand how to combine complementary flavors and textures strategically - the light angel food cake, rich cream cheese filling, and tart-sweet cherries create satisfying complexity despite dead-simple preparation teaching important lesson that impressive cooking comes from thoughtful ingredient selection and assembly rather than necessarily requiring technical prowess. The transformation of store-bought components into cohesive, attractive, delicious dessert shows that "from scratch" and "homemade" aren't synonymous - you can create genuine homemade food using quality convenience products when those products serve the recipe well, challenging the notion that only recipes made entirely from basic ingredients count as "real cooking" while honoring the reality that modern cooks balance quality with practicality. Whether you're someone seeking stress-free entertaining desserts that can be made ahead eliminating day-of kitchen chaos, a novice cook building confidence through recipes that are nearly impossible to fail yet produce impressive results, a potluck regular needing reliable crowd-pleasers that transport well and serve many economically, someone interested in vintage American food culture and the desserts that sustained mid-century community gatherings, a busy parent wanting special-occasion desserts without requiring oven-time or advanced skills, or simply anyone who appreciates how the best recipes often honor tradition while adapting to contemporary lifestyles where convenience matters but quality and satisfaction remain non-negotiable, this delivers completely. The twenty-minute preparation time and make-ahead convenience mean you can create elegant dessert without disrupting your schedule or occupying kitchen space when you need it for other preparations, while the four-day refrigerator storage means you can make this well in advance and simply pull from fridge when dessert time arrives eliminating that frantic last-minute dessert-making that often derails entertaining. Once you've experienced how that fluffy cream cheese layer tastes almost like no-bake cheesecake but lighter and less rich, tasted how tart cherries cut through sweetness preventing cloying dessert overload, understood how the angel food cake softens and integrates creating texture somewhere between cake and pudding that's uniquely satisfying, watched how the dramatic red-and-white presentation makes guests think you spent hours when you actually spent twenty minutes, and appreciated how vintage recipes persist because they genuinely work solving real problems like feeding crowds economically while looking impressive and tasting universally appealing, you'll find yourself making this for every potluck and family gathering, experimenting with different pie filling flavors discovering your favorite combinations, confidently volunteering to bring dessert knowing this never disappoints and always gets compliments, understanding that recipe popularity across decades isn't about following trends but about reliable performance meeting genuine needs, and recognizing that sometimes the wisest cooking choice is embracing recipes that acknowledge and respect our time constraints while still delivering satisfaction and joy, with cherries in the snow embodying that perfect balance between effortless preparation and delicious results, honoring both mid-century convenience culture and contemporary desire for food that brings people together around shared tables, proving that the best recipes are those we actually make repeatedly rather than just admire from afar, teaching us that cooking traditions persist when they serve real communities producing real satisfaction, and demonstrating that there's no shame in simple, easy desserts when they taste good, look pretty, and make people happy - which is ultimately what dessert is meant to do.
Frequently Asked Questions
- → Can I make this dessert ahead of time?
- Yes! This dessert actually tastes better when made a few hours ahead or even the night before. Just keep it covered in the fridge until serving time.
- → Can I use fresh cherries instead of pie filling?
- You can, but you'll need to cook them down with sugar first to create a thick sauce. The canned pie filling is much easier and gives consistent results.
- → How long does this dessert keep in the fridge?
- It will stay fresh for up to 4 days when stored in an airtight container in the refrigerator.
- → Can I use a different cake flavor?
- Angel food cake works best because it's light and absorbs the creamy mixture nicely. Pound cake or sponge cake could work, but the texture will be different.
- → What can I use instead of Cool Whip?
- You can use homemade whipped cream, but the dessert may be a bit softer and less stable. Make sure to whip the cream to stiff peaks before folding it in.
- → Do I have to use a glass pan?
- No, any 9x13-inch pan will work. Glass just makes it look pretty when you serve it, but plastic or metal containers are fine too.