
 Pin it
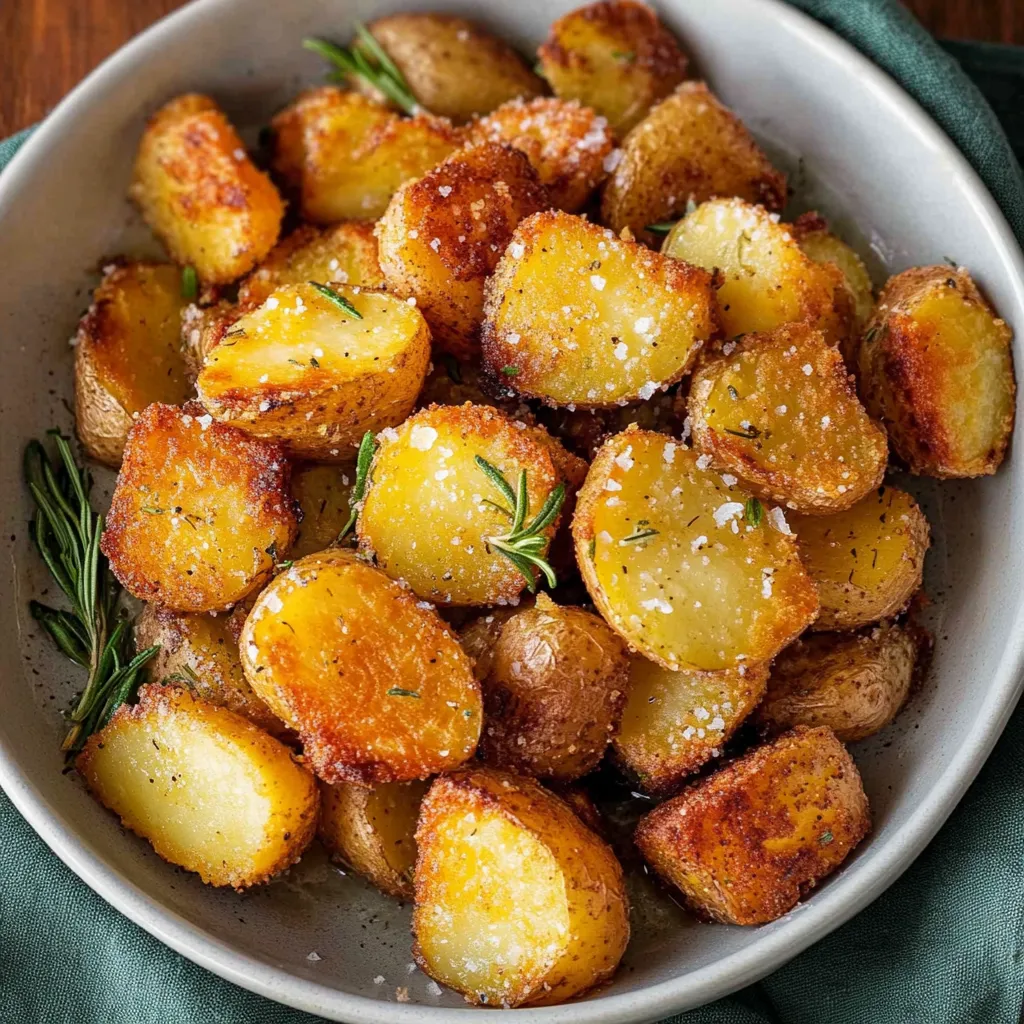
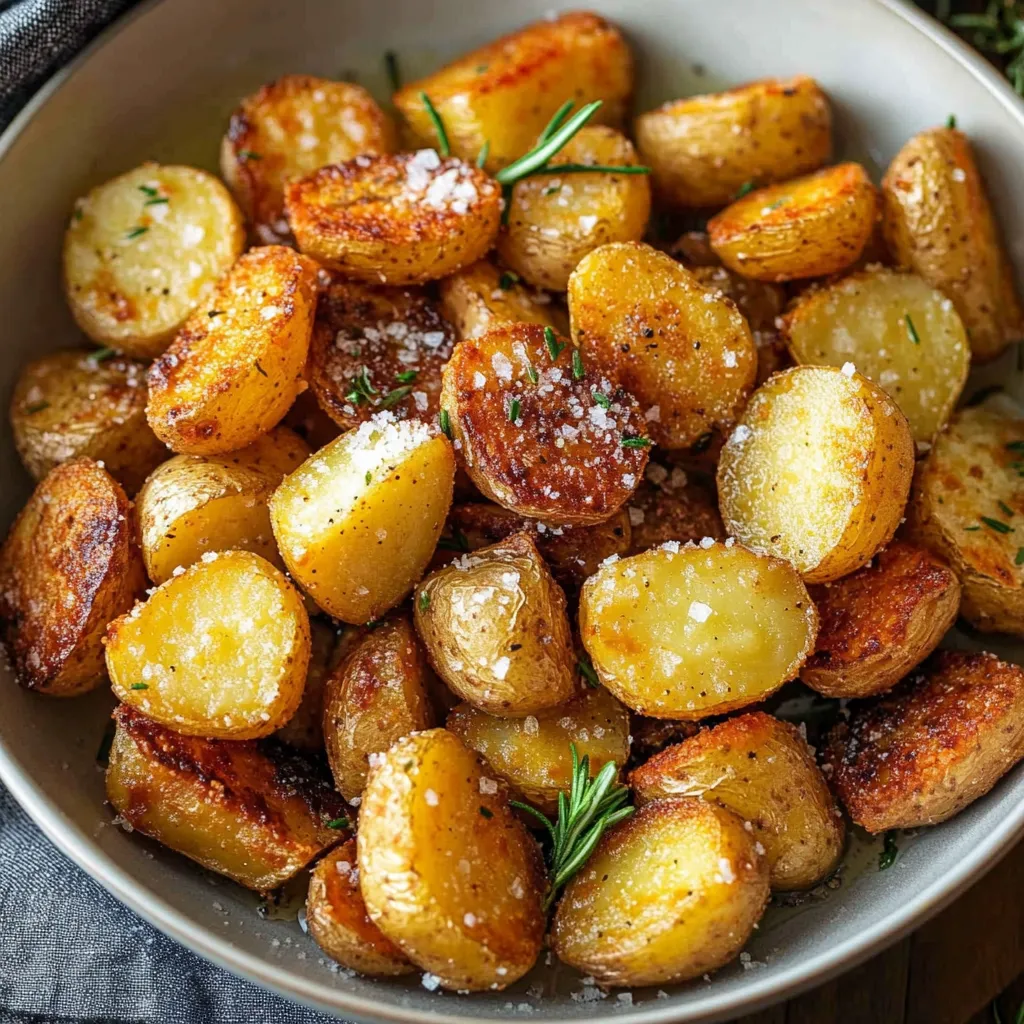
Roasted potatoes get a bad reputation for being either burnt on the outside with raw centers, or soggy and disappointing. After going through countless batches and testing different methods, I finally cracked the code for potatoes that deliver a seriously crunchy exterior while keeping that creamy, almost buttery center intact. The secret involves using two types of potatoes together in a way that might seem unusual at first, but trust me when I say the results are worth every extra minute of effort. These potatoes have become my go-to side dish for everything from weeknight dinners to holiday spreads, and I've watched even the most devoted mashed potato fans reach for seconds and thirds.
I've made these potatoes at least thirty times now, tweaking and adjusting until they came out exactly right every single time. The first batch I served was at a family dinner where my sister-in-law, who normally picks at side dishes, asked me three times if I was sure there wasn't any butter involved because she couldn't believe how creamy they tasted. That's when I knew this recipe was a keeper.
Ingredients and What Makes Them Essential
- Yukon Gold Potatoes (2 ½ pounds): These golden-fleshed potatoes have a naturally buttery flavor and creamy texture that Russets simply can't match. When shopping, look for potatoes that feel firm with smooth skin and no green spots or sprouts. Medium-sized ones work best because they're easier to cut into uniform pieces.
- One Large Russet Potato: This might seem odd since you're mainly using Yukon Golds, but the Russet serves a specific purpose. Its high starch content breaks down during cooking and creates that thick, crispy coating on the outside of your potatoes. Pick one that's large and feels heavy for its size.
- Extra Virgin Olive Oil (5 tablespoons): Don't reach for the cheap stuff here. Since this recipe is so simple, the olive oil flavor really comes through. Look for oil that smells fresh and fruity, not musty or bland. The oil helps conduct heat and creates those crispy edges we're after.
- Kosher Salt: Potatoes are starchy and need more salt than you'd think to taste properly seasoned. Kosher salt has larger crystals that distribute evenly and don't make things taste overly salty. You'll use it in the boiling water and again when tossing the potatoes before roasting.
- Black Pepper (freshly ground): Fresh pepper adds a subtle heat and depth. Pre-ground pepper from a jar that's been sitting in your cupboard for two years won't give you the same punch.
- Fresh Rosemary (2 tablespoons, optional): Rosemary and potatoes are a classic combination for good reason. The piney, aromatic flavor cuts through the richness. If you're buying fresh rosemary, look for sprigs that are deep green and fragrant, not brown or dried out.
Step-by-Step Instructions
- Prepare Your Potatoes:
- Start by peeling the Yukon Gold potatoes completely, removing all the skin with a vegetable peeler. Cut each potato into quarters if they're small to medium-sized, or into sixths if you've got larger ones. You're aiming for pieces that are roughly 1 ½ to 2 inches wide. Try to keep them as uniform as possible so they cook evenly. Set these aside in a bowl. Now peel your Russet potato and cut it lengthwise into four long quarters. Here's where it gets important - slice each quarter as thinly as you possibly can, like you're trying to make potato chips but not quite that thin. These paper-thin slices will break down completely during the boiling stage, which is exactly what you want.
- Parboil the Potatoes:
- Fill a large saucepan with water and add a generous amount of salt - about 2 tablespoons for a large pot. Bring this to a rolling boil over high heat. Once it's boiling hard, add all your potatoes - both the Yukon Gold chunks and those thin Russet slices. Reduce the heat to medium so the water is gently simmering, not aggressively boiling. This gentle simmer is crucial because if the water is bubbling too violently, your potatoes will start breaking apart before they're properly cooked through. Let them simmer for about 8 minutes total. Start checking the Yukon Golds at the 7-minute mark by piercing one with a paring knife. You want it to slide in with just a tiny bit of resistance - think al dente pasta. The potato should feel tender but not so soft that it's falling apart. The Russet slices should be completely soft and starting to break down into smaller pieces by this point.
- Drain and Dry the Potatoes:
- Set a colander in your sink and carefully pour the potatoes into it to drain. Give the colander a gentle shake to remove excess water. Here's a step many people skip that makes a real difference - return the drained potatoes to the same hot saucepan you boiled them in and place it back on the burner with the heat turned off. Let them sit there for 3 to 4 minutes, shaking the pan occasionally. The residual heat from the pan will evaporate any remaining moisture clinging to the potatoes. This drying step is what helps achieve maximum crispiness later because wet potatoes will steam in the oven instead of crisping up.
- Rough Up the Potatoes:
- Transfer all the potatoes to a large mixing bowl. Take a fork and look for any pieces of the Russet potato that are still somewhat intact - they'll be the whitish pieces mixed in with the golden Yukon Golds. Use your fork to mash these Russet pieces against the side of the bowl until they're completely broken down into a starchy mash. Now comes the fun part - hold the bowl firmly with both hands and shake it vigorously back and forth for about a minute. You'll see the potatoes start to look roughed up on the edges and a starchy coating beginning to form on the surface. This rough texture is what will turn into that crunchy crust.
- Season and Coat:
- Once you've got a nice starchy coating developing on your potatoes, pour in 5 tablespoons of olive oil, 1 ½ teaspoons of kosher salt, and ½ teaspoon of freshly ground black pepper. Using a silicone spatula or wooden spoon, toss everything together for about 30 seconds to a minute. You'll notice the mixture transforming - the oil combines with that starchy coating and bits of mashed Russet to create what looks almost like a thick mashed potato paste clinging to each piece. This coating should look substantial and shaggy, not thin and slick. Every piece of potato should be thoroughly coated in this mixture. Take a tiny piece and taste it - it should taste slightly saltier than you'd want the final product to be. Don't worry, that saltiness will mellow considerably during roasting.
- Roast the First Side:
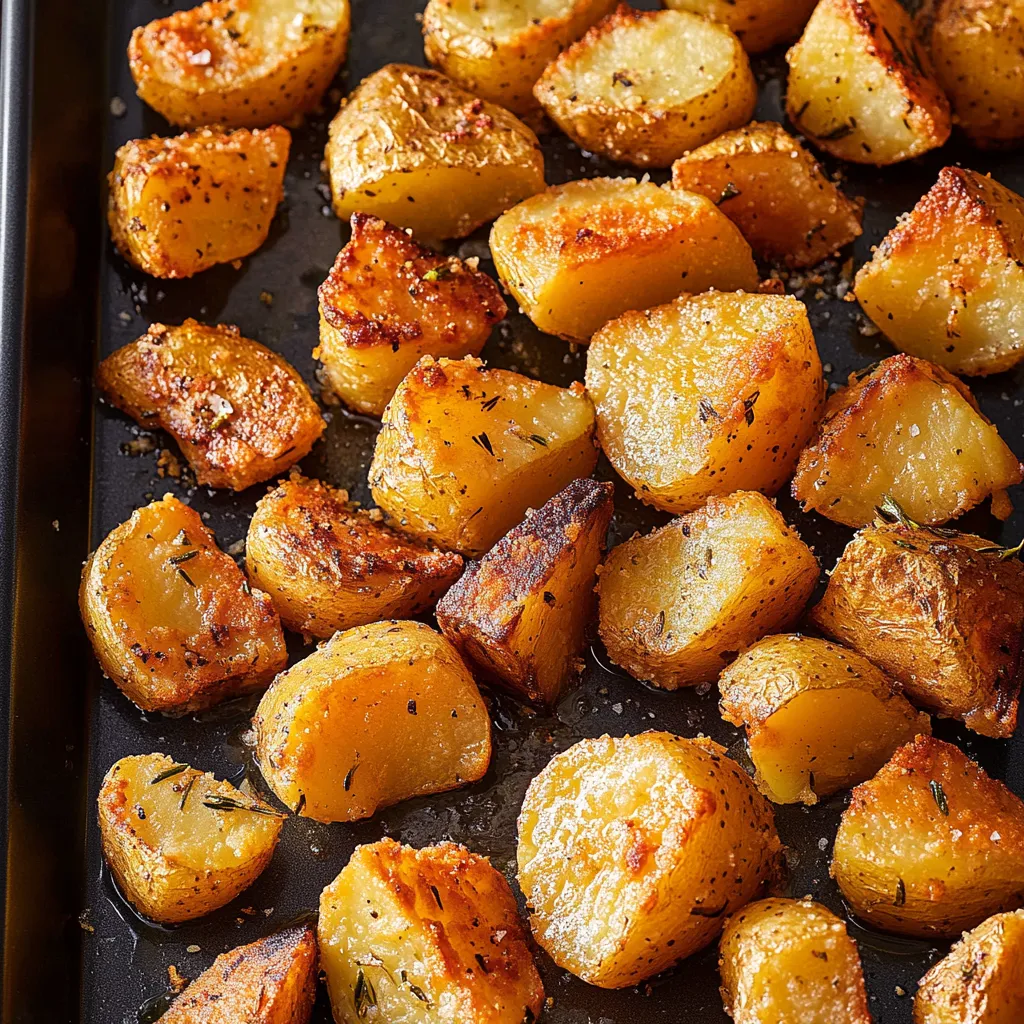
- While you were prepping the potatoes, your oven should have been preheating to 450°F (230°C) with a roasting pan or rimmed baking sheet inside. Carefully remove the hot pan from the oven using oven mitts. Working quickly, scrape all the potatoes onto the hot pan, spreading them out into a single layer as much as possible. Some will inevitably overlap slightly, and that's fine, but try to give each piece some space. Use your spatula to scrape every last bit of that starchy coating from your mixing bowl onto the potatoes - don't waste any of it. Slide the pan back into the oven and roast for 20 minutes without opening the door. During this time, the bottoms are developing that deep golden-brown crust.
- Flip and Continue Roasting:
- After 20 minutes, pull the pan out and use a pair of tongs to flip each potato piece over. You'll see that beautiful golden-brown crust on the bottom. If some pieces are sticking to the pan, use a thin metal spatula to gently release them before flipping. Try to get them all flipped onto an uncooked side. At this point, if you notice the potatoes on the outer edges of your pan are browning much faster than the ones in the center, swap their positions to ensure even cooking. Return the pan to the oven for another 20 minutes.
- Prepare the Rosemary Oil:
- While the potatoes finish their second round of roasting, strip the leaves from your fresh rosemary sprigs and chop them as finely as you can manage - you want them almost minced. Put the chopped rosemary in a small bowl and drizzle in just enough olive oil to create a coarse paste when you stir it together, about 1 to 2 teaspoons. The mixture should hold together but not be swimming in oil.
- Final Roast with Rosemary:
- After the full 40 minutes of roasting, your potatoes should be deeply golden on both sides. Remove the pan one more time and use a spoon to dollop the rosemary mixture over the potatoes. Use a pastry brush or clean fingers to spread it across as many potato pieces as you can reach. The oil will help distribute the rosemary flavor. Put the pan back in the oven for a final 7 minutes. This last blast of heat will crisp everything up even more and let the rosemary flavor infuse into the potatoes. When you pull them out, they should be deeply golden brown, almost mahogany in the crispiest spots, with visible crispy edges and that incredible rosemary aroma filling your kitchen.
 Pin it
My family has always been particular about potatoes. Growing up, my mother made them every Sunday, but they were usually just acceptable, never extraordinary. When I first made this version for a holiday dinner, my father, who rarely comments on food, actually stopped mid-conversation to ask what I'd done differently. He ended up eating potatoes instead of his usual roll, which in our house was basically unheard of. Now these have become the requested potato dish for every family gathering, and I've stopped even suggesting mashed potatoes because everyone votes for these crispy ones instead.
Understanding Potato Varieties and Starch Content
Not all potatoes behave the same way in the oven, and understanding why helps you become a better cook overall. Russet potatoes contain the highest amount of starch, which makes them fluffy and dry when cooked - perfect for baking or frying, but not ideal when you want a creamy interior in roasted potatoes. That dry texture can be almost chalky if you're eating them plain. Yukon Golds sit in the middle of the starch spectrum, which gives them the best of both worlds - enough starch to crisp up nicely, but enough moisture to stay creamy inside. Red potatoes and fingerlings are on the low-starch, high-moisture end, which makes them great for boiling but they don't crisp up as well when roasted. This recipe uses both Russet and Yukon Gold specifically to capture the high starch from the Russet for exterior crispiness while maintaining the creamy texture of the Yukon Gold on the inside.
The Role of Salt in Potato Cooking
Potatoes need significantly more salt than most vegetables because of their starchy, bland nature. When you salt the boiling water generously, the potatoes actually absorb some of that salt as they cook, which seasons them from the inside out. If you wait until after roasting to add salt, it only sits on the surface and can't penetrate the interior, leaving you with potatoes that taste bland when you bite into them despite looking well-seasoned on the outside. The salt you add before roasting serves a dual purpose - it flavors the starchy coating that becomes your crispy crust, and it helps draw out a bit more moisture from the potato surface, which promotes better browning. This is why tasting the potatoes after tossing them with oil and salt is so important - you can adjust the seasoning at that point when it still matters.
Why Temperature and Pan Choice Matter
Roasting at 450°F creates an environment hot enough to rapidly evaporate surface moisture and trigger serious browning, but not so hot that the outside burns before the inside finishes cooking. If you roast at a lower temperature, say 375°F or 400°F, your potatoes will take much longer and may dry out before achieving that deep golden crust. The pan material makes more difference than you'd expect - darker, heavier pans absorb and retain heat better than shiny, thin baking sheets, which means more consistent crisping. A roasting pan with higher sides creates a slightly different environment than a flat sheet pan, trapping a bit of moisture that keeps the interiors from drying out while still allowing the tops and bottoms to crisp up beautifully. If you notice the edges of your pan are getting too dark while the center pieces are still pale, your oven likely has hot spots, which is common in home ovens and nothing to worry about - just rotate the pan halfway through cooking.
Storing and Reheating for Best Results
Roasted potatoes are always best fresh from the oven, but leftovers can be brought back to life if you know the right technique. Never reheat them in the microwave - that just makes them soggy and sad, with all that hard-won crispiness turning to mush. The stovetop method using a cast iron skillet is your best bet because the direct heat and the bit of added oil re-crisps the exterior while warming the inside through. If you don't have cast iron, a regular nonstick skillet works too, though it won't get quite as hot. You can also reheat them in a 425°F oven on a baking sheet for about 10 minutes, though this takes longer and won't get them quite as crispy as the skillet method. Stored properly in an airtight container, these will keep for three days in the refrigerator, though in my house they rarely last that long.
Variations and Flavor Additions You Can Try
Once you've mastered the basic technique, this recipe becomes a template for all sorts of variations. Instead of rosemary, try mixing minced fresh thyme and a bit of lemon zest into your oil for a brighter, more citrusy flavor. Garlic lovers can toss whole unpeeled garlic cloves onto the pan for the last 20 minutes of roasting - they'll become sweet and caramelized, perfect for squeezing out and eating alongside the potatoes. For a spicy kick, toss the finished potatoes with smoked paprika and a pinch of cayenne pepper. You can also experiment with different finishing touches like a sprinkle of grated Parmesan cheese in the last 5 minutes of roasting, or a drizzle of balsamic vinegar and fresh chopped parsley right before serving. The key is to wait until the potatoes are mostly cooked before adding any delicate ingredients that might burn, and to add fresh herbs and acidic ingredients at the very end to keep their flavors bright.
 Pin it
After making these potatoes dozens of times, I can tell you they've completely changed how I think about side dishes. They're substantial enough to be satisfying but not so heavy that they weigh you down. The combination of textures - that shattering crispy outside giving way to the creamy inside - makes every bite interesting instead of monotonous. I've served these alongside everything from simple weeknight roasted chicken to elaborate holiday roasts, and they've never once disappointed. The rosemary version is my personal favorite, but even when I'm feeling lazy and skip that step, these potatoes are still better than any other roasted potato recipe I've tried. They've earned their permanent spot in my regular cooking rotation, and I have a feeling they'll do the same in yours.
Frequently Asked Questions
- → What type of potatoes work best for this recipe?
- Yukon Gold potatoes are perfect because they get crispy on the outside while staying creamy inside. Adding one Russet potato helps create that extra starchy coating that makes them super crunchy.
- → Why do I need to boil the potatoes first?
- Boiling softens the potatoes and breaks down the surface, which helps create that fluffy, starchy coating. This coating is what gets incredibly crispy when roasted in the oven.
- → Can I make these without a roasting pan?
- Yes, a regular rimmed baking sheet works fine. Just make sure to preheat it in the oven so the potatoes start crisping up immediately when you add them.
- → How do I store leftover roasted potatoes?
- Keep them in an airtight container in the fridge for up to 3 days. Reheat them in a hot oven or air fryer to get them crispy again. Microwaving will make them soft.
- → Can I prep these potatoes ahead of time?
- You can boil and rough up the potatoes a few hours ahead, then keep them covered at room temperature. Add the oil and seasonings right before roasting for the best texture.
- → Do I have to use rosemary?
- Not at all. The rosemary is completely optional. The potatoes taste amazing on their own, but fresh herbs like thyme or sage would also be delicious if you want to add them.