
 Pin it
Matzo doesn't usually top anyone's list of exciting baking projects, but once you taste homemade versions, the boxed stuff feels like a completely different food. These crackers come out light and flaky with a tender crispness that shatters perfectly when you bite into them, nothing like the dense, cardboard-like texture of commercial matzo. The dough comes together in minutes with just four pantry ingredients, and each piece bakes in under five minutes, which means you can have fresh matzo on the table faster than a trip to the store. While this version isn't kosher for Passover since it contains oil and isn't made under strict rabbinical supervision, it's perfect for everyday meals, Shabbat dinners, or any time you want crackers with real flavor and texture.
I discovered this recipe out of necessity during a Passover week when the stores were completely sold out of matzo, and I was skeptical that homemade could possibly be worth the effort. My first attempt was a disaster—so hard I nearly broke a tooth—and my second batch shattered into dust the moment I touched it. But this olive oil version changed everything. The dough rolled out beautifully, baked up golden and blistered, and had this incredible flaky quality that made me understand why people used to make all their crackers from scratch. Now I make these year-round, sometimes adding za'atar or sesame seeds on top, and they disappear within hours.
Ingredients and What Makes Them Essential
- All-purpose flour (2 cups): This forms the structure of your matzo and should be measured carefully for the right dough consistency. All-purpose works perfectly because it has moderate protein content that creates a tender cracker without being too fragile. Look for unbleached flour if possible since it has slightly better flavor, and make sure it's fresh—flour that's been sitting in your pantry for months can taste stale. Scoop it into your measuring cup and level it off with a knife rather than packing it down, or weigh it for the most accurate results.
- Kosher salt (½ teaspoon): Salt enhances all the other flavors and keeps the matzo from tasting flat or bland. Kosher salt dissolves evenly throughout the dough and has a clean, pure taste without any chemical aftertaste. If you only have table salt, use slightly less since it's more concentrated by volume. The salt also helps strengthen the gluten structure just enough to make rolling easier.
- Olive oil (2 tablespoons): This is what transforms basic unleavened crackers into something with real flavor and tenderness. The oil coats the flour particles and creates layers as you roll, resulting in that flaky, almost pastry-like quality. Use a good-quality olive oil since you'll taste it in the finished matzo—look for one that's fruity and smooth rather than harsh or bitter. Extra virgin olive oil works beautifully, though you could substitute with a neutral oil if you prefer a milder flavor.
- Water (½ cup, cold): Cold water keeps the dough from becoming sticky and makes it easier to handle. You want just enough moisture to bring the flour together without making it wet or tacky. If your kitchen is very dry, you might need an extra tablespoon of water, but add it cautiously since too much makes the dough impossible to roll thin. Tap water works fine, though filtered water gives you slightly cleaner flavor.
Step-by-Step Instructions
- Mix the dry ingredients with oil:
- Get out your food processor and attach the steel blade, which is the standard blade that comes with most machines. Measure your all-purpose flour carefully and add it to the food processor bowl along with the kosher salt. Drizzle in the olive oil, distributing it around the bowl rather than pouring it all in one spot. Pulse the processor three or four times just to mix the oil into the flour initially. You'll see the mixture start to look like coarse sand or damp breadcrumbs as the oil coats the flour particles. This step is important because it starts developing the flaky layers you want in the finished matzo. If you don't have a food processor, you can do this by hand in a mixing bowl, using your fingers to rub the oil into the flour until it resembles coarse meal. It takes a bit longer but works just as well.
- Add water and form the dough:
- Turn your food processor on and let it run continuously—don't pulse at this stage. With the motor running, pour the cold water through the feed tube in a steady stream. Watch carefully as the dough comes together. It will go from shaggy clumps to a cohesive mass that starts chasing itself around the bowl. Continue processing for about two full minutes, which seems longer than necessary but really helps develop the dough's structure and makes it much easier to roll later. The dough should form into a firm, smooth ball that rides up on the blade and spins around cleanly without sticking to the sides of the bowl. If you press your finger into it, it should feel firm and elastic, not soft or tacky. If the dough seems too dry and won't come together, add water one teaspoon at a time with the processor running. If it's too wet and sticky, sprinkle in a bit more flour. The texture should be similar to Play-Doh—smooth, pliable, and just slightly warm from the friction of mixing.
- Divide and shape the dough:
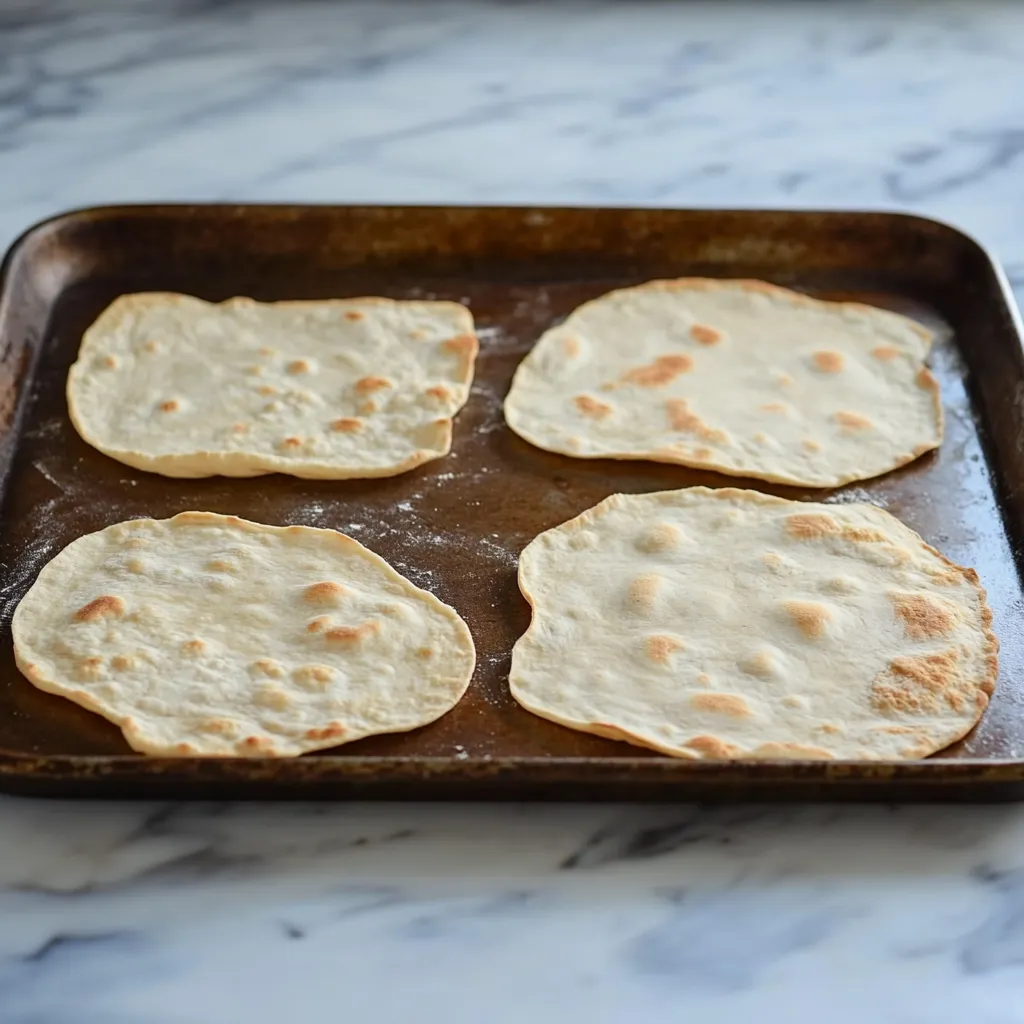
- Turn the dough out onto a clean countertop—you don't need flour at this stage since the dough shouldn't be sticky. Use a bench scraper or sharp knife to cut the dough ball in half, creating two equal pieces. Cut each half in half again, giving you four pieces. Then cut each of those quarters into three equal portions, which gets you to twelve small balls total. This systematic division ensures all your matzos will be roughly the same size and bake evenly. Roll each portion between your palms to form a smooth ball, which takes just a few seconds per piece. The balls should be about the size of golf balls or small walnuts. Cover the balls with a damp kitchen towel or plastic wrap to prevent them from drying out while you work, since exposed dough forms a skin quickly that makes rolling difficult.
- Roll the dough extremely thin:
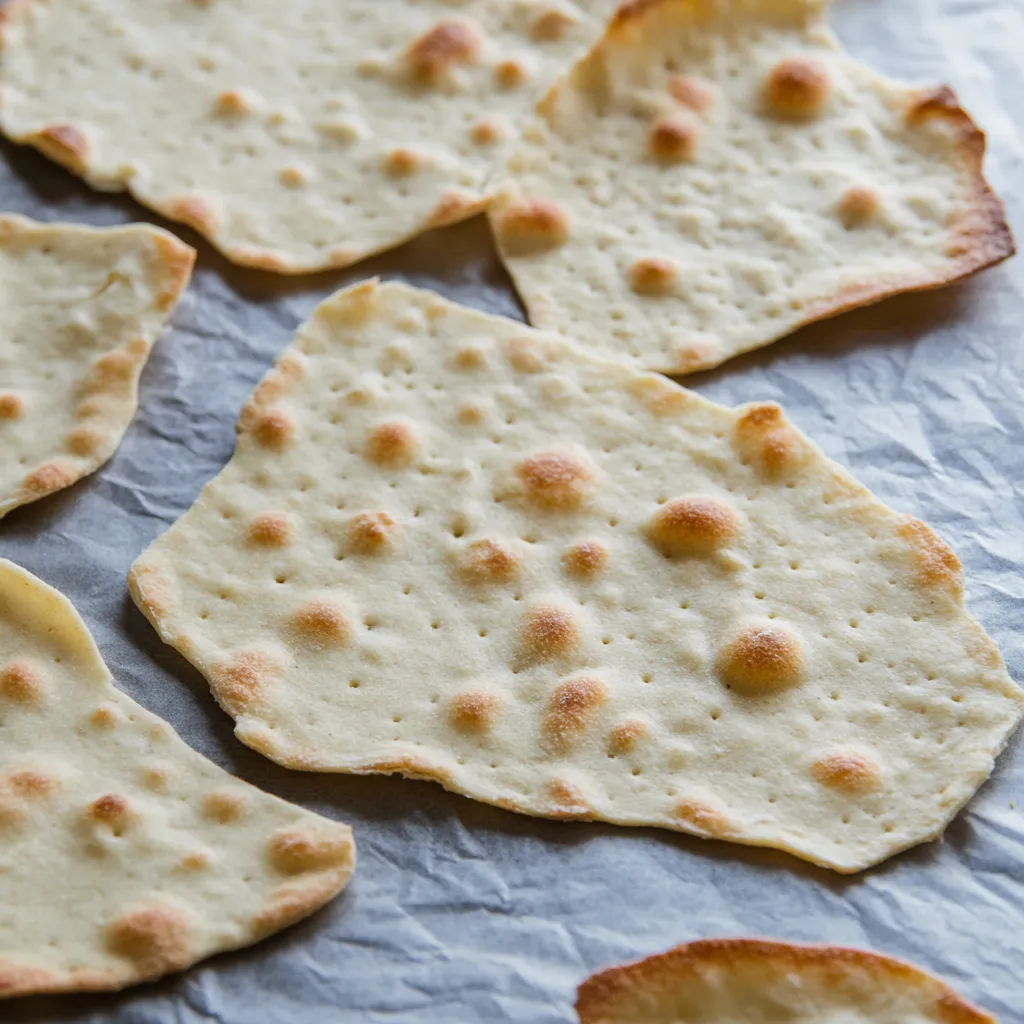
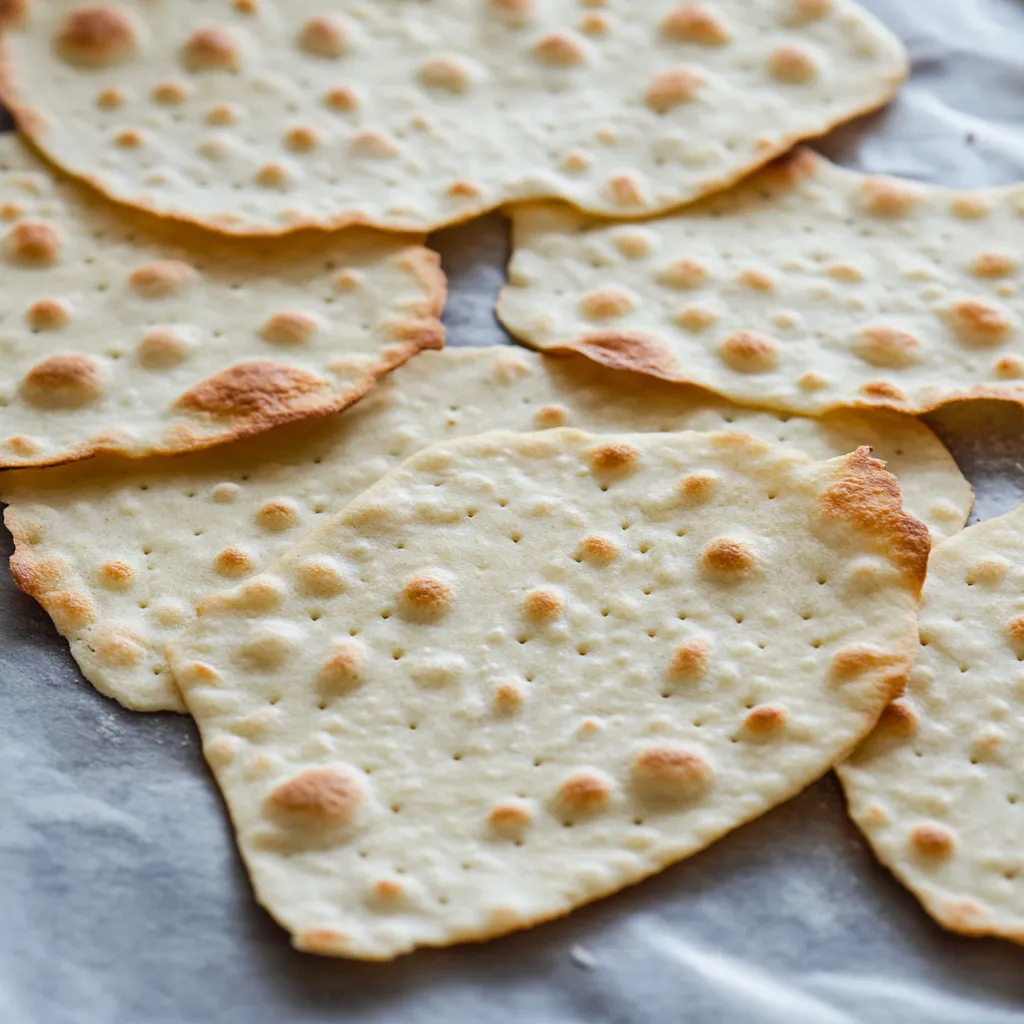
- Set up your rolling station by lightly flouring your work surface—just a thin dusting is all you need. Take one ball of dough and use your palm to flatten it into a disc about three inches across, which gives you a good starting point for rolling. Get your rolling pin and start rolling from the center outward, rotating the dough a quarter turn after each roll to maintain an even thickness and roughly circular shape. Apply firm, even pressure as you roll, really leaning into it to stretch the dough as thin as possible. You want to roll each piece into a circle or irregular oval that's six to eight inches across and so thin you can almost see light through it when you hold it up—think of the thickness of a few sheets of paper stacked together. Don't worry if the shapes aren't perfect circles; irregular, rustic shapes are completely authentic and traditional for matzo. If the dough starts sticking at any point, dust your work surface and rolling pin with just a tiny bit more flour, but use as little as possible since excess flour can make the finished matzo taste dusty and dry. The thinner you roll, the crispier and more delicate your matzo will be, so really push yourself to get it as thin as you possibly can without tearing it.
- Prepare for baking:
- While you're rolling out the first few pieces, preheat your oven to 500°F, which is the highest setting on most home ovens. This intense heat is crucial for getting the characteristic blistered, spotted appearance and crisp texture that defines good matzo. Line a large baking sheet with parchment paper, which prevents sticking and makes cleanup easier. If you have multiple baking sheets, prepare them all so you can work efficiently. As you finish rolling each piece of dough, transfer it carefully to the prepared baking sheet using your hands or a thin spatula if needed. You can usually fit about three rolled-out pieces per standard baking sheet without them touching. Once they're on the sheet, take a fork and prick the dough all over, making rows of holes about an inch apart across the entire surface. This docking is essential because it prevents the matzo from puffing up into a giant balloon during baking. The holes allow steam to escape so the cracker bakes evenly and stays relatively flat with just scattered bubbles rather than one enormous air pocket.
- Bake the first side:
- Slide your baking sheet into the preheated oven and set a timer for two minutes, but don't walk away—you need to watch these closely because they bake incredibly fast at such high heat. The matzo will start puffing up in spots, creating those characteristic bubbles and blisters. You'll see the surface going from pale and raw-looking to starting to develop golden spots. Depending on how thin you rolled them and the exact temperature of your oven, they might be ready in as little as two minutes or might need up to four minutes. Look for golden brown spots across the surface and edges that are just beginning to curl up slightly. The color should be uneven—some spots darker than others, with those beautiful charred freckles that give matzo its distinctive appearance. If you smell any burning or see dark brown spots turning black, pull them out immediately. Every oven runs a bit differently, so your first batch is a learning experience for timing. If they're browning too quickly, you can reduce the oven temperature slightly to 475°F for subsequent batches.
- Flip and finish baking:
- Use a thin metal spatula or tongs to carefully flip each matzo over. They'll be very hot and somewhat fragile at this point, so work gently. The first side should be golden and spotted with darker patches. Return the baking sheet to the oven for the second side, which cooks faster than the first—usually just one to two minutes. Watch through the oven door as the second side develops color. You want an overall light golden tone with those same blistered spots, but the second side typically stays a bit lighter than the first. When both sides are done, the matzo should be mostly crisp, though it might still have a few slightly soft spots that will firm up as it cools. Pull the sheet from the oven and immediately transfer the matzos to a cooling rack using your spatula. Leaving them on the hot baking sheet can cause them to continue cooking and potentially burn.
- Cool and repeat:
- Let the finished matzos cool completely on a wire rack, which takes about 10 minutes. As they cool, they'll become increasingly crisp and develop that satisfying snap when you break them. While they're cooling, repeat the rolling and baking process with your remaining dough balls. You'll get into a rhythm where you're rolling out the next batch while the current one bakes, which makes the whole process move quickly. Keep an eye on how quickly each batch is baking and adjust your timing as needed based on what you observe. Some pieces might be rolled thinner than others, and those will bake faster. Once everything is baked and cooled, your homemade matzo is ready to serve immediately, or you can store it for later use.
 Pin it
The ingredient that makes the biggest difference here is definitely the olive oil, and I've learned not to cheap out on it after making several batches. The first time I made these, I used a basic, mass-produced olive oil that was honestly a bit harsh and bitter on its own, and I could taste that bitterness in the finished matzo. The next batch, I used a really good fruity, smooth extra virgin oil from my local market, and the difference was remarkable. The matzo had this subtle richness and pleasant flavor that made me actually want to eat it plain, and guests at our seder commented on how much better it tasted than the boxed stuff. Now I always use my good olive oil for matzo, and I've started experimenting with different varieties—Tuscan oils give a peppery note, while Spanish oils tend to be smoother and milder. My family has come to expect these at every gathering, and they've completely ruined store-bought matzo for all of us.
Understanding Unleavened Bread and Its History
Unleavened bread has existed in cultures around the world for thousands of years, making it one of humanity's oldest prepared foods. Before people discovered that wild yeasts could ferment dough and create risen bread, all bread was essentially flat and unleavened, baked quickly on hot stones or in primitive ovens. Matzo specifically comes from Jewish tradition, where it represents the haste with which the Israelites left Egypt during the Exodus—they didn't have time to let their bread rise, so they baked it flat. This historical connection makes matzo one of the most symbolically important foods in Jewish culture, particularly during Passover when eating leavened bread is forbidden.
Traditional kosher-for-Passover matzo follows extremely strict rules that have been refined over centuries. The flour and water cannot come into contact with each other for more than 18 minutes from the moment of mixing until the matzo finishes baking, because that's the point at which fermentation theoretically begins. Observant matzo bakeries maintain special production lines where everything happens at lightning speed under rabbinical supervision. The matzos are perforated with special spiked rollers to prevent rising, and they're baked in ovens that reach temperatures well above 500°F for the fastest possible cooking time. The addition of oil, like in this recipe, automatically disqualifies matzo from being kosher for Passover since traditional Passover matzo can only contain flour and water.
The texture difference between homemade and commercial matzo is striking once you experience it firsthand. Factory-made matzo is baked at extreme temperatures and compressed under heavy rollers, which creates that characteristic dense, hard texture that can feel like chewing on cardboard. It's designed for long shelf life and durability during shipping rather than optimal eating quality. Homemade matzo, by contrast, can have a much more pleasant eating experience with tender crispness and actual flavor from the olive oil. You're making it fresh, so it doesn't need to survive months in a box on a shelf. The trade-off is that homemade matzo isn't as sturdy and needs to be eaten within a few days for the best texture.
Troubleshooting Common Matzo-Making Issues
Getting the dough consistency right is probably the trickiest part of making matzo, and it varies based on humidity, flour brands, and how you measure. If your dough feels too dry and crumbly and won't hold together, it needs more water—add it literally one teaspoon at a time while processing until the dough forms a cohesive ball. Going too fast here is how you end up with sticky dough, which is much harder to fix. On the flip side, if your dough feels tacky or sticks to your hands or the counter when rolling, work in small amounts of additional flour by dusting your work surface and the dough surface lightly. The key is patience and small adjustments rather than dumping in large amounts of liquid or flour all at once.
Rolling the dough thin enough challenges even experienced bakers at first because unleavened dough is quite elastic and wants to spring back. The resting period isn't specified in this recipe, but if you're struggling with dough that keeps shrinking back when you roll it, let each ball rest for about 10 minutes under plastic wrap before rolling. This gives the gluten time to relax, making the dough much more cooperative. Use firm pressure with your rolling pin and work quickly—the faster you roll, the less time the gluten has to tense up. If a particular piece is being stubborn, set it aside and roll a different one, then come back to the difficult piece after it's had a few minutes to rest.
Burning is a real risk at 500°F, and everyone burns at least one batch when they're learning. The key is never walking away from the oven during baking and being ready to pull the matzos out the moment they look done. Dark spots are fine and actually desirable for flavor, but black spots mean burning and bitterness. If your oven runs hot or you're seeing too much browning, don't hesitate to lower the temperature to 475°F or even 450°F. Slightly slower baking is better than ruined, burnt matzo. Also, rotate your baking sheet front to back halfway through baking if you notice uneven coloring, since most ovens have hot spots.
Creative Variations and Flavor Add-Ins
Once you've mastered the basic recipe, matzo becomes a blank canvas for experimentation with different flavors and seasonings. Before baking, brush the rolled-out dough lightly with additional olive oil and sprinkle with coarse sea salt for a simple but delicious upgrade. Za'atar, the Middle Eastern spice blend of herbs, sesame seeds, and sumac, is spectacular on matzo and connects to the Sephardic Jewish tradition. Sesame seeds, poppy seeds, or a combination of both add nutty flavor and visual interest. For something more aromatic, try dried rosemary, thyme, or oregano pressed into the surface before baking.
Whole wheat flour can replace half or all of the all-purpose flour for a nuttier, more rustic matzo with extra fiber and nutrition. The dough will be slightly more challenging to roll thin since whole wheat has more structure, but the earthy flavor is worth it. You could also experiment with adding a tablespoon of honey to the dough for a touch of sweetness that pairs beautifully with the olive oil, creating something closer to a sweet cracker than traditional matzo. This obviously takes it further from the traditional unleavened bread concept, but it makes a delicious snack.
For a completely different approach, try using flavored oils instead of plain olive oil. Garlic-infused olive oil, lemon olive oil, or even toasted sesame oil will each impart distinct flavors to the finished crackers. You can also make chocolate matzo by brushing the baked and cooled crackers with melted dark chocolate, letting it set, then breaking them into shards for a treat that's become popular in modern Jewish cooking. The contrast of bitter chocolate with the savory, slightly salty cracker is surprisingly addictive.
Serving Suggestions and Uses
Fresh matzo is absolutely delicious eaten on its own while it's still slightly warm from the oven, and it doesn't need any embellishment to be enjoyable. The olive oil gives it enough flavor that plain matzo makes a perfectly satisfying snack. However, it also serves as an excellent vehicle for toppings and spreads. Classic combinations include cream cheese with smoked salmon and capers, which is basically a Jewish bagel deconstructed. Butter and jam for a simple breakfast treat, or hummus topped with cucumber and tomatoes for a light lunch.
During Passover, matzo is traditionally used for making matzo brei, which is essentially a Jewish version of French toast where you soak broken matzo pieces in beaten eggs and fry them until golden. Homemade matzo works beautifully for this since it's tender enough to absorb the egg mixture quickly without becoming mushy. You can also crush homemade matzo to make your own matzo meal for coating chicken or fish, or to use as a binder in dishes like matzo balls. The flavor of homemade matzo meal is notably better than boxed since it's fresh and has the olive oil richness.
For an elegant appetizer, break cooled matzo into irregular shards and top each piece with something special—goat cheese and roasted beets, chopped egg salad with fresh dill, or smoked whitefish salad. The thin, crispy texture makes it similar to crostini or flatbread crackers, but with its own unique character. You can also serve it alongside soups and stews as you would any cracker or bread, where it's perfect for scooping or dipping.
Storage and Shelf Life Considerations
Homemade matzo stays crisp and fresh for about three to four days when stored properly at room temperature. The key is keeping moisture away since any humidity will make the crackers go soft and stale quickly. Store completely cooled matzo in an airtight container or resealable plastic bag, ideally with a small packet of food-safe silica gel if you have one available to absorb any moisture. Don't stack them too tightly or they might break—these are more delicate than commercial matzo since they're so thin and flaky.
If your matzo does lose its crispness after a day or two, you can refresh it by placing the pieces on a baking sheet and heating them in a 300°F oven for five to seven minutes. This drives off any absorbed moisture and brings back that fresh-baked crunch. Let them cool completely before eating since they'll seem softer when hot but crisp up as they cool. This trick works multiple times, though the matzo will gradually lose quality with each reheating.
For longer storage, matzo freezes surprisingly well if wrapped carefully. Place sheets of parchment paper between the matzo pieces so they don't stick together, then wrap the whole stack tightly in plastic wrap followed by aluminum foil. Properly wrapped matzo can be frozen for up to two months. To use frozen matzo, let it come to room temperature in its wrapping so condensation doesn't make it soggy, then crisp it briefly in a low oven if needed. While it won't be quite as perfect as fresh, it's still far superior to store-bought and means you can have homemade matzo available without the commitment of baking it frequently.
 Pin it
Making matzo from scratch has become one of my favorite small baking projects because it's quick, nearly foolproof once you get the feel for it, and produces something genuinely better than what you can buy. There's something satisfying about making this ancient food in your own kitchen with minimal equipment and simple ingredients. The whole process from start to finish takes maybe 45 minutes if you work efficiently, and most of that is hands-on time that feels productive rather than just waiting around. These crackers have honest flavor and real texture that makes them a pleasure to eat rather than just a symbolic obligation, and they've changed how my family thinks about matzo entirely. Once you experience truly fresh matzo with that delicate flakiness and rich olive oil taste, the boxed version seems like a completely different food that just happens to share the same name.
Frequently Asked Questions
- → Can I make matzo without a food processor?
- Yes, you can mix the dough by hand in a bowl. Just stir together the flour, salt, and oil, then add water gradually until a non-sticky dough forms. Knead it for a minute until smooth.
- → How thin should I roll the matzo dough?
- Roll it as thin as possible, almost see-through. The thinner you roll it, the crispier your matzo will be. Aim for about the thickness of a dime.
- → Why do I need to poke holes in the dough?
- Poking holes with a fork prevents the matzo from puffing up too much during baking. It helps the crackers stay flat and cook evenly.
- → How do I store homemade matzo?
- Keep the cooled matzo in an airtight container at room temperature. They'll stay crispy for up to 2 days. Don't store them while still warm or they'll get soft.
- → Can I use whole wheat flour instead?
- Yes, whole wheat flour works fine. The matzo will have a nuttier flavor and slightly darker color. You might need a tiny bit more water since whole wheat absorbs more liquid.
- → Is homemade matzo kosher for Passover?
- No, homemade matzo isn't considered kosher for Passover unless made under strict rabbinical supervision. This recipe is great for everyday eating throughout the year.