
 Pin it
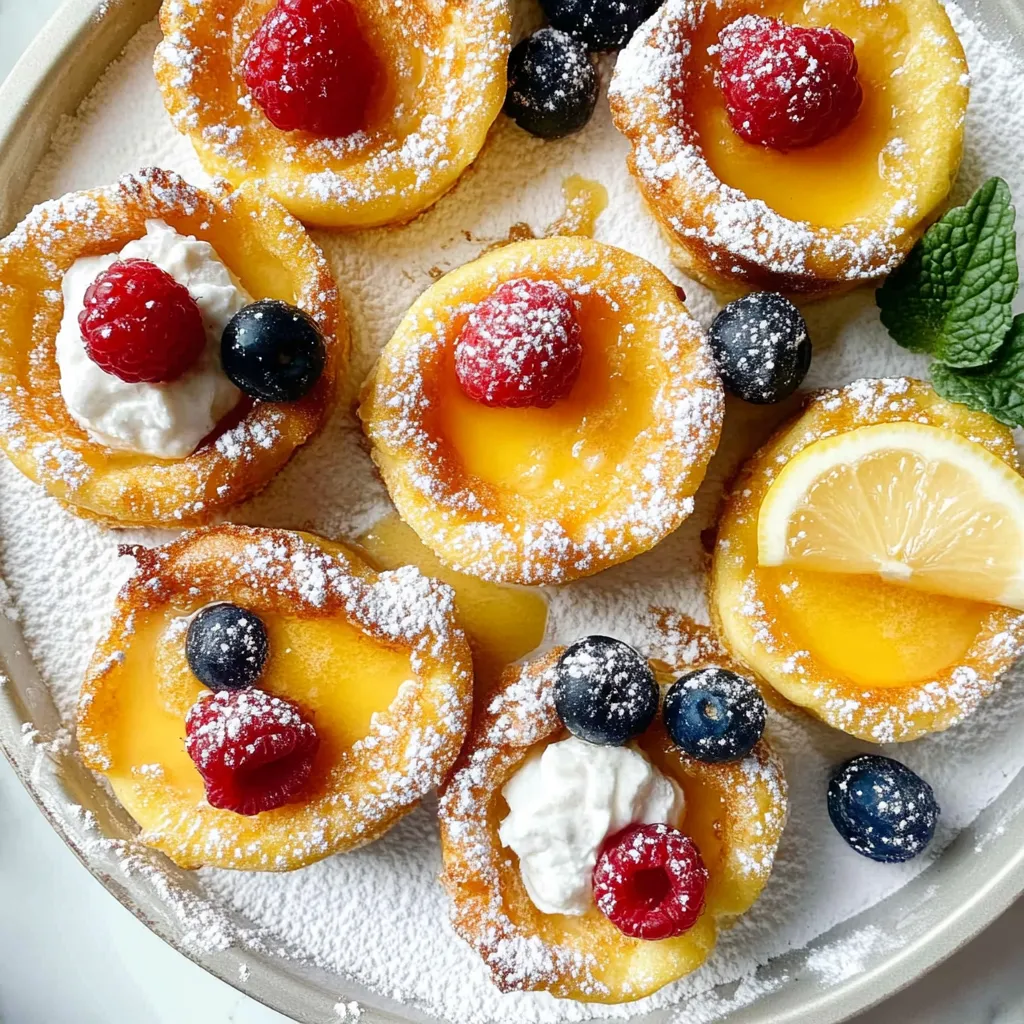
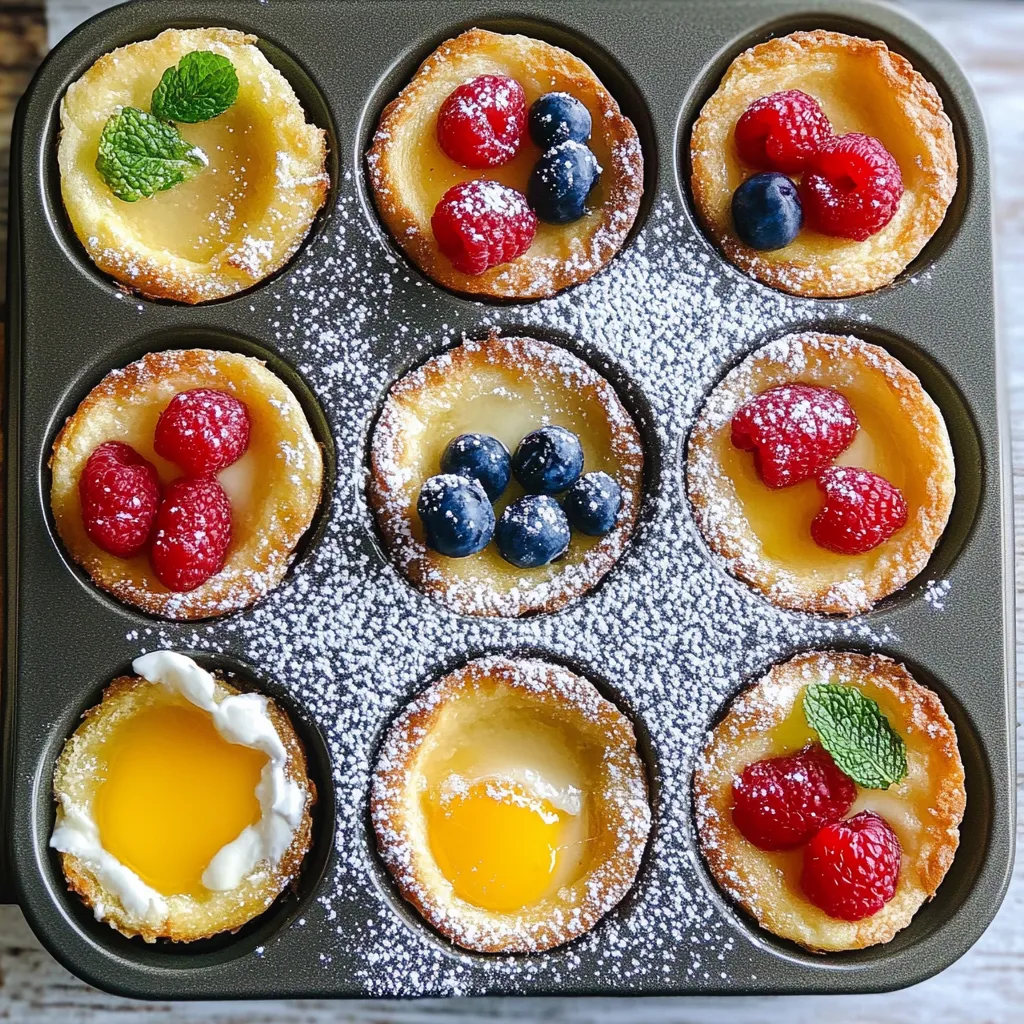
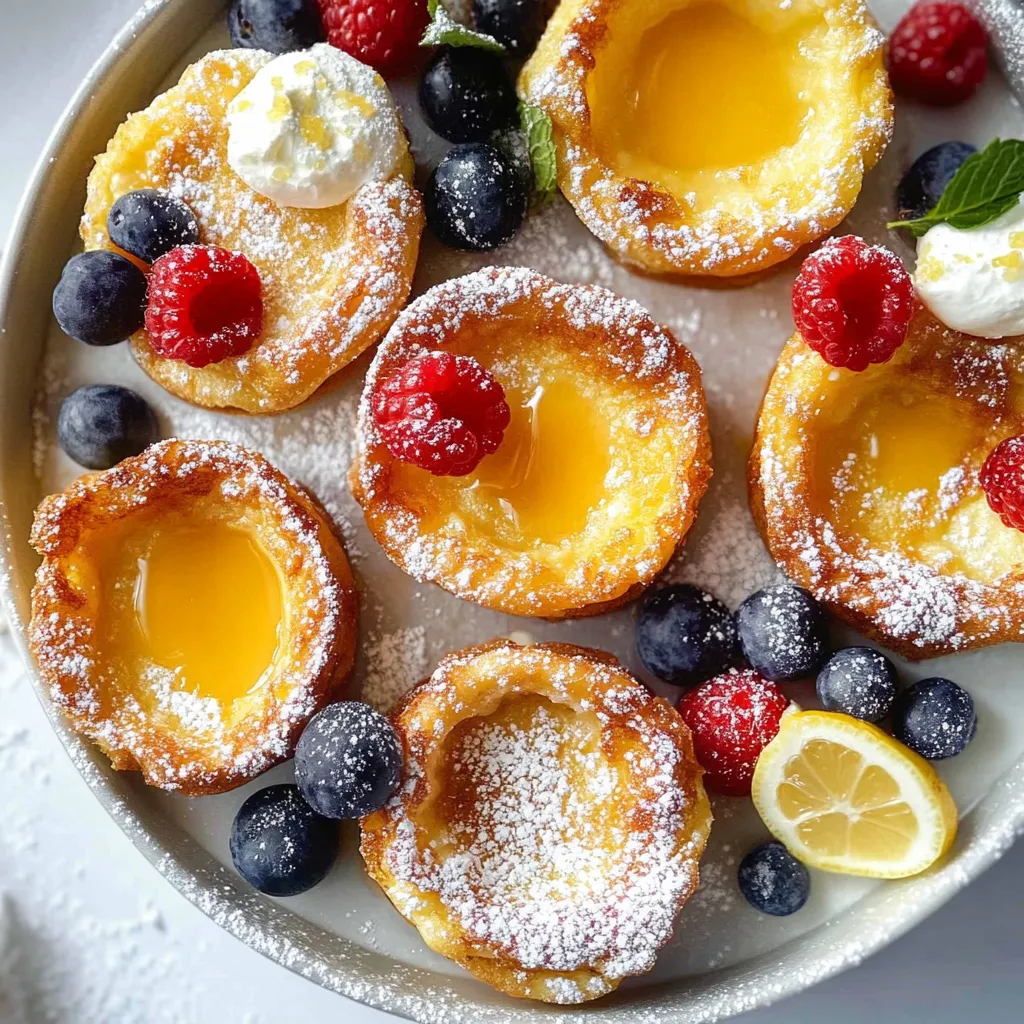
Baking pancakes in muffin tins instead of a skillet transforms breakfast into something that feels special without requiring any extra skill or effort. These mini Dutch babies puff up dramatically in the oven, creating golden buttery edges that rise high above custard-like centers. The batter comes together in a blender in less than a minute, and individual portions mean everyone gets their own perfectly cooked pancake with crispy edges all the way around. Melted butter in each cup creates a base that becomes almost caramelized during baking, adding richness that plain pancakes never achieve.
Dutch baby pancakes became my weekend breakfast obsession after I realized I could skip the stovetop entirely and let the oven do all the work. The mini muffin tin version started when I had guests for brunch and needed to serve eight people at once instead of making everyone wait for individual large Dutch babies. Watching these puff up through the oven window never gets old - my kids press their faces against the glass every time, amazed that pancakes can rise like little soufflés. The first batch I made deflated immediately because I opened the oven door too soon, but once I learned to resist that temptation, these became foolproof.
Ingredients and Why They Matter
- Butter (6 tablespoons, about ¾ stick): Melting butter directly in the muffin cups before adding batter creates the signature crispy edges and prevents sticking; unsalted butter lets you control salt levels precisely
- Large eggs (3): Eggs provide structure and create that custardy center texture; room temperature eggs blend more smoothly than cold ones straight from the fridge
- Granulated sugar (2 tablespoons): Just enough sweetness to balance the eggy flavor without making these taste like dessert; you can adjust up or down based on topping choices
- Vanilla extract (1 teaspoon, or more to taste): Vanilla adds warmth and depth; pure vanilla extract tastes better than imitation, and vanilla bean paste creates even more flavor if you have it
- Whole milk (¾ cup): Full-fat milk creates the richest, creamiest texture; 2% milk works in a pinch but won't be quite as luscious
- All-purpose flour (¾ cup, measured correctly): Flour provides just enough structure to hold the puffed shape; too much makes these dense and cakey instead of light and custardy
- Salt (½ teaspoon, or ¼ teaspoon if using salted butter): Salt enhances all the other flavors and prevents these from tasting flat or bland
How To Make It
- Prepare the muffin tin with butter:
- Set your oven to 400°F and let it preheat fully - the high temperature is crucial for getting that dramatic puff. While the oven heats, cut your butter into 12 equal pieces, roughly ½ tablespoon each. Drop one piece of butter into each cup of a standard 12-cup muffin tin. The tin should be completely clean and dry before adding butter. Once the oven reaches temperature, place the muffin tin on the center rack and let the butter melt completely, which usually takes 3-4 minutes. Watch through the oven window - you want the butter fully melted and just starting to sizzle slightly but not browning or smoking. This melted butter will form the base that creates those crispy edges and prevents sticking.
- Blend the batter:
- While butter melts in the oven, make your batter in a blender. Add the eggs first, then sugar, vanilla, and milk. Measure your flour last and add it on top of the liquid ingredients - this order makes blending easier and prevents flour from sticking to the blender bottom. Put the lid on securely and blend on medium-high speed for about 30 seconds until everything looks smooth and combined. Stop the blender and use a rubber spatula to scrape down the sides, checking especially for flour clinging to the walls or hiding at the bottom. Any unblended flour creates lumps in your finished pancakes. Blend again for another 10-15 seconds until absolutely smooth. The batter should be thin and pourable, similar to heavy cream consistency. Let it rest in the blender while you prepare the muffin tin.
- Coat the muffin cups:
- Carefully remove the hot muffin tin from the oven using oven mitts - both the pan and the melted butter inside are extremely hot. Set it on a heat-safe surface. Take a pastry brush and quickly brush the melted butter up the sides of each cup, coating the walls all the way to the rim. This step is essential because the batter will stick to any unbuttered spots and won't release cleanly after baking. Work quickly but thoroughly - if you don't have a pastry brush, swirl the tin carefully to coat the sides with butter. The butter might start solidifying if you take too long, so move with purpose. Some people skip this brushing step, but those crispy edges release much more easily when you've coated the entire cup.
- Fill and bake immediately:
- Give your batter one final quick stir or pulse in the blender, then pour it into the prepared muffin cups. Fill each cup about two-thirds full, which gives the batter room to puff up without overflowing. Don't stress about getting exactly equal amounts in each cup - eyeballing it works fine. A measuring cup with a pour spout makes this easier than pouring directly from the blender. Immediately return the filled muffin tin to the hot oven. Set a timer for 16 minutes and resist any temptation to open the oven door before then. Opening the door even briefly lets out heat and causes the pancakes to deflate instead of puffing properly. Use your oven light and peer through the window if you need to check on them.
- Watch for doneness signs:
- After 16 minutes, check through the oven window. The mini Dutch babies should have puffed dramatically with edges rising high above the centers, and everything should look golden brown. The edges might be darker brown than the centers, which is normal and desirable. If they still look pale or haven't puffed much, give them another 2-4 minutes. Total baking time usually runs 16-20 minutes depending on your oven and how hot it runs. When they're done, the edges will be crispy and golden, the centers will look set but still slightly jiggly, and you might see some darker brown spots on the highest peaks. Don't wait for the centers to look completely dry or firm, because they'll continue cooking from residual heat after you remove them from the oven.
- Remove and serve quickly:
- Take the muffin tin out of the oven - it's still very hot, so use oven mitts. The mini Dutch babies will start deflating almost immediately, which is completely normal and expected. As they deflate, the centers sink down to create that characteristic custardy texture. Let them cool in the pan for just 1-2 minutes so they're not burning hot, then use a small offset spatula or butter knife to gently loosen the edges and lift each one out. The buttered cups should release them easily. Transfer to serving plates and add toppings immediately while they're still warm. These taste best eaten right away while the edges are crispy and the centers are warm and custardy. They'll still be good after sitting for 10 minutes, but some of that textural contrast diminishes as they cool.
 Pin it
Whole milk became my non-negotiable ingredient for these after making one batch with skim milk that turned out thin and disappointing. The fat content in whole milk creates that rich, creamy texture in the centers that makes Dutch babies feel special. My kids argue over who gets the puffiest ones, not realizing they all deflate within seconds anyway. I've started serving these when we have overnight guests because I can put them in the oven and then actually sit down to eat with everyone instead of being stuck at the stove flipping pancakes while my coffee gets cold.
The Science of Puffing
Understanding why Dutch babies puff helps you troubleshoot when things don't work perfectly. The high oven temperature rapidly heats the batter, causing the liquid to convert to steam. This steam gets trapped in the egg-flour structure, pushing it upward and outward to create those dramatic puffs. The edges touching the hot pan set quickly and become crispy, while the centers stay soft and custardy because they're insulated from direct heat. When you remove the pan from the oven, the steam cools and condenses back to liquid, causing the inevitable deflation. This process is normal and desirable - those sunken centers become the perfect vessels for holding toppings like syrup, fruit, or whipped cream.
Blending Order Matters
Adding ingredients to the blender in the right sequence makes blending easier and prevents issues. Liquids go in first - eggs and milk - because they surround the blender blades and help everything move smoothly. Sugar and vanilla dissolve easily in the liquid. Flour goes in last on top of the liquid, which prevents it from clumping on the blender bottom where blades can't reach it. If you add flour first, it often sticks to the bottom and sides, requiring much more scraping and re-blending to incorporate fully. That final scrape down with a spatula catches any flour hiding on the blender walls or bottom, ensuring smooth batter without any lumps that would create dense spots in your finished pancakes.
Muffin Tin Selection
Standard 12-cup muffin tins work best for this recipe with cups measuring roughly 2.75 inches across and 1.5 inches deep. Mini muffin tins make adorable tiny Dutch babies but require reducing baking time to about 10-12 minutes. Jumbo or Texas-size muffin tins create larger individual servings but need extra baking time, closer to 22-25 minutes. Non-stick tins release the pancakes more easily than bare metal, though proper buttering should work with any material. Avoid silicone muffin cups for this recipe because they don't conduct heat well enough to create crispy edges. Dark metal pans brown the edges faster than light-colored ones, so you might need to reduce baking time by a minute or two if using dark pans.
Topping Combinations
The neutral, eggy flavor of Dutch babies makes them perfect canvases for countless topping combinations. Classic simple toppings include powdered sugar dusted over the top with a squeeze of fresh lemon juice and a drizzle of pure maple syrup. Fresh berries with whipped cream creates a lighter, fruitier version perfect for spring and summer. Lemon curd spread in the centers with fresh blueberries tastes bright and tangy. Sliced peaches or nectarines with a sprinkle of cinnamon sugar works beautifully. Nutella and sliced bananas appeals to chocolate lovers. Caramelized apples or pears with a dollop of Greek yogurt offers sophistication. Savory toppings work too - try crème fraîche with smoked salmon and fresh dill, or ricotta with sautéed mushrooms and herbs for brunch that leans more lunch than breakfast.
Make-Ahead Strategies
While these taste absolutely best fresh from the oven, you can prepare components ahead to streamline morning cooking. Measure all your dry ingredients into a bowl the night before. Crack eggs into a container and measure milk into another, storing both refrigerated overnight. In the morning, combine everything in the blender and proceed as usual. The batter itself doesn't hold well unbaked because the eggs make it perishable, so mixing ahead isn't recommended beyond an hour or so. Baked leftovers can be refrigerated in an airtight container for 2 days - reheat in a 350°F oven for about 5 minutes to restore some crispness, though they'll never be quite as good as fresh. Freezing works for up to a month; thaw overnight in the fridge and reheat as above.
Common Problems and Solutions
Dutch babies that don't puff usually suffer from oven temperature issues - make sure your oven truly reaches 400°F before baking, and consider using an oven thermometer if you suspect inaccurate temperatures. Pancakes that stick to the pan didn't get enough butter on the sides, or the butter wasn't hot enough when you added the batter. Dense, heavy texture means too much flour or overmixing after adding flour, which develops gluten and makes them tough. Burnt edges with raw centers suggest oven temperature too high or muffin tin placed too close to the heating element - move to a lower rack. Flat pancakes that never puff point to opening the oven door too early or old eggs that have lost some leavening power.
 Pin it
These mini Dutch baby pancakes represent the kind of breakfast cooking I wish I'd discovered years earlier. The simple technique of blending everything together and letting the oven work its magic eliminates the stress of stovetop pancake making where you're constantly monitoring heat and flipping at the right moment. Everyone gets their own individual portion that comes out of the oven perfectly cooked at the same time, so the whole family can actually eat together while the food is hot. When guests watch these puff up through the oven window, they're always impressed and assume the recipe must be complicated, which makes it fun to explain how ridiculously easy they actually are. Sometimes the best cooking tricks are the ones that deliver maximum impact with minimal effort.
Frequently Asked Questions
- → Can I make the batter ahead of time?
- Yes, you can mix the batter the night before and keep it in the fridge. Just give it a quick stir before pouring it into the hot buttered muffin tin.
- → Why do my Dutch babies deflate after baking?
- This is totally normal! They puff up in the oven but naturally settle once you take them out. This creates that signature custardy center everyone loves.
- → Can I use a different type of milk?
- Whole milk works best for the richest flavor, but you can use 2% milk if that's what you have. Avoid skim milk as it won't give you the same buttery texture.
- → Do I need a special muffin tin?
- Any standard 12-cup muffin tin works great. Just make sure to butter each cup really well so the pancakes don't stick to the sides.
- → How do I store leftovers?
- Keep them in an airtight container in the fridge for up to 2 days. Reheat in a 350 degree oven for about 5 minutes to crisp them back up.
- → What's the best way to serve these?
- Dust them with powdered sugar right out of the oven, then add your favorite toppings like maple syrup, fresh berries, lemon curd, or whipped cream.