
 Pin it
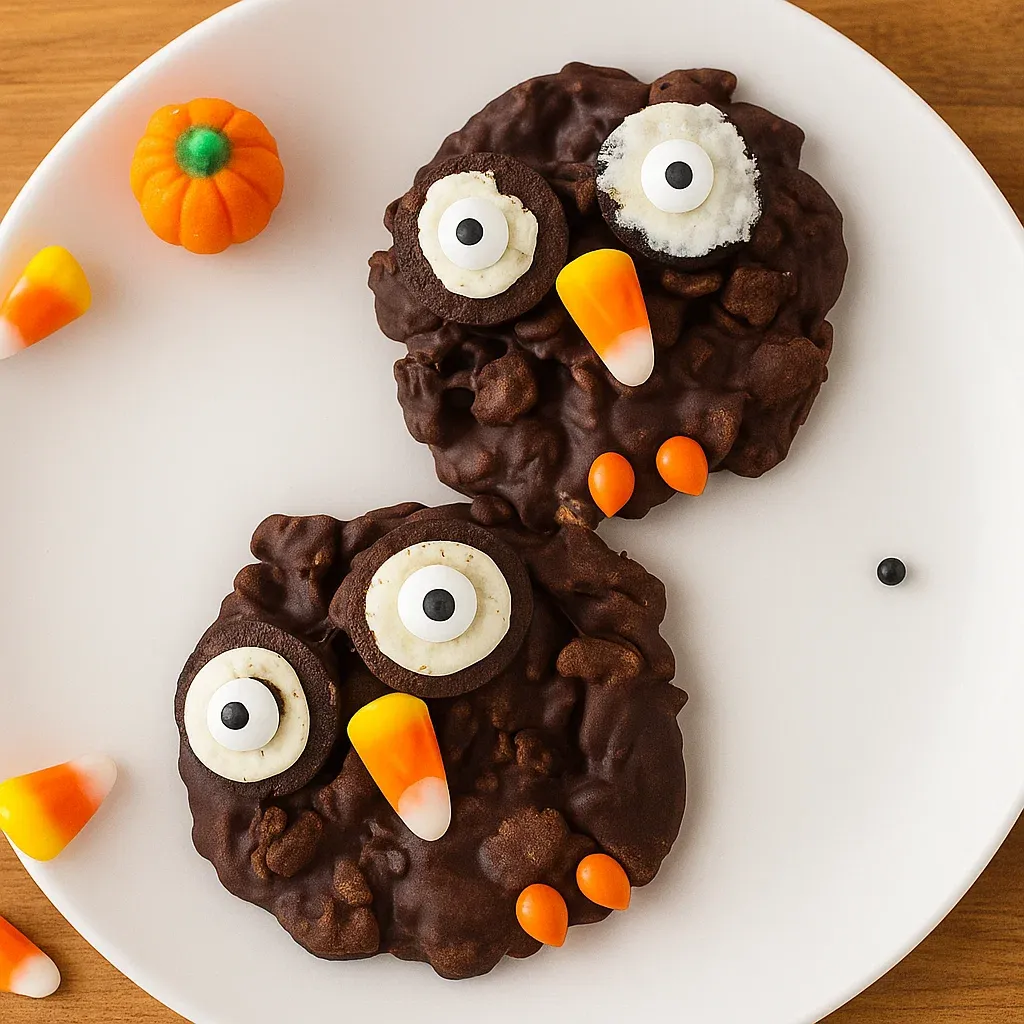
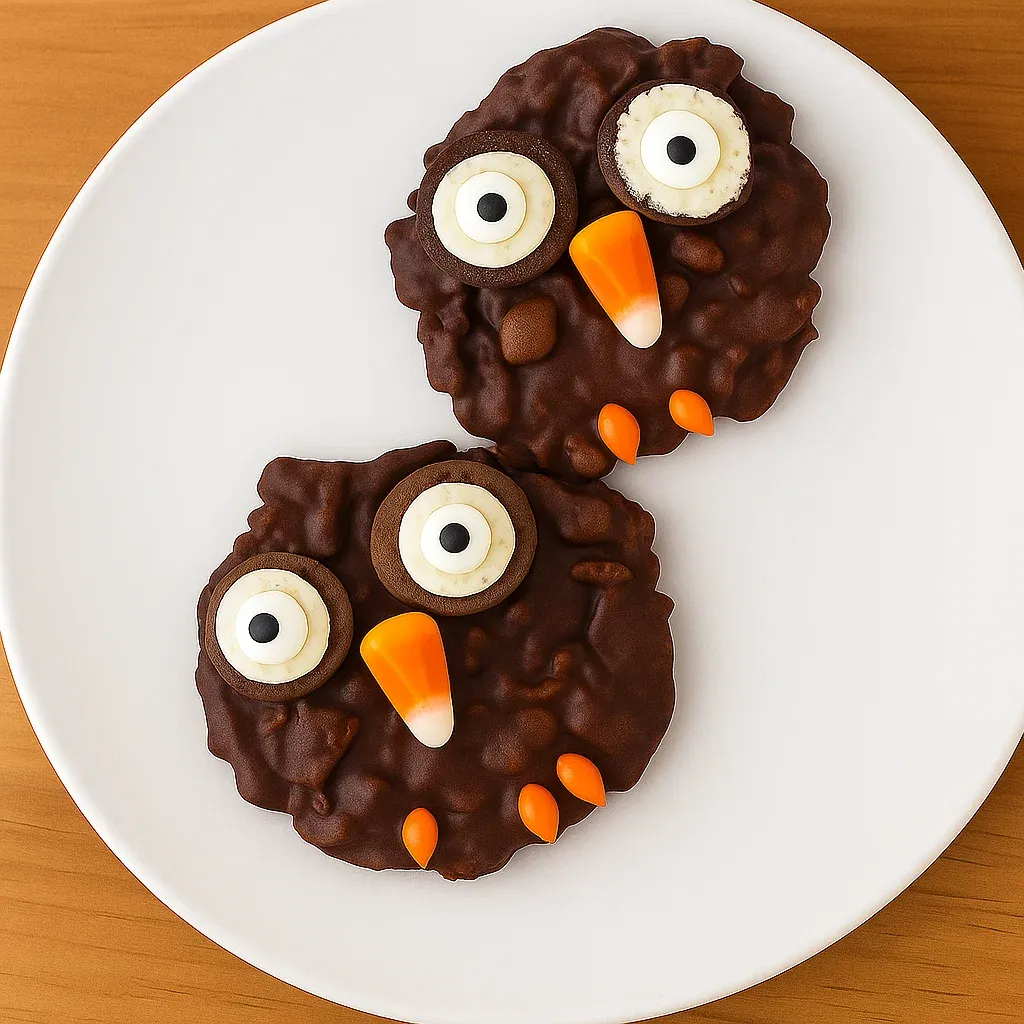
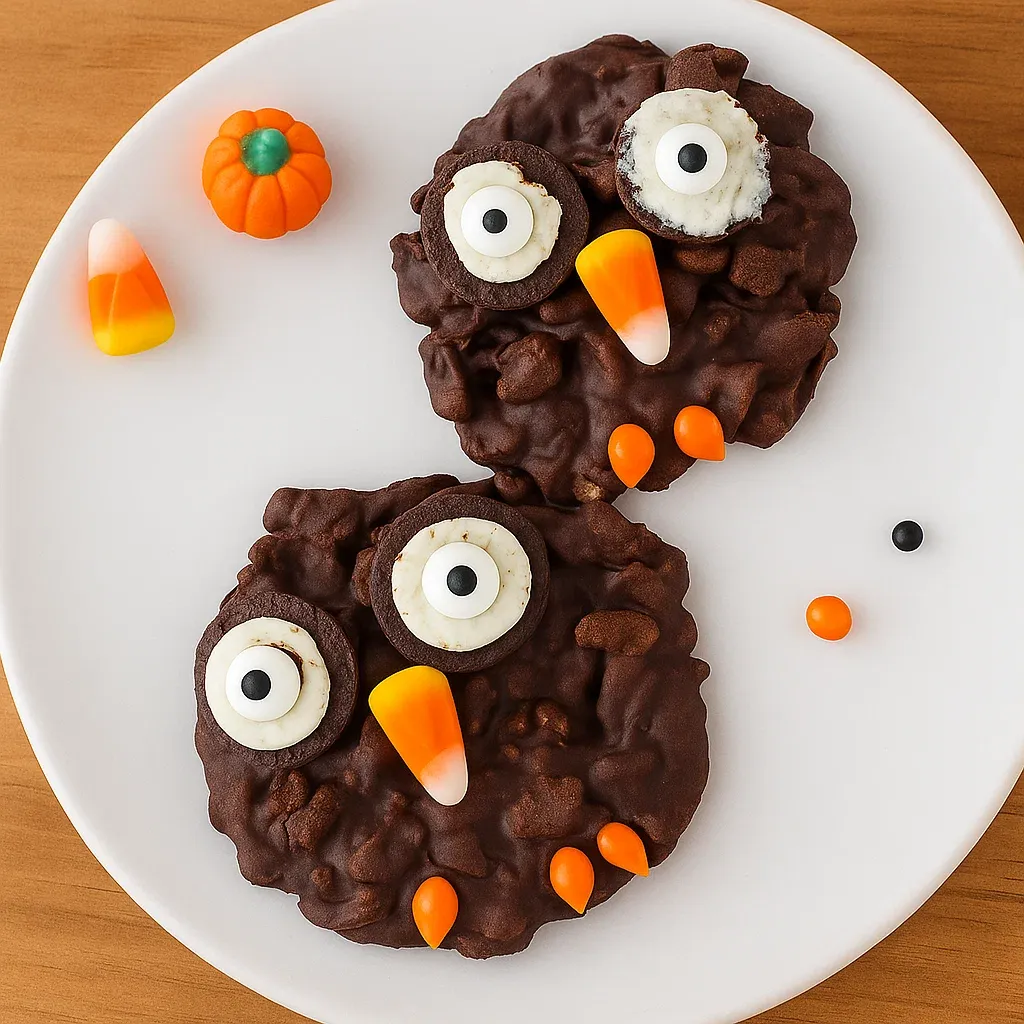
Turning chocolate rice cereal treats into adorable owls takes maybe 30 minutes and requires no oven whatsoever. These no-bake cookies get shaped while still warm from the stovetop, then decorated with mini Oreos for eyes, candy corn beaks, and chocolate-covered sunflower seeds for feet. The chocolate coating binds everything together while adding rich flavor, and kids can handle almost every step from stirring to decorating. These work perfectly for Halloween parties, fall gatherings, or just making a random afternoon more fun with an activity that produces something actually worth eating.
No-bake treats became my solution for entertaining kids during school breaks when they're bored but I don't want to heat up the house with the oven. These owl cookies specifically started when my daughter's class needed Halloween party treats but the school had a no-homemade-baked-goods policy. The stovetop method technically doesn't count as baking, and the individual portions meant no concerns about cross-contamination. Kids at the party went crazy over them, and several parents asked for the recipe. Now I make these every fall regardless of whether we have a party planned because they're too cute and easy not to.
Ingredients and Why They Matter
- Butter: ¼ cup, 4 tablespoons - Adds richness and helps create the syrupy coating that binds cereal together
- Light corn syrup: ¼ cup - Provides sweetness and keeps cookies soft and chewy rather than hard and brittle; honey or maple syrup substitute if needed
- Granulated sugar: ¼ cup - Adds sweetness and helps the coating set properly as it cools
- Cocoa powder: 3 tablespoons - Creates chocolate flavor throughout the base; use unsweetened cocoa powder not hot chocolate mix
- Salt: pinch - Enhances chocolate flavor and balances sweetness
- Chocolate hazelnut spread or alternative: ½ cup - Nutella adds creamy chocolate and hazelnut notes; peanut butter or nut-free chocolate spread work as substitutes
- Vanilla extract: 1 teaspoon - Deepens chocolate flavor and adds warmth
- Rice cereal: 3 cups - Crispy rice cereal provides crunch and structure; use any brand of rice krispies
- Chocolate melting wafers: 1 cup - Ghirardelli melts smoothly and sets firm; use as edible glue for attaching decorations
- Mini Oreo cookies: about 24, two per owl - Split in half to create owl eyes with the cream filling visible
- Edible candy eyes: 24, two per owl - Stick onto the Oreo cream to create pupils; find these in baking aisles or online
- Mini candy corn: 12, one per owl - Positioned point-down creates perfect beaks
- Orange chocolate-covered sunflower seeds: 24-36, two to three per owl - Arranged at the bottom make little owl feet; substitute orange M&Ms if needed
- Paper straws: optional - Glued to cookie backs with chocolate turn these into owl pops for easier holding
How To Make It
- Make the chocolate coating:
- Place a medium saucepan on the stove over medium heat and add the butter, corn syrup, granulated sugar, cocoa powder, and salt. Stir everything together constantly as the butter melts and the sugar dissolves. Keep stirring until the mixture comes to a gentle boil with bubbles breaking across the entire surface, which usually takes about 3-4 minutes. Watch carefully and don't walk away because sugar mixtures can burn quickly. Once bubbling, remove the pan from heat immediately. Add the chocolate hazelnut spread and vanilla extract, stirring vigorously until everything combines into a smooth, glossy chocolate mixture with no streaks or lumps remaining. The residual heat will melt the spread easily.
- Combine with cereal:
- Pour the rice cereal into the hot chocolate mixture while it's still in the pot. Use a large spoon or silicone spatula to stir and fold, coating every piece of cereal completely with the chocolate coating. Work relatively quickly but thoroughly, making sure no dry cereal pieces remain. The mixture will seem very thick and sticky, which is exactly right. Keep stirring until uniform chocolate color covers everything and the cereal pieces stick together in clumps. This coating is what holds your owl-shaped cookies together once they cool.
- Shape into cookies:
- Line a large baking sheet or two with parchment paper or a silicone baking mat. Working quickly while the mixture is still warm and pliable, scoop out portions using a large spoon or cookie scoop - about 2-3 tablespoons per cookie. Drop each portion onto the prepared baking sheet, spacing them about 2 inches apart. You should get approximately 12 cookies from this batch. Take the back of a spoon and gently press down on each mound, flattening the bottom slightly while shaping it into an oval that's wider at the top than the bottom, creating an owl body shape. Don't worry about making them perfectly uniform - rustic owl shapes work fine. Let the shaped cookies cool completely at room temperature for about 30 minutes, or speed things up by refrigerating them for 15 minutes. They need to be completely firm before decorating.
- Prepare melting chocolate:
- While cookies cool, get your decorations organized and ready. Split the mini Oreos carefully with a butter knife, twisting gently so the cream filling stays on one half of each cookie - these become the eye backgrounds. Set out your candy eyes, mini candy corn, and chocolate-covered sunflower seeds in separate small bowls so everything is easy to grab. Place the chocolate melting wafers in a microwave-safe bowl and microwave at 50% power for 30-40 seconds. Remove and stir thoroughly, then continue microwaving in 20-second intervals at 50% power, stirring between each one, until completely melted and smooth. Don't overheat or the chocolate will seize. The melted chocolate acts as edible glue for attaching all your decorations.
- Attach straws if using:
- If you want owl pops instead of flat cookies, now is when to add the straws. Dip the top inch of a paper straw into the melted chocolate, coating it well. Press this chocolate-coated end firmly onto the back center of one cooled cookie, holding it in place for about 10 seconds until the chocolate starts setting. Lay the cookie flat with the straw extending off the edge of your work surface to dry completely. Repeat with remaining cookies. Let these set for 5-10 minutes before decorating the fronts. If skipping straws, just proceed directly to decorating.
- Decorate the owls:
- Now comes the fun part where these transform from chocolate cereal blobs into adorable owls. Use a toothpick or small offset spatula to dab a bit of melted chocolate onto the back of one Oreo half, then press it onto the upper portion of a cookie for one eye. Repeat with another Oreo half positioned next to the first eye, spacing them slightly apart. Dab more chocolate onto the backs of two candy eyes and press them onto the cream centers of the Oreos, creating pupils. Take one mini candy corn and dip the wide end into melted chocolate, then position it point-down between and slightly below the eyes to create a beak. Finally, dip the backs of 2-3 chocolate-covered sunflower seeds into chocolate and arrange them at the bottom of the cookie pointing outward like little owl feet. Hold each decoration in place for a few seconds until the chocolate grabs. Repeat this entire decorating process with all remaining cookies. Let decorated owls sit undisturbed for about 15 minutes so the chocolate hardens and everything stays secure.
 Pin it
Chocolate hazelnut spread became my go-to baking ingredient after discovering it adds incredible richness to simple recipes without requiring multiple steps. My son has a peanut allergy, so I keep both Nutella and nut-free chocolate spreads in the pantry depending on who's eating. These owl cookies work perfectly with either version, and honestly most kids can't tell the difference. The chocolate coating tastes rich enough that people assume these took more effort than they actually did, which makes me look like a more ambitious baker than I really am.
The Stovetop Technique
Understanding how the chocolate coating comes together helps you recognize when it's ready and prevents common problems. Butter melts first, then sugar dissolves into the liquid, and cocoa powder disperses throughout. Bringing this to a boil activates the sugar's binding properties that help everything set properly once cool. Boiling too long makes the mixture too thick and hard when cooled, while not boiling enough leaves it too soft and sticky. That gentle bubbling across the entire surface signals the perfect stopping point. Adding chocolate spread off the heat prevents it from separating or becoming grainy from too much heat.
Shaping While Warm
The window for shaping these cookies is relatively short because the chocolate mixture sets as it cools. Work quickly but don't stress - if a few cookies harden before you finish shaping, that's okay because they'll still taste good even if they're rounder than intended. Some cooks find it helpful to have a partner during this step - one person scoops while the other shapes. Using a spoon dipped in cold water can prevent the sticky mixture from adhering to your tools. Creating that wider top and narrower bottom owl body shape isn't critical; round cookies work fine too since the decorations make them recognizable as owls regardless.
Decoration Assembly Line
Setting up an organized workspace before decorating makes the process much smoother, especially when working with kids. Arrange all your candies and decorations in small bowls in the order you'll use them - Oreos, candy eyes, candy corn, sunflower seeds. Put melted chocolate in the center where everyone can reach it. Have toothpicks or small spoons for applying chocolate. Give each person a few cookies to decorate rather than everyone grabbing from one pile. This assembly line approach prevents chaos and keeps things moving. Kids enjoy having clear stations and steps to follow rather than a free-for-all that results in spilled chocolate and crying.
Creative Variations
While traditional brown owls work perfectly, variations create different looks and accommodate dietary restrictions or ingredient availability. Using peanut butter instead of chocolate spread makes peanut butter owls with lighter color. White chocolate melted into the cereal creates snowy owls. Adding food coloring to white chocolate makes any color owl imaginable - pink for Valentine's Day, green for spring, blue for baby showers. Decoration substitutions work too - brown M&Ms replace Oreos, whole almonds become beaks, regular-size candy corn works if mini isn't available, and orange M&Ms substitute for sunflower seeds. The base recipe stays the same while the final appearance changes.
Storage and Freshness
These no-bake cookies stay fresh longer than you might expect because the chocolate coating protects the cereal from humidity. Store in an airtight container with wax paper or parchment between layers to prevent decorations from sticking together or getting damaged. Room temperature storage works fine in cool, dry climates for up to a week. Warmer or humid environments require refrigeration to prevent the cookies from getting soft and sticky. Cold cookies taste fine - some people actually prefer them chilled. Bring to room temperature for 10-15 minutes before serving if you prefer softer texture. Don't freeze these because the decorations often crack and the texture changes oddly.
Party Presentation Ideas
How you display these owls can enhance their impact at parties beyond just piling them on a plate. Arrange cookies on a platter covered with crushed graham crackers to look like dirt or fallen leaves, creating a forest scene. Stand owl pops in a vase filled with candy corn or autumn candies for a festive centerpiece. Wrap individual owls in clear cellophane bags tied with ribbon as party favors guests can take home. Create a "tree" by inserting owl pops into a foam ball or cone covered in brown paper. Line them up on a serving board with fall leaves scattered around. These little touches turn simple cookies into memorable party elements.
Troubleshooting Common Issues
Sometimes the chocolate mixture turns out too thick or too thin, affecting how well it holds shape. Too thick usually means it cooked too long - you can't really fix this, but the cookies will just be firmer and crunchier. Too thin means it didn't cook enough - return it to the heat and boil for another minute. Decorations falling off indicate the melted chocolate wasn't thick enough or you didn't let it set long enough before moving the cookies. Cookies spreading flat instead of holding shape means the mixture was too warm when you shaped them - refrigerate briefly to firm up, then reshape. Cereal not fully coated creates dry spots - make sure to stir thoroughly.
 Pin it
These owl cookies represent exactly the kind of recipe I wish I'd known about when my kids were younger and desperately needed entertaining during long afternoons. The combination of simple cooking, creative decorating, and immediate results keeps kids engaged from start to finish. When they see their finished owls lined up on the counter, each one looking slightly different based on how they positioned the decorations, the pride on their faces makes the minimal mess completely worthwhile. Sometimes the best recipes aren't the most sophisticated ones, but rather the ones that bring people together over something fun and delicious that everyone can participate in making.
Frequently Asked Questions
- → Do I need to bake these owl cookies?
- No baking required at all! You just heat the ingredients on the stove, shape the cookies, and let them cool before decorating.
- → How long do these cookies stay fresh?
- Store them in an airtight container at room temperature for up to 5 days. They actually taste better the next day once everything sets up nicely.
- → Can I use different decorations?
- Absolutely! Use whatever candy you have on hand. M&Ms, chocolate chips, or almonds all work great. Get creative with what's in your pantry.
- → What if I don't have chocolate spread?
- Peanut butter works perfectly as a substitute. You can also use Nutella or any nut-free spread if allergies are a concern.
- → Are these cookies kid-friendly to make?
- Yes! Kids love helping with the decorating part. Just handle the stovetop cooking yourself, then let them place the eyes, beaks, and feet on the owls.
- → Can I make these ahead of time?
- Perfect for making ahead! Prepare them up to 2 days before your party. Just store in a single layer so the decorations don't get damaged.
- → Why did my mixture get too hard to shape?
- The mixture firms up fast as it cools. Work quickly after mixing in the cereal, and if it gets too stiff, warm it gently on the stove for a few seconds.