
 Pin it
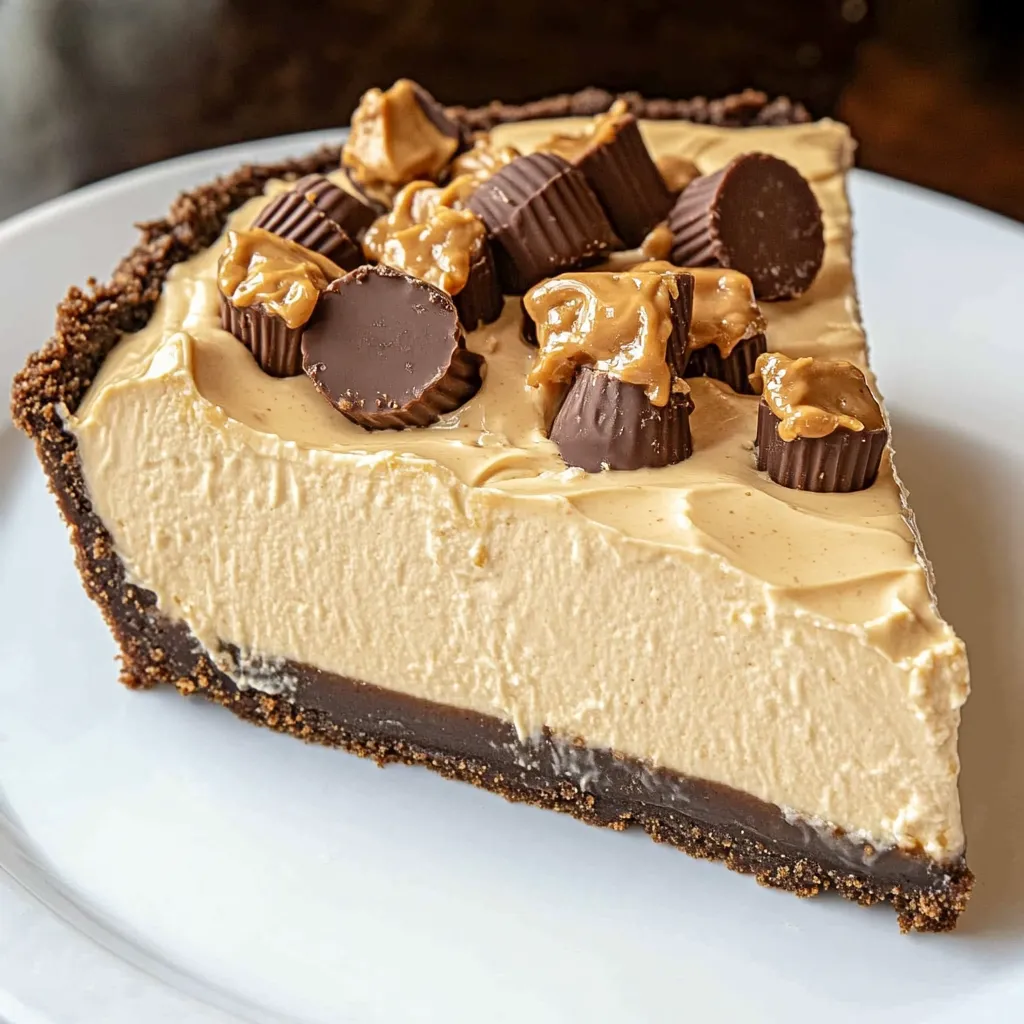
This no-bake peanut butter pie delivers pure decadence with minimal effort. The silky-smooth filling combines cream cheese and peanut butter for an irresistibly rich taste that's perfectly balanced with just enough sweetness. Nestled in a chocolate graham cracker crust and topped with peanut butter drizzle and chopped Reese's cups, this show-stopping dessert looks like it came from a bakery case but requires zero baking skills.
I first made this pie for a summer potluck when turning on the oven seemed criminal during a heatwave. It disappeared faster than any other dessert on the table, and three different people asked for the recipe before the night was over! Even my mother-in-law, who claims to "not really care for peanut butter," helped herself to seconds. That's when I knew this recipe was a keeper that I'd be making for years to come.
Ingredients
- 1 (8 oz) package cream cheese, softened: The base of our filling, providing tangy richness and velvety texture
- 1¼ cups creamy peanut butter, divided: 1 cup goes into the filling, while the extra ¼ cup is melted for that beautiful drizzle on top
- ¾ cup powdered sugar: Just enough to sweeten without overwhelming the peanut butter flavor
- 1 (8 oz) container whipped topping, thawed: Lightens the filling to create that perfect mousse-like consistency
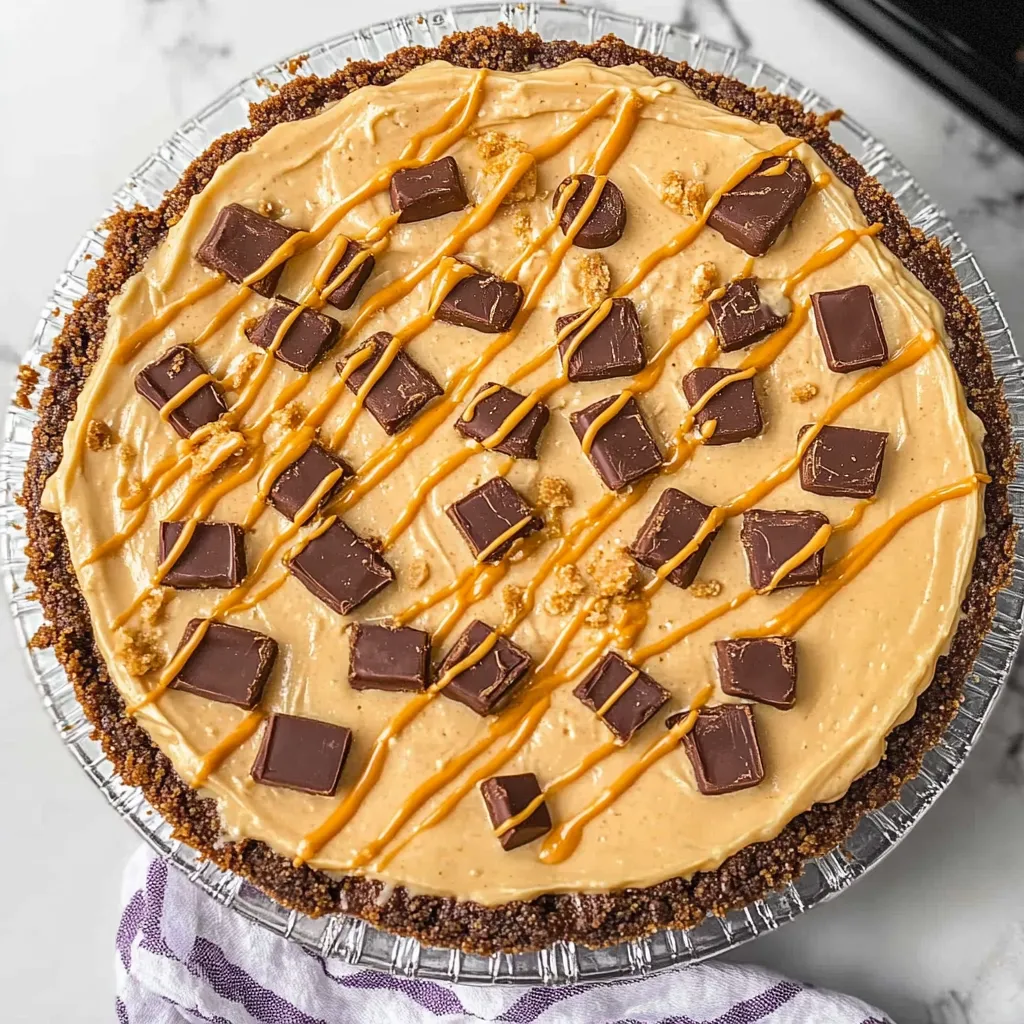
- 1 (9-inch) chocolate graham cracker crust: Using pre-made saves time, but homemade works beautifully too
- ½ cup mini peanut butter cups, chopped (optional): These add visual appeal and extra peanut butter-chocolate goodness
Step-by-Step Preparation Instructions
- Step 1: Soften the cream cheese:
- Remove cream cheese from the refrigerator at least 30 minutes before beginning. Properly softened cream cheese is essential for a smooth, lump-free filling. You should be able to press it gently with your finger and leave an indentation. If you're short on time, unwrap the cream cheese and microwave it in 10-second bursts, checking after each until softened but not melted.
- Step 2: Prepare the filling base:
- In a large mixing bowl, combine the softened cream cheese, 1 cup of peanut butter, and powdered sugar. Using an electric mixer on medium speed, beat the mixture until completely smooth and fluffy, about 2-3 minutes. Take your time with this step – scrape down the sides of the bowl with a rubber spatula halfway through to ensure everything is evenly incorporated.
- Step 3: Lighten the filling:
- Gently fold in the thawed whipped topping using a rubber spatula. Start by adding about ⅓ of the whipped topping and fold carefully to lighten the peanut butter mixture. Then add the remaining whipped topping, continuing to fold with a light hand using a down-up-and-over motion. This technique preserves the air in the whipped topping for a fluffy texture. Mix just until no white streaks remain – overmixing will deflate your filling.
- Step 4: Fill the crust:
- Spoon the peanut butter filling into the chocolate graham cracker crust. Use the back of the spoon or an offset spatula to smooth the top into an even layer. Tap the pie gently on the counter a few times to help eliminate any air pockets.
- Step 5: Chill thoroughly:
- Cover the pie with the plastic lid that came with the crust or loosely with plastic wrap. Refrigerate for at least 4 hours, though overnight is even better. The chilling time allows the filling to set properly and the flavors to meld together.
- Step 6: Add the finishing touches:
- Just before serving, melt the remaining ¼ cup of peanut butter in a microwave-safe bowl for about 30 seconds, stirring halfway through until smooth and pourable. Sprinkle the chopped peanut butter cups around the edge of the pie, then drizzle the melted peanut butter across the top in a zigzag pattern. For a more controlled drizzle, transfer the melted peanut butter to a squeeze bottle or a small zip-top bag with a tiny corner snipped off.
 Pin it
The Secret to Perfect Texture
The key to this pie's incredible texture lies in properly incorporating the whipped topping. I've learned through many trials that the folding technique makes all the difference between a dense, heavy pie and one that's light and mousse-like.
My first attempt at this recipe was a disaster – I used the electric mixer to blend in the whipped topping, which completely deflated it. The result was a flat, dense pie that tasted good but had none of that ethereal texture that makes this dessert special.
Now I always use a rubber spatula and a gentle hand to preserve those precious air bubbles. It takes a bit more time and patience, but the resulting cloud-like texture is absolutely worth it.
Last Christmas, I was scrambling to find a dessert that wouldn't compete for oven space with all the other holiday dishes. This pie saved the day! I made it the night before, and it was ready and waiting in the refrigerator while we enjoyed our holiday meal. Several relatives commented that it tasted just like the peanut butter pie from our favorite local restaurant – a compliment I treasure!
Creative Variations
While this pie is perfect as written, I love how versatile the base recipe is. Over the years, I've created several variations that have become family favorites:
For a more intense chocolate experience, try layering a thin spread of hot fudge sauce over the crust before adding the peanut butter filling. The contrast between the cool peanut butter filling and the fudgy layer is absolutely divine.
When I'm feeling fancy, I'll fold some chopped peanut butter cups directly into the filling for little surprises in every bite. Just add them after you've fully incorporated the whipped topping, folding gently to distribute without crushing them.
For a fun twist on a classic flavor combination, try adding a sliced banana in a single layer over the crust before pouring in the filling. The banana-peanut butter-chocolate combination is nostalgic and delicious.
I've been making this no-bake peanut butter pie for nearly a decade now, tweaking it slightly each time until reaching this perfect version. What started as a way to avoid heating up the kitchen in summer has become one of my signature desserts that friends and family request for birthdays, holidays, and special gatherings. The combination of simplicity and impressive results makes this a recipe I return to again and again, and I hope it becomes a favorite in your household too!
Frequently Asked Questions
- → Can I make this pie ahead of time?
- Yes! This pie is perfect for making ahead. You can prepare it up to 3 days before serving and keep it refrigerated.
- → Can I freeze peanut butter pie?
- Absolutely! This pie freezes beautifully and can be enjoyed frozen as a cool summer treat. Just be aware the texture might be slightly different when fully thawed.
- → What can I use instead of Cool Whip?
- You can substitute freshly whipped cream. Whip 1.5 cups heavy cream with 2-3 tablespoons powdered sugar until stiff peaks form.
- → Can I use crunchy peanut butter?
- While creamy peanut butter gives the smoothest texture, crunchy peanut butter works if you prefer some texture in your pie.
- → What other toppings work well?
- Chocolate sauce, chocolate shavings, crushed peanuts, or a sprinkle of sea salt all make delicious alternative toppings.