
 Pin it
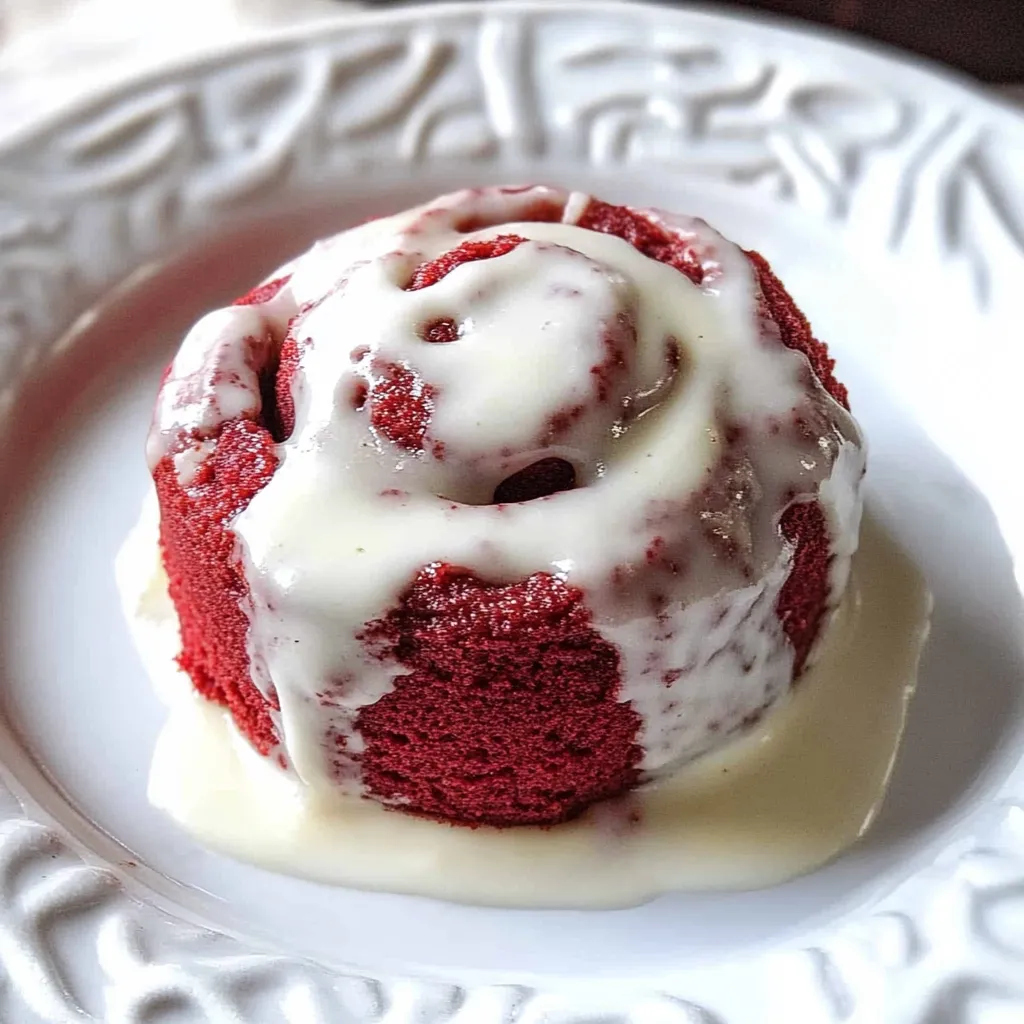
Red velvet cinnamon rolls bring together two beloved treats in one show-stopping breakfast indulgence. These pillowy soft rolls feature a vibrant crimson dough infused with subtle cocoa notes, wrapped around a buttery cinnamon-sugar filling, and crowned with tangy cream cheese frosting. Using red velvet cake mix as a shortcut ingredient, these stunning spirals are surprisingly simple to make while delivering maximum visual impact and flavor.
I first made these for a Valentine's Day brunch with friends, and the moment I placed the pan on the table, phones immediately came out to capture their beauty. My neighbor, who typically declines dessert, ate two in one sitting. There's something magical about the way the subtle cocoa in the red dough complements the warm cinnamon filling. When my mother-in-law requested the recipe after trying them, I knew this creation was something special – she doesn't hand out culinary compliments easily!
Essential Ingredients
- Red Velvet Cake Mix: The secret shortcut that delivers that distinctive red velvet flavor and gorgeous color without extra steps
- Instant Yeast: Helps the dough rise quickly and reliably – no proofing required when using instant yeast
- Brown Sugar: Creates a moist, caramel-like filling that melts into the spirals as they bake
- Cinnamon: The warming spice that makes these rolls irresistible, perfectly complementing the subtle cocoa notes
- Cream Cheese: Essential for that tangy frosting that is signature to both red velvet cake and cinnamon rolls
Step-by-Step Instructions
- Step 1: Prepare the dough.
- In the bowl of a stand mixer fitted with a dough hook, combine one 15.25 oz box of red velvet cake mix, 1 cup all-purpose flour, 2¼ teaspoons instant yeast, and 1¼ cups lukewarm water (about 110°F). Mix on low speed until combined, then gradually add up to 1 additional cup of flour, ¼ cup at a time, until the dough forms a soft, slightly sticky ball that pulls away from the sides of the bowl. This typically takes 5-7 minutes of mixing.
- Step 2: First rise.
- Transfer the dough to a large greased bowl, turning once to coat the surface. Cover with a clean kitchen towel and place in a warm, draft-free spot to rise until doubled in size, approximately 1½-2 hours. A good trick is to place the bowl in an oven that's been briefly heated to its lowest setting then turned off.
- Step 3: Roll out the dough.
- Once risen, gently punch down the dough and turn it out onto a lightly floured surface. Using a rolling pin, shape it into a rectangle approximately 16×12 inches in size. Take your time with this step – an even rectangle ensures uniform rolls.
- Step 4: Add the filling.
- In a small bowl, mix together 1 cup packed light brown sugar and 2½ tablespoons ground cinnamon until well combined. Brush the dough rectangle with ⅓ cup melted unsalted butter, making sure to spread it to the edges. Sprinkle the cinnamon-sugar mixture evenly over the buttered surface, leaving a ½-inch border along one long edge.
- Step 5: Form the rolls.
- Starting with the long edge that has filling all the way to the edge, carefully roll the dough into a tight log. Pinch the seam to seal. Using a sharp knife or unflavored dental floss, cut the log into 12 equal pieces. The dental floss technique (sliding it under the log, crossing it on top, and pulling) prevents squishing the rolls.
- Step 6: Second rise.
- Arrange the rolls in a greased 9×13-inch baking pan, spacing them evenly. Cover with a kitchen towel and let rise in a warm place for 30 minutes, or until slightly puffy. Meanwhile, preheat your oven to 350°F.
- Step 7: Bake to perfection.
- Place the rolls in the preheated oven and bake for 20-25 minutes, until the tops are just beginning to turn golden and the centers are set. Be careful not to overbake, as red velvet can make it harder to see when they're done.
- Step 8: Prepare the cream cheese frosting.
- While the rolls are baking, beat together 4 oz softened cream cheese and ¼ cup softened unsalted butter until smooth and fluffy. Add 1½ cups powdered sugar, 1 teaspoon vanilla extract, and a pinch of salt. Beat until smooth and creamy, about 2 minutes.
- Step 9: Finish and serve.
- Allow the rolls to cool for 10-15 minutes before spreading with the cream cheese frosting. This cooling period is important – if the rolls are too hot, the frosting will simply melt off. Serve warm for the ultimate comfort food experience.
 Pin it
I'm particularly attentive to the temperature of the water when making these rolls. My first attempt was disappointing because my water was too hot and killed the yeast. Now I always use a kitchen thermometer to ensure the water is exactly 110°F – warm enough to activate the yeast but not so hot it destroys it. When demonstrating this recipe at my sister's bridal shower, I emphasized the importance of letting the rolls rise in a warm spot. We placed the covered dough near a sunny window, and everyone was amazed at how beautifully it puffed up.
Make-Ahead Options
One of the greatest features of these red velvet cinnamon rolls is their make-ahead potential. After placing the cut rolls in the baking pan, you can cover them tightly with plastic wrap and refrigerate overnight. In the morning, simply allow them to come to room temperature for about 30 minutes before baking. Alternatively, you can freeze the unbaked rolls for up to 6 weeks – just place the plastic-wrapped pan in the freezer. When ready to bake, thaw overnight in the refrigerator, then allow to come to room temperature before baking as directed.
Homemade Cake Mix Option
While the boxed mix makes this recipe incredibly simple, I sometimes make my own red velvet cake mix from scratch when I have the time. Simply combine 1½ cups all-purpose flour, 1½ cups granulated sugar, 2 teaspoons cocoa powder, ½ teaspoon salt, ½ teaspoon baking powder, and 1½ teaspoons baking soda. When mixing the dough, add 2 teaspoons of red gel food coloring to the water. This homemade version gives you control over the ingredients and allows you to adjust the intensity of the red color to your preference.
Serving Suggestions
These rolls are spectacular on their own, but for a truly indulgent brunch spread, I like to serve them alongside fresh berries and a sparkling mimosa or coffee. For holiday mornings, pair them with savory breakfast casseroles to balance the sweetness. If serving at a brunch gathering, consider leaving some of the rolls unfrosted and offering the cream cheese icing on the side, allowing guests to add as much or as little as they prefer.
Chef's Helpful Tips
Dental floss trick: Use unflavored dental floss to cut the rolls cleanly without squishing them – slide it under the log, cross over the top, and pull Rising environment: Create a perfect rising environment by preheating your oven to its lowest setting, turning it off, then placing the covered dough inside Frosting consistency: If you prefer a pourable glaze rather than a spreadable frosting, add 1-2 tablespoons of milk to thin the cream cheese mixture
I discovered this recipe when planning a Valentine's Day breakfast that would impress my family without requiring me to wake up at dawn. What began as an experiment combining two beloved treats has become a requested tradition for special mornings. There's something deeply satisfying about the moment when you lift the kitchen towel after the second rise and see those perfectly formed, vibrant red spirals nestled together in the pan. The way the house fills with the aroma of cinnamon as they bake signals to everyone that something extraordinary is about to be enjoyed.
Frequently Asked Questions
- → Can I make these cinnamon rolls ahead of time?
- Yes! You can prepare them the night before. After cutting the rolls, place them in the baking dish, cover with plastic wrap and refrigerate overnight. Let them sit at room temperature for 30 minutes before baking.
- → Can I freeze these cinnamon rolls?
- Absolutely. Freeze them unfrosted in an airtight container for up to 2 months. Thaw overnight in the refrigerator, warm in the oven, then add fresh frosting.
- → What if I don't have a stand mixer?
- You can mix by hand with a wooden spoon until combined, then knead on a floured surface for 8-10 minutes until smooth and elastic.
- → Why use red velvet cake mix?
- The cake mix adds the signature red color and subtle chocolate flavor while making the dough easier to prepare than traditional cinnamon rolls.
- → How do I know when the rolls are done baking?
- The rolls should be golden brown around the edges and feel set in the center when lightly pressed. If you're unsure, the internal temperature should be around 190°F.
- → Can I add chocolate chips to the filling?
- Yes! Adding ½ cup of mini chocolate chips to the cinnamon-sugar filling complements the red velvet flavor wonderfully.