
 Pin it
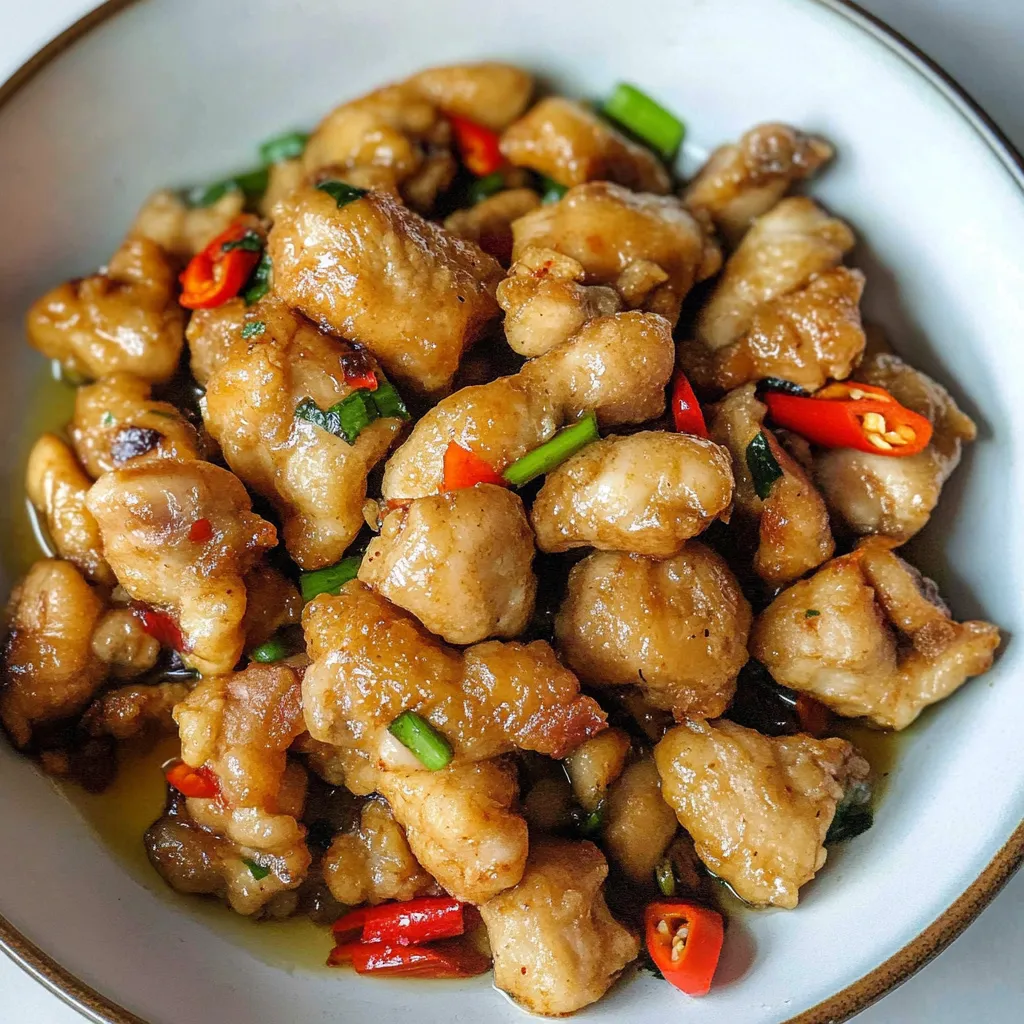
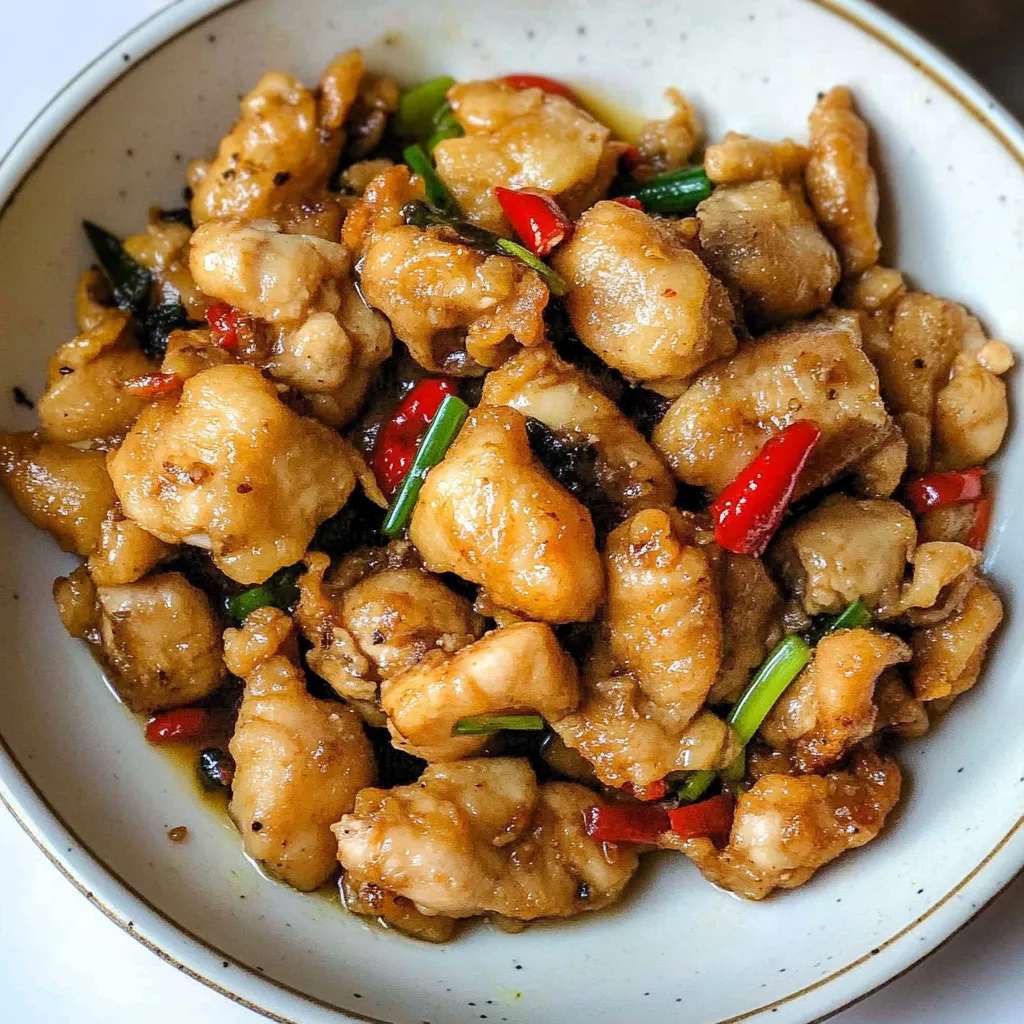
Salt and pepper chicken is one of those Chinese restaurant dishes that seems deceptively simple - just crispy fried chicken tossed with aromatics and seasonings - but getting it right at home requires understanding a few key techniques that restaurants use. The magic happens when you coat diced chicken in cornstarch and shallow-fry it until the exterior becomes incredibly crispy and golden while the inside stays tender and juicy, then toss those crispy pieces with quickly sautéed garlic, ginger, chilies, and green onions that create aromatic, peppery flavor in every bite. What makes this particularly appealing for home cooking is that it comes together in about twenty minutes with no marinating required and no deep-frying equipment - just a regular skillet with enough oil for shallow frying. The combination of crispy texture, pungent aromatics, and that distinctive salt-and-pepper seasoning creates restaurant-quality results that taste like takeout but cost a fraction of the price and contain ingredients you can actually pronounce.
I started making salt and pepper chicken about six years ago after ordering it constantly from my local Chinese restaurant and realizing I was spending a fortune on something I could probably make myself. The first few attempts were disappointing - either the chicken wasn't crispy enough, the aromatics burned, or the seasoning was off. After watching several restaurant kitchen videos and understanding the importance of cornstarch coating and proper oil temperature, I finally got it right. Now I make this at least twice a month and never order it from restaurants anymore because homemade tastes fresher and I can control the spice level exactly how I want it.
Ingredients and What Makes Them Essential
- Boneless Skinless Chicken Thighs (1½ pounds, about 4-5 thighs): Chicken thighs stay moister and more flavorful than breasts during high-heat cooking. The slightly higher fat content prevents them from drying out. Boneless and skinless simplifies prep and eating. You can substitute chicken breast if you prefer, but reduce cooking time by 1 to 2 minutes to prevent dryness.
- Cornstarch (½ cup): Cornstarch creates that signature crispy coating when fried. Unlike flour which can get gummy, cornstarch stays incredibly crisp. It coats more evenly than flour and creates a delicate, shattering crust. Don't substitute with all-purpose flour which won't give you the same texture. Potato starch or arrowroot starch work as substitutes.
- Garlic (6 cloves, minced): Fresh garlic provides pungent, aromatic flavor that's essential to this dish. Mince it finely so it cooks quickly without burning. Don't substitute jarred minced garlic or garlic powder which taste completely different from fresh.
- Fresh Ginger (1-inch piece, minced): Ginger adds sharp, spicy, aromatic heat. Peel the ginger with a spoon, then mince it very finely. Fresh ginger is crucial - ground ginger powder tastes completely different and won't work here.
- Red Chili (1 large, sliced): Fresh red chili adds heat and color. Any large red or green chili works, or use bird's eye chilies for more intense spice. If you don't have fresh, substitute ½ to 1 teaspoon of red pepper flakes as a last resort. Remove the seeds for milder heat.
- Green Onions (3, chopped, white and green parts separated): Green onions add mild onion flavor and beautiful green color. The white parts go in with the aromatics, the green parts as garnish. You can substitute finely chopped shallot or regular onion.
- Shaoxing Wine (3 tablespoons, divided): This Chinese rice wine adds complex, slightly sweet flavor. It's used both in seasoning the chicken and deglazing the pan. Substitute dry sherry, cooking sake, or dry white wine. For non-alcoholic, use chicken broth.
- White Granulated Sugar (1 teaspoon): Just a small amount of sugar balances the salt and pepper and helps the aromatics caramelize slightly. Don't skip it even though it seems odd.
- Salt (1 teaspoon, divided): Salt seasons the chicken and enhances all the other flavors. Start conservatively since you can adjust at the end. Use fine sea salt or kosher salt.
- Black Pepper or White Pepper (1 teaspoon, divided, freshly ground): This is the signature flavor. Black pepper is more common and has stronger flavor, while white pepper is traditional in Chinese cooking and has a sharper, more pungent quality. Freshly ground tastes exponentially better than pre-ground.
- Neutral Cooking Oil (½ cup for shallow frying): Use oil with a high smoke point like vegetable, canola, grapeseed, avocado, or peanut oil. Don't use olive oil which has a low smoke point and will smoke and burn at the temperatures needed for frying.
Step-by-Step Instructions
- Prepare the Chicken:
- Place your chicken thighs on a cutting board and use a sharp knife to cut them into bite-sized pieces about 1½ inches wide. Try to keep the pieces relatively uniform in size so they cook evenly - if some pieces are much larger than others, the small pieces will overcook while the large ones are still raw in the center. Transfer all the diced chicken to a large bowl. Add 2 tablespoons of Shaoxing wine, ½ teaspoon of salt, and ½ teaspoon of black or white pepper to the chicken. Use your hands or a spoon to mix everything together thoroughly, coating all the chicken pieces with the seasonings. At this point you can marinate the chicken for 10 to 15 minutes if you have time, which allows the flavors to penetrate deeper, but it's not required - the dish works perfectly well without marinating.
- Coat with Cornstarch:
- Add ½ cup of cornstarch directly to the bowl with the seasoned chicken. Use your hands to toss and massage the chicken, making sure every single piece gets evenly coated with a thin layer of starch. You want complete coverage with no bare spots or the coating won't be uniformly crispy. The cornstarch should form a dry, powdery coating on each piece. If any pieces look wet or sticky, add a bit more cornstarch. Shake off any excess cornstarch so you don't have thick, gummy coating.
- Prepare the Aromatics:
- While you're coating the chicken, get all your aromatics ready because once you start cooking, everything happens fast. Mince 6 cloves of garlic very finely - you want tiny pieces, not chunks. Peel and mince a 1-inch piece of ginger just as finely as the garlic. Slice 1 large red chili into thin rounds, removing seeds if you want less heat. Chop 3 green onions, keeping the white parts separate from the green parts - you'll cook the whites with the other aromatics and use the greens as garnish. Have 1 teaspoon of sugar measured and 1 tablespoon of Shaoxing wine ready to go. Line a plate with paper towels or set out a wire cooling rack for draining the fried chicken.
- Shallow Fry the Chicken:
- Place a large skillet or wok - at least 12 inches wide - over medium heat and add ½ cup of neutral cooking oil. Let the oil heat for about 2 to 3 minutes until it's hot and shimmering. To test if it's ready, drop in a small piece of chicken - it should immediately sizzle vigorously. Carefully add all the cornstarch-coated chicken pieces to the hot oil, spreading them out in a single layer as much as possible. Don't overcrowd - if your pan isn't large enough, fry in two batches. Let the chicken cook undisturbed for about 3 to 4 minutes until the bottom side is golden brown and crispy. Use tongs or a spatula to flip each piece over. Continue cooking for another 3 to 4 minutes until the second side is also golden and crispy, and the chicken is cooked through completely. The total cooking time should be 7 to 8 minutes. The internal temperature should reach 165°F if you have a thermometer. Once done, transfer all the fried chicken to your paper towel-lined plate or wire rack to drain excess oil. The chicken should look gorgeously golden and crispy.
- Cook the Aromatics:
- Carefully pour out most of the oil from the pan, leaving just about 2 teaspoons - enough to coat the bottom in a thin layer. Return the pan to the stove and reduce the heat to low. This is important because high heat will burn the garlic and ginger instantly. Add the minced garlic, minced ginger, sliced red chili, the white parts of the green onions, and 1 teaspoon of sugar to the pan. Sauté, stirring constantly, for about 30 seconds until everything is fragrant and the garlic just starts to turn golden. Watch carefully because garlic burns in seconds and burnt garlic tastes bitter and ruins the dish. As soon as you smell that amazing garlicky-ginger aroma, you're done.
- Combine and Finish:
- Immediately add all the fried chicken back to the pan with the aromatics. Pour in 1 tablespoon of Shaoxing wine around the edges of the pan - this deglazes any stuck bits and adds flavor. Toss everything together vigorously for about 30 seconds, making sure the chicken gets coated with the aromatics and the aromatics distribute evenly. The wine will create a bit of steam and sizzle. Remove the pan from the heat. Taste a piece of chicken and add more salt and pepper if needed. Transfer everything to a serving platter, sprinkle with the reserved green parts of the green onions as garnish, and serve immediately while hot and crispy.
 Pin it
My college roommate was from Hong Kong and would make fun of me for ordering salt and pepper chicken from restaurants, claiming it was something anyone could make at home in less time than delivery takes. I didn't believe her until she demonstrated one night, going from raw chicken to finished dish in literally twenty minutes. After watching her technique - particularly how she made sure the oil was properly hot and didn't burn the garlic - I understood why my early attempts had failed. Now I'm the one making fun of people who order it when it's this easy to make yourself.
Understanding Why Cornstarch Creates Superior Crispiness
Cornstarch produces a different type of crispy coating than flour, and understanding why helps you appreciate what makes this dish work. Flour contains gluten proteins that can form long chains when mixed with liquid, creating chewiness that's great for bread but wrong for crispy coatings. Cornstarch is pure starch with no gluten, so it forms a delicate, shattering crust rather than chewy coating. When cornstarch is heated in oil, the starch granules absorb a small amount of moisture from the chicken, swell, and then quickly crisp up, forming a thin, incredibly crunchy shell. The coating stays lighter and more delicate than flour-based batters. Cornstarch also browns more evenly and at lower temperatures than flour, creating that beautiful golden color without risk of burning. This is why so many Asian frying techniques use cornstarch rather than flour. The key is coating the chicken in a thin, even layer - too thick and it becomes gummy, too thin and you lose the crispy effect.
The Chemistry of Shaoxing Wine in Chinese Cooking
Shaoxing wine serves multiple purposes in this dish beyond just adding alcoholic content. This fermented rice wine from Shaoxing, China contains complex flavor compounds from fermentation - amino acids, sugars, and aromatic compounds that add depth impossible to achieve with salt alone. The alcohol acts as a solvent, extracting and distributing flavors from the aromatics more effectively than water-based liquids could. When you deglaze the pan with Shaoxing wine, the alcohol helps lift stuck-on browned bits while the wine's acidity brightens all the flavors. The slight sweetness balances the salt and pepper. As the wine hits the hot pan, much of the alcohol evaporates quickly, leaving behind concentrated flavor without making the dish taste boozy. In the initial chicken seasoning, the wine helps tenderize the meat slightly through its acidic properties. Substitutes like dry sherry or cooking sake work because they have similar fermented complexity, while plain chicken broth lacks that depth even though it's a serviceable non-alcoholic alternative.
Why Chicken Thighs Work Better Than Breasts
The choice between chicken thighs and breasts significantly impacts the final result. Chicken thighs contain more intramuscular fat and connective tissue than breasts, which means they stay moister and more flavorful during high-heat cooking. The fat bastes the meat from the inside, preventing it from drying out. Thigh meat also has richer, more pronounced chicken flavor than mild breast meat. The slightly darker color of thigh meat creates more appealing appearance when fried golden brown. Thighs are more forgiving of slight overcooking - if you go an extra minute, they'll still be juicy, while breasts become dry and stringy. The texture is also more tender. If you do use chicken breast, you must be more careful about cooking time and temperature, and you should consider pounding it slightly thinner for more even cooking. Cut breast pieces slightly smaller than thigh pieces since they cook faster. Many restaurant versions of salt and pepper chicken use thighs specifically for these reasons, understanding that the end result is superior.
The Art of Stir-Frying Aromatics Without Burning
Stir-frying aromatics like garlic, ginger, and chilies requires careful heat management because they go from perfectly fragrant to burnt in seconds. The high surface area created by mincing means these ingredients have maximum exposure to heat, which speeds up both cooking and burning. The key is using lower heat than you'd think necessary - medium-low or low rather than the high heat used for other stir-frying. Adding a small amount of sugar helps because it caramelizes and creates flavor while buffering the aromatics slightly from direct heat. Constant stirring is essential to prevent any pieces from sitting in one hot spot long enough to burn. The aromatics are done as soon as they become fragrant - if you see them browning, you're already close to burning them. Many home cooks fail at Chinese stir-fries because they're afraid to use high heat for the protein but then forget to reduce heat for the aromatics. Professional wok cooking involves constantly adjusting heat levels throughout the cooking process.
Air Fryer Method and How It Differs
Air frying creates similar crispy results with significantly less oil, which appeals to people trying to reduce fat intake. An air fryer works by circulating super-hot air around food at high speed, essentially convection baking at very high temperatures. This creates browning and crisping similar to frying but without submerging in oil. For this chicken, spray the air fryer basket with oil, arrange seasoned chicken in a single layer without touching, spray the tops with oil, and air fry at 400°F for 9 to 12 minutes until golden and cooked through. The results are crispy and delicious but slightly different from shallow-fried - the texture is more like oven-fried than truly fried. Air-fried chicken may be slightly less golden and the coating might not be quite as shattering-crisp. It also requires working in batches if you have a small air fryer. However, it's significantly healthier and doesn't heat up your kitchen or create frying smells. For the best of both worlds, shallow-fry when you want maximum crispiness and authentic texture, air-fry when you want convenience and less oil.
Storage, Reheating, and Meal Prep Considerations
This dish is definitely best fresh when the coating is at peak crispiness, but it stores reasonably well if you know how to reheat properly. Let the chicken cool completely to room temperature, then transfer to an airtight container and refrigerate for up to 4 days. The coating will soften during storage, which is inevitable with fried foods. To reheat and restore some crispiness, spread the chicken on a baking sheet and bake at 400°F for about 10 minutes until heated through and the coating crisps up again. Or reheat in a skillet over medium heat, stirring occasionally. Microwave reheating works for convenience but won't restore any crispiness - the chicken will be soft but still tasty. For freezing, let the chicken cool completely, arrange pieces in a single layer on a baking sheet and freeze until solid, then transfer to a freezer bag for up to 3 months. Reheat from frozen in a 375°F oven for 15 to 20 minutes. For meal prep, consider frying the chicken and storing it separately from the aromatics, then quickly stir-fry everything together when ready to eat for maximum freshness.
Variations and Customization Ideas
While the classic version is delicious, this salt and pepper template works with numerous proteins and vegetables. Salt and pepper shrimp is perhaps even more popular - use the same technique with large shrimp, reducing cooking time to about 4 to 5 minutes total. Salt and pepper pork uses diced pork shoulder with the same method. Salt and pepper tofu works for vegetarians - press firm tofu, cube it, coat in cornstarch, and fry. You can add vegetables with low water content like bell peppers or snap peas when cooking the aromatics. For spicier versions, increase the chilies or add Sichuan peppercorns which create that distinctive numbing sensation. For more savory depth, add a splash of soy sauce with the Shaoxing wine. For garlic lovers, double the garlic. Some versions include sliced onions or jalapeños. The basic formula of frying cornstarch-coated protein until crispy, then tossing with quickly sautéed aromatics, works with countless variations.
Serving Suggestions and Complete Meal Ideas
Salt and pepper chicken works as a main dish in a complete Chinese meal or as a standalone protein with simple sides. For a full Chinese dinner, serve it with steamed white or brown rice to soak up any juices, a vegetable stir-fry like garlic bok choy or Chinese broccoli, and perhaps a soup like egg drop or hot and sour. For mixed protein meals, pair with other dishes like Mongolian beef, honey walnut shrimp, or mapo tofu. Noodles work beautifully - serve over chow mein, lo mein, or plain noodles. For lower-carb options, serve with cauliflower rice or alongside simply steamed vegetables. It's also excellent in lettuce wraps with fresh herbs and rice. For parties, serve as an appetizer with toothpicks for easy eating. The crispy chicken works in rice bowls topped with pickled vegetables and a fried egg. However you serve it, make sure to provide plenty of napkins because eating crispy fried chicken with your hands is part of the experience.
 Pin it
After making salt and pepper chicken countless times over the past several years, it's become one of my most reliable weeknight dinners because the active cooking time is so short and the results are so satisfying. I appreciate that it uses basic ingredients I usually have on hand and doesn't require any special shopping. The technique has become second nature - checking oil temperature, coating chicken evenly, managing heat for the aromatics - so I can make it while simultaneously helping kids with homework or having a conversation. Knowing I can create restaurant-quality Chinese food at home in twenty minutes means I rarely order takeout anymore, which saves money and lets me control exactly what goes into my food. This represents exactly what good home cooking should be - achievable, delicious, practical, and genuinely better than what most restaurants serve once you understand the techniques.
Frequently Asked Questions
- → Can I use chicken breast instead of thighs?
- Yes, chicken breast works great. Just cut it into similar-sized pieces so everything cooks evenly. Thighs are a bit juicier, but breast meat will still turn out delicious and crispy.
- → What can I use instead of Shaoxing wine?
- Dry sherry is the closest substitute. You can also use dry white wine, cooking sake, or even chicken broth if you don't have any alcohol on hand.
- → Can I make this in an air fryer?
- Absolutely! Spray the basket with oil, arrange the chicken in one layer, spray the top, and cook at 400°F for 9-12 minutes. No need to flip it halfway through.
- → How do I keep the chicken crispy?
- Serve it right away for maximum crispiness. The coating will soften as it sits. Make sure your oil is hot enough before adding the chicken, and don't overcrowd the pan.
- → Is this recipe spicy?
- It has a mild kick from the chili and black pepper, but it's not overwhelming. You can adjust the heat by using more or less chili, or remove the seeds for a milder version.
- → What should I serve with this chicken?
- Steamed rice is perfect for soaking up the flavors. You can also serve it with fried rice, noodles, or some stir-fried vegetables on the side.