
 Pin it
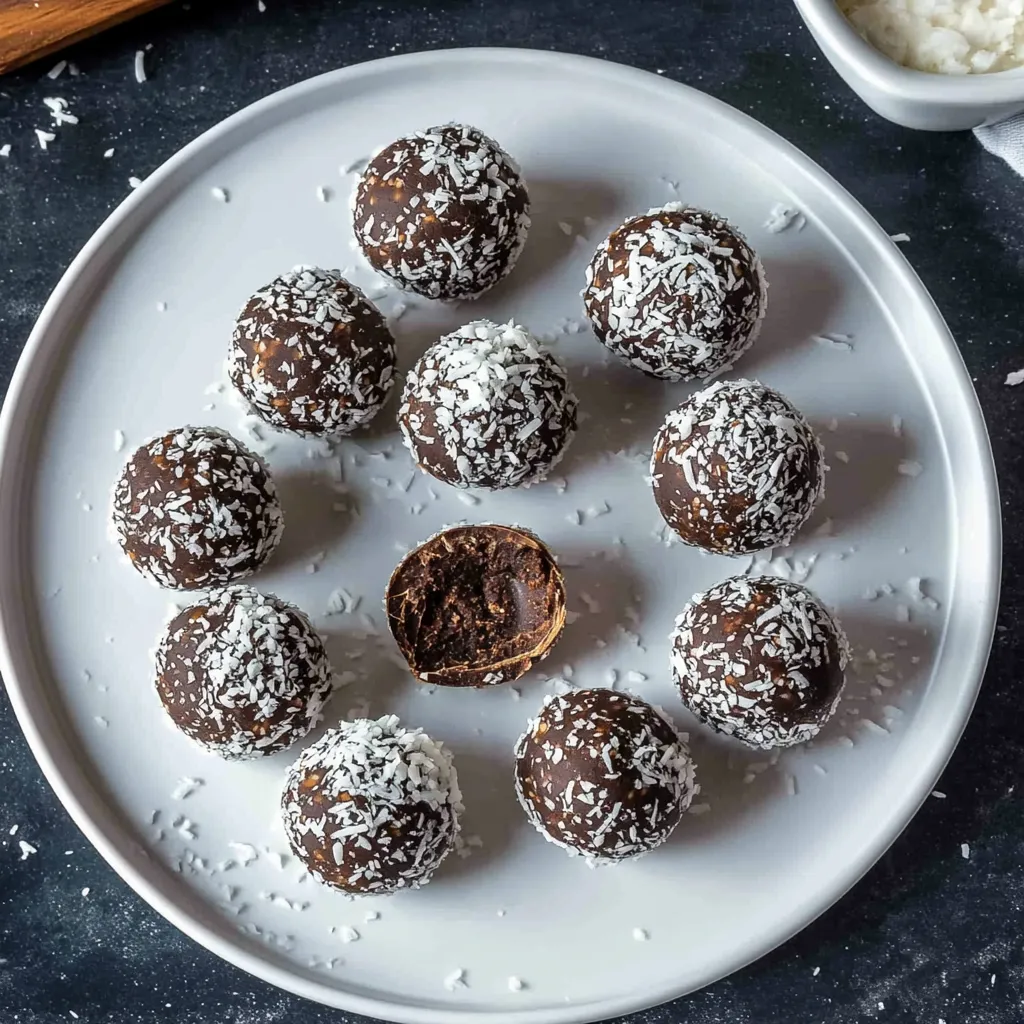
These irresistibly rich coconut and chocolate bliss balls deliver the perfect combination of natural sweetness, satisfying texture, and wholesome nutrition in bite-sized portions that make healthy snacking feel like an indulgent treat. The genius of this no-bake recipe lies in how it transforms simple whole food ingredients like dates, cocoa, and coconut into cohesive, fudgy balls that satisfy chocolate cravings while providing sustained energy from natural sugars, healthy fats, and fiber. Unlike processed energy bars or sugary snacks that provide quick energy spikes followed by crashes, these bliss balls offer steady, long-lasting fuel that keeps both kids and adults satisfied between meals.
I developed this recipe when I needed portable, nutritious snacks that would satisfy my family's sweet tooth without the guilt or energy crashes that come with conventional treats. The first batch disappeared so quickly that I immediately doubled the recipe, and now these have become our go-to solution for everything from school lunchboxes to post-workout fuel because they taste indulgent while being genuinely nourishing.
Essential Ingredients and Selection Tips
- Fresh dates: Choose plump, soft Medjool dates for the best natural sweetness and binding properties; if using standard dates, soak them for 15 minutes to soften before processing
- Quality cocoa powder: Use unsweetened, Dutch-processed cocoa for rich chocolate flavor without bitterness; raw cacao powder provides more antioxidants if preferred
- Desiccated coconut: Fine, unsweetened coconut flakes blend smoothly and provide tropical flavor plus healthy medium-chain fatty acids
- Raw honey: Choose unprocessed honey for better flavor and nutrients; this also makes the balls school-safe for nut-free environments
- Virgin coconut oil: Use unrefined coconut oil for better flavor and nutrition; melt gently to maintain beneficial properties
- Whole grain cereal: Weetbix or similar whole grain cereals add fiber and help bind the mixture while providing satisfying texture
- Raw seeds: Sunflower seeds, hemp seeds, or chia seeds add protein, healthy fats, and subtle crunch that makes each bite more interesting
The secret to perfect texture is processing until the mixture just holds together when pressed - over-processing creates paste while under-processing results in crumbly balls that fall apart.
Detailed Step-by-Step Instructions
- Step 1: Prepare your ingredients:
- If using standard dates, soak them in warm water for 15 minutes to soften, then drain thoroughly. Ensure your coconut oil is melted but not hot, and have all other ingredients measured and ready.
- Step 2: Set up your food processor:
- Use a food processor or high-powered blender for best results. Mini blenders work for smaller batches but may require stopping to scrape down sides more frequently.
- Step 3: Add dry ingredients first:
- Start with the dates, cocoa powder, desiccated coconut, and Weetbix in the food processor bowl. This layering helps ensure even processing and prevents ingredients from sticking to the bottom.
- Step 4: Process the base mixture:
- Pulse several times to break down the larger pieces, then process continuously for 30-60 seconds until the mixture begins to clump together and form a cohesive mass.
- Step 5: Add binding ingredients:
- With the processor running, add the melted coconut oil, honey, and seeds through the feed tube. The mixture should start forming a ball around the processor blade.
- Step 6: Check consistency:
- Stop processing and test the mixture by pressing a small amount between your fingers. It should hold together easily without being sticky or dry. Add water one teaspoon at a time if too dry, or more coconut if too wet.
- Step 7: Form into balls:
- Using clean hands or a small cookie scoop, portion the mixture into walnut-sized balls, rolling between your palms to create smooth, round shapes. Work quickly as the mixture firms up as it cools.
- Step 8: Apply optional coatings:
- Roll finished balls in extra desiccated coconut, cocoa powder, or chopped seeds for added texture and visual appeal. This step also prevents sticking during storage.
- Step 9: Set properly:
- Place the formed balls on parchment paper-lined trays and refrigerate for at least 30 minutes until firm. This setting time is crucial for proper texture and easy handling.
- Step 10: Store correctly:
- Transfer set balls to airtight containers and refrigerate for up to two weeks or freeze for up to three months. Layer between parchment paper to prevent sticking.
 Pin it
The most important technique is achieving the right moisture balance - the mixture should hold together when squeezed but not be so wet that it sticks to your hands during rolling.
These bliss balls have become my evidence that healthy snacking doesn't require sacrificing flavor or satisfaction. My kids often choose these over candy or cookies because they say they taste better and don't make them feel "weird" afterward like sugary treats sometimes do.
Understanding Natural Sweetening and Date Selection
The type and quality of dates dramatically affects both flavor and texture in bliss balls. Medjool dates provide superior natural sweetness and binding properties due to their higher moisture content and softer texture, while standard dates require soaking to achieve similar results. Fresh, pliable dates create smoother, more cohesive mixtures, while dried-out dates result in grainy textures that don't bind properly. Understanding these differences allows you to adjust processing time and liquid additions accordingly.
Texture Science and Binding Mechanisms
Perfect bliss ball texture relies on understanding how different ingredients contribute to binding and mouthfeel. The natural sugars in dates act as a binding agent when processed, while coconut oil provides fat that helps everything stick together and creates richness. The fiber in whole grain cereals adds structure and prevents the balls from being too dense, while seeds provide textural contrast that makes each bite more interesting and satisfying.
Flavor Balance and Enhancement Techniques
The success of these bliss balls depends on balancing sweet, rich, and subtle flavors without any single element overwhelming the others. Cocoa provides deep chocolate notes without bitterness, coconut adds tropical sweetness and richness, while honey contributes floral complexity that enhances rather than masks other flavors. Understanding this balance allows you to customize flavor intensity and create variations that suit different taste preferences.
Storage Science and Shelf Life Optimization
Proper storage is crucial for maintaining both texture and food safety in these moisture-rich treats. Refrigeration slows natural enzymatic processes that could cause flavor changes while keeping fats from becoming rancid. The low water activity in properly made bliss balls helps prevent bacterial growth, but moisture control through proper containers and layering with parchment prevents texture degradation and sticking.
Nutritional Optimization and Ingredient Substitutions
This recipe provides an excellent foundation for customizing nutrition profiles based on specific dietary needs or preferences. Adding protein powder increases amino acid content for post-workout recovery, while different nuts and seeds can boost specific vitamins and minerals. Understanding how substitutions affect both nutrition and texture allows you to create variations that meet various dietary requirements while maintaining the appealing taste and texture that makes these treats so satisfying.
These coconut and chocolate bliss balls have taught me that the most successful healthy treats are those that don't feel like compromises but rather like discoveries of how good wholesome ingredients can taste when combined thoughtfully. Every time I make them, I'm reminded that understanding how natural ingredients work together - dates for binding and sweetness, coconut for richness, seeds for protein and texture - allows you to create snacks that satisfy cravings while genuinely nourishing your body and providing sustained energy for whatever your day brings.
Frequently Asked Questions
- → How long do these bliss balls last?
- They keep fresh in the fridge for up to one week when stored in an airtight container.
- → Can I use something instead of dates?
- Yes, you can substitute raisins for dates, or use a mix of half dates and half raisins for different flavor.
- → Do I need to cook these balls?
- No cooking required! Just mix, roll, and chill in the fridge until they firm up.
- → What if my mixture is too dry?
- Add water one tablespoon at a time and blend again until the mixture holds together when pressed.
- → Can I make these without coconut oil?
- Yes, the coconut oil is optional. The recipe works fine without it, though it adds extra richness.
- → Are these suitable for kids?
- Perfect for kids! They're naturally sweet from dates and honey, with no artificial ingredients or added sugar.