
 Pin it
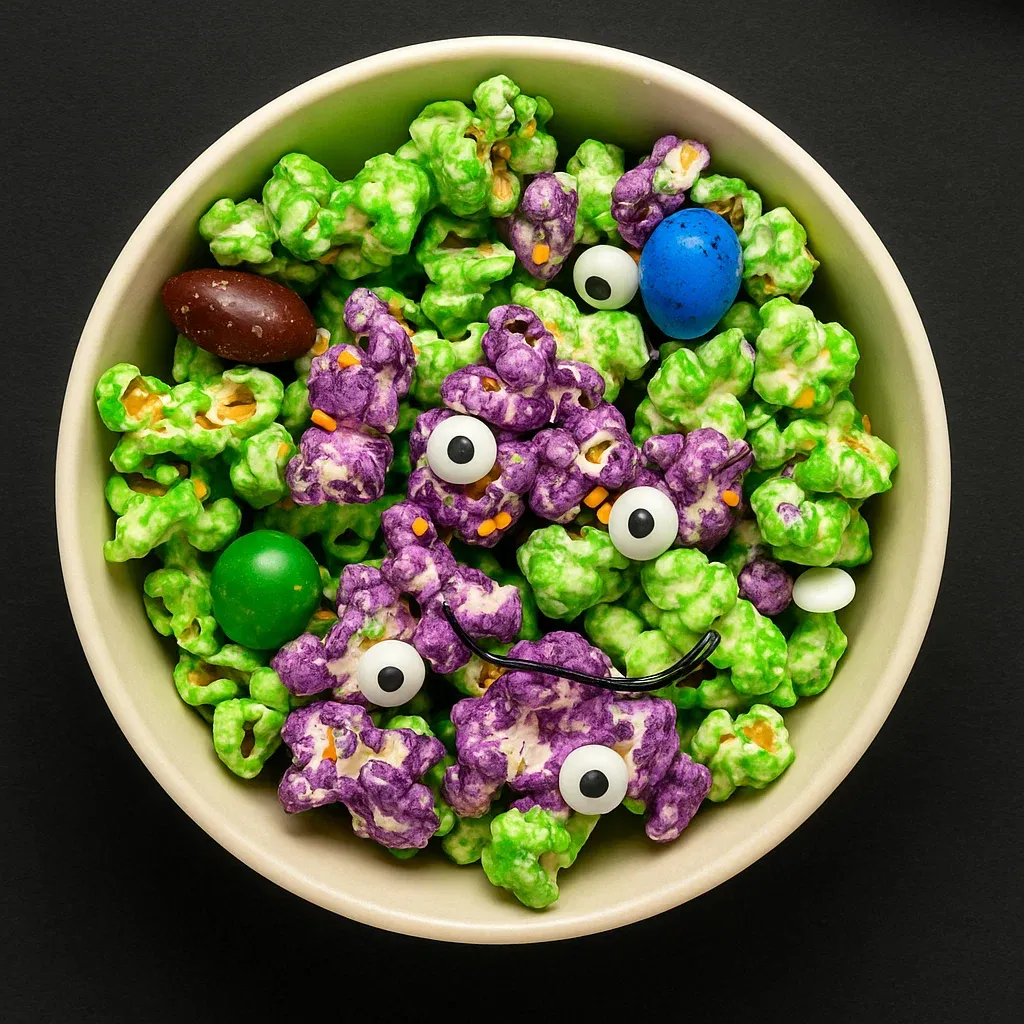
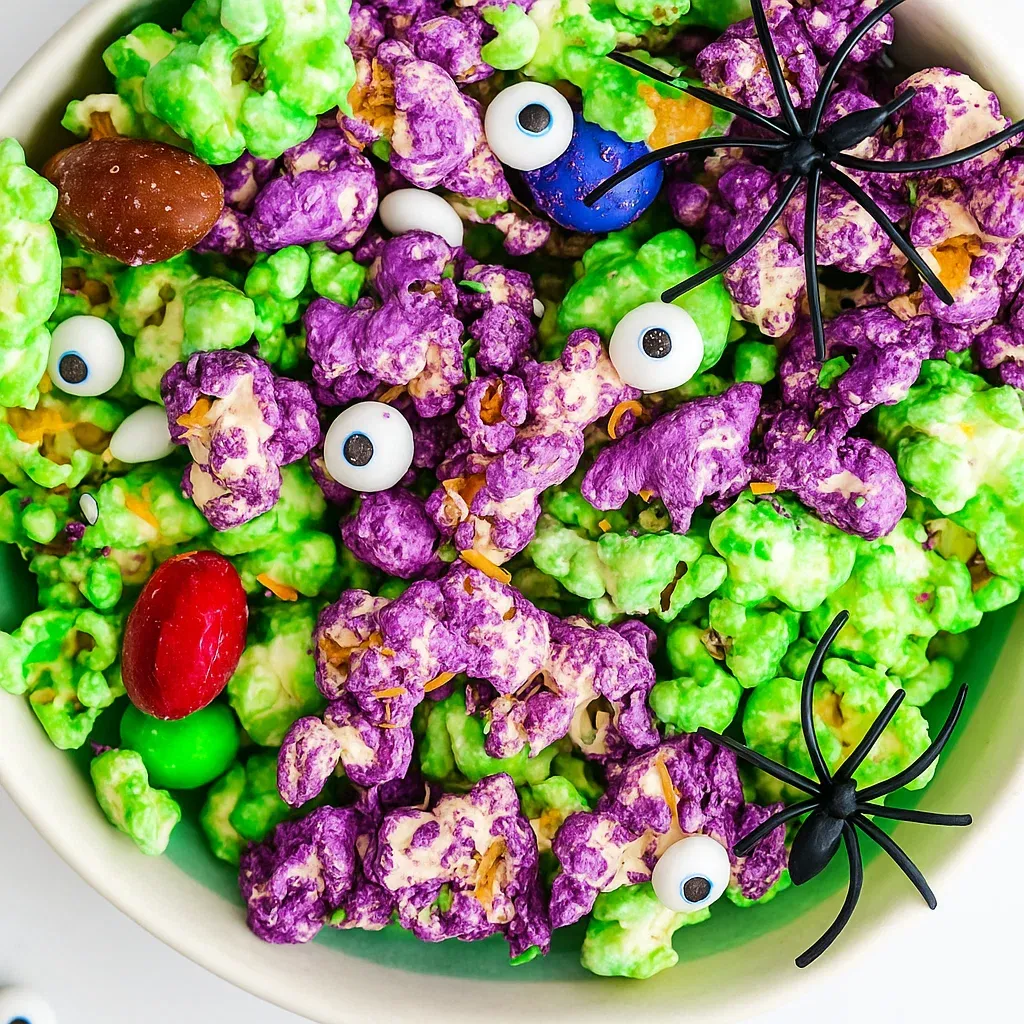
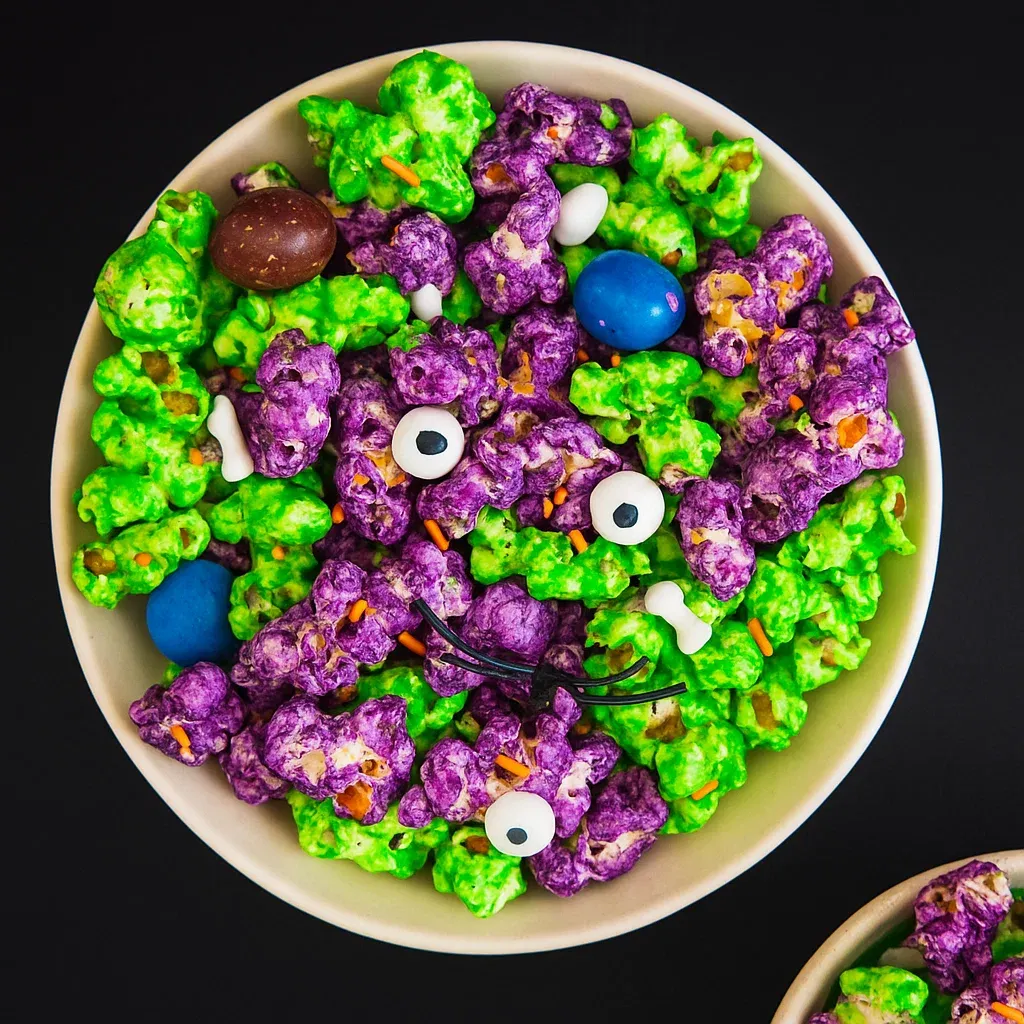
Popcorn becomes party-ready when you coat it in colored candy melts and toss in some googly candy eyes. This Halloween treat takes about ten minutes from start to finish, and kids can help with almost every step. The candy coating hardens quickly once you drizzle it over the popcorn, creating sweet, crunchy clusters that look festive without requiring any baking or complicated techniques. Green and purple colors scream Halloween, but you can use any color combination for different holidays or just because you feel like making colorful snacks on a regular Tuesday afternoon.
My kids used to beg me to make this every October when they were younger, and we'd spend Saturday afternoons turning our kitchen into a popcorn factory. They loved choosing which colors to use and arguing over how many candy eyes each batch needed. We'd pack finished popcorn into clear bags tied with orange ribbon, and they'd hand them out at school or leave them on neighbors' porches. Even now that they're teenagers who rarely get excited about holiday crafts, they still ask if we're making the Halloween popcorn because some traditions stick around for good reasons.
Ingredients and Why They Matter
- Popped popcorn: (about 8-10 cups) - Fresh-popped popcorn gives you the best texture and flavor, whether you make it on the stovetop, in an Instant Pot, or use microwave bags; pick out any unpopped kernels before coating because biting into those ruins the whole experience
- Candy melts in Halloween colors: (12-16 ounces total, divided by color) - These wafers melt smoothly and set up firm quickly without tempering like chocolate requires; green and purple work for Halloween, but orange, black, or white are equally festive
- Candy eyes or googly eyes: (½ cup or as many as you want) - Edible candy eyes sold in baking sections add personality and make plain popcorn look like little monsters; you'll find them at craft stores, supermarkets during Halloween season, or online year-round
- Halloween sprinkles: (¼ cup or to taste) - Orange and black sprinkles, or any spooky shapes you find, add color pops and extra sweetness; regular sprinkles work fine if Halloween-specific ones aren't available
- Optional mix-ins like M&Ms, mini marshmallows, or pretzel pieces: (1 cup total) - Adding candy or other crunchy elements creates more variety in each handful and lets you customize based on what your family enjoys eating
How To Make It
- Pop your popcorn:
- Start by making fresh popcorn using whatever method you prefer - stovetop in a large pot with oil, air popper, Instant Pot, or microwave bags all work equally well. You need about 8-10 cups of popped corn total, which usually means popping about ½ cup of kernels. Once the popping slows to a few seconds between pops, remove from heat immediately to prevent burning. Pour the popped corn into a large bowl and carefully pick through it to remove any unpopped kernels, because those hard kernels can crack teeth and nobody wants that surprise in their Halloween treat. If you're using pre-popped bagged popcorn, just empty it into your bowl. Divide the popcorn between two large mixing bowls so you can coat each portion with different colored candy melts. Make sure your bowls are big enough to allow stirring without popcorn flying everywhere.
- Prepare your candy melts:
- Get out two microwave-safe bowls and measure your candy melts, putting one color in each bowl. For green and purple popcorn, I usually use about 6-8 ounces of candy melts per color. Place the first bowl in the microwave and heat on medium power for 20 seconds. Remove and stir the candy melts even though they won't look melted yet. Return to the microwave for another 20 seconds, then stir again. Keep repeating this process of heating for 20 seconds and stirring until the candy melts are completely smooth and fluid with no lumps remaining. This gradual melting prevents the candy from seizing up or burning. If the melted candy seems too thick to drizzle easily, stir in about ½ teaspoon of vegetable oil to thin it slightly. Repeat this entire melting process with your second color in the other bowl. Work with one color at a time because candy melts start hardening as soon as they cool down.
- Coat the popcorn:
- Working quickly now because candy melts set fast, pour your first color of melted candy over one bowl of popcorn. Use a large spoon or silicone spatula to gently fold and stir the popcorn, coating as many pieces as possible with the colored candy. You don't need every single kernel covered - some bare spots add visual interest and prevent the finished product from being too sweet. The coating will start setting almost immediately as it contacts the cooler popcorn. Keep stirring and folding for about 30 seconds until the candy begins firming up. Repeat this exact process with your second color and the other bowl of popcorn. The candy-coated popcorn will feel slightly sticky at first but will firm up completely within just a few minutes.
- Add the decorations:
- While your candy coating is still tacky and hasn't fully hardened, work quickly to add the fun elements. Sprinkle candy eyes over both bowls of popcorn, using as many as you want - some people like just a few scattered throughout while others prefer eyes on almost every cluster. Shake Halloween sprinkles over everything, letting them fall randomly for a natural look. If you're adding M&Ms, mini marshmallows, pretzel pieces, or any other mix-ins, toss those in now too. Gently stir everything one more time to help the decorations stick to the candy coating. The candy melts will grab onto whatever you add and hold everything in place once they set completely. This whole decorating process needs to happen within about 2-3 minutes before the coating hardens, so have all your toppings opened and ready before you start.
- Let it set completely:
- Spread each color of popcorn out on separate baking sheets lined with parchment paper or wax paper if you want faster, more even setting. The coating will harden at room temperature in about 10-15 minutes, or you can speed things up by putting the trays in the refrigerator for 5 minutes. You'll know it's ready when the candy coating feels completely firm and dry to the touch, not sticky anymore. Once both colors are set, you can either keep them separate in individual bowls for a color-coordinated presentation, or combine both colors in one large serving bowl for a mixed Halloween look. Break apart any large clusters that formed during setting so the popcorn is easier to grab and eat by the handful.
- Serve and store:
- Transfer your finished Halloween popcorn to serving bowls for immediate snacking, or portion it into clear cellophane bags tied with ribbons for party favors and gifts. The popcorn tastes best when eaten fresh the same day you make it because the candy coating can absorb moisture from the air over time, making everything less crispy. If you need to store it, keep it in an airtight container at room temperature for up to 3 days maximum. Don't refrigerate stored popcorn because condensation will make it soggy. The candy eyes might bleed their colors slightly if exposed to humidity, but the treat remains perfectly safe to eat.
 Pin it
Green candy melts have been my favorite for Halloween popcorn ever since my daughter insisted we make "Frankenstein food" when she was six years old. We started adding the candy eyes that year and suddenly plain green popcorn became monster popcorn that her friends actually got excited about. Now I keep bags of different colored candy melts in my pantry year-round because we've made red and green popcorn for Christmas, pastel colors for Easter, and even blue popcorn for my son's birthday party with a space theme. The base method stays exactly the same regardless of which colors or holidays you're celebrating.
Melting Candy Successfully
Getting candy melts to the right consistency matters more than you might think because too-thick candy won't coat evenly and overheated candy can seize into unusable clumps. The microwave method works best when you use medium or 50% power rather than full power, preventing hot spots that burn portions of the candy while leaving other areas solid. Stirring between each short heating interval distributes heat evenly throughout the bowl. If your candy melts seem grainy or thick even after melting completely, the temperature dropped too low or moisture contaminated them. Adding a tiny bit of vegetable oil or coconut oil rescues too-thick candy by thinning it to a pourable consistency. Never add water or milk because any moisture causes candy melts to seize permanently into a stiff, unusable paste.
Color Combinations Beyond Halloween
While orange, purple, green, and black scream Halloween, this exact recipe works for every holiday and celebration with simple color swaps. Christmas calls for red and green candy melts with festive sprinkles and maybe some crushed candy canes mixed in. Valentine's Day uses pink and red with heart-shaped sprinkles. Easter looks beautiful in pastel yellow, pink, and blue with small chocolate eggs instead of candy eyes. Fourth of July obviously needs red, white, and blue with star sprinkles. Birthday parties let you match any theme by choosing appropriate colors and swapping Halloween sprinkles for birthday cake sprinkles. The popcorn doesn't care what holiday you're celebrating - it just provides a neutral, crunchy base that takes on whatever colors and decorations you add.
Making It Interactive for Kids
This recipe works perfectly as a hands-on activity for children because most steps are safe and simple enough for little hands. Kids can measure and pour the popcorn into bowls, help remove unpopped kernels, choose which colors to use, and definitely handle all the sprinkling and decorating. The only step requiring adult supervision is melting the candy in the microwave, and even older children can do this with guidance. Set up an assembly line where one person stirs the melted candy into popcorn while others add eyes and sprinkles. Everyone gets involved and the whole project feels more like playtime than cooking.
Mix-In Possibilities
Adding extra ingredients transforms basic candy-coated popcorn into something more substantial with varied textures and flavors in every bite. Mini marshmallows bring chewy sweetness that contrasts with crunchy popcorn. M&Ms or Reese's Pieces add chocolate hits and more color variety. Broken pretzel sticks or pretzel pieces introduce saltiness that balances the sweet candy coating. Chopped nuts like peanuts, cashews, or almonds provide richness and protein. Dried cranberries or raisins work if you want fruit elements. Crushed cookies - Oreos, graham crackers, or shortbread - create different flavor profiles entirely. Small candy pieces like candy corn, gummy worms, or chocolate chips all fit the theme. Use whatever sounds good to your family, keeping mix-ins to about 1 cup total per batch so they don't overwhelm the popcorn base.
Storage and Freshness Tips
Popcorn loses its crispness faster than most snacks because it readily absorbs moisture from the air, so proper storage extends how long it stays enjoyable. Keep finished popcorn in airtight containers or zip-top bags with as much air pressed out as possible. Room temperature storage works fine for up to three days, after which the popcorn starts getting stale and chewy. Humidity is the enemy here - if you live in a humid climate, your popcorn will soften even faster. Avoid refrigerating because cold air contains moisture that condenses on the popcorn when you bring it back to room temperature. For party favors, pack the popcorn into bags no more than a day before giving them away. Individual portions in small bags actually stay fresher than keeping everything in one large container because you're not repeatedly exposing the whole batch to air every time someone wants a snack.
 Pin it
Halloween popcorn represents everything I love about simple holiday treats that prioritize fun over perfection. You don't need special equipment, advanced techniques, or expensive ingredients to create something that makes kids light up with excitement. The whole process from start to finish takes less time than driving to a store to buy pre-made treats, and the kitchen stays relatively clean because you're basically just melting, stirring, and sprinkling. Watching candy-coated popcorn covered in googly eyes come together reminds me that the best holiday memories often come from these casual moments spent making something together rather than from elaborate productions that stress everyone out. Whether you make this for a party, package it as gifts, or just eat it straight from the bowl on a random weeknight, it brings that festive feeling without demanding too much effort.
Frequently Asked Questions
- → Can I make this Halloween popcorn ahead of time?
- Yes, you can make it up to 3 days before your party. Just store it in an airtight container or sealed bags to keep it fresh and crunchy.
- → What can I use instead of candy melts?
- White chocolate works great as a substitute. Add food coloring to get different colors, but keep in mind it takes a bit longer to harden than candy melts.
- → Why did my candy melts get clumpy?
- Candy melts seize up when they come in contact with water. Make sure your bowl and utensils are completely dry before melting. If they're too thick, add a little vegetable oil.
- → What other toppings can I add to this popcorn?
- Try M&M's, mini marshmallows, crushed Oreos, or any small candies you like. Just add them while the candy coating is still wet so they stick.
- → How do I keep the popcorn from getting soggy?
- Make sure the popcorn is completely cooled before adding the melted candy. Store it in an airtight container once it's fully set, and don't refrigerate it.
- → Is this recipe safe for kids to help with?
- Definitely! Kids can help toss the popcorn with toppings and decorate it. Just have an adult handle the melting part since the candy gets hot.
- → How long does it take for the candy coating to harden?
- Candy melts usually set in about 15 to 20 minutes at room temperature. You can speed it up by putting the popcorn in the fridge for 10 minutes.