
 Pin it
This pumpkin cheese ball has become my go-to appetizer for every fall gathering because it looks absolutely adorable while tasting way better than those store-bought cheese balls wrapped in plastic. The combination of cream cheese, sharp cheddar, and chive and onion spread creates this incredibly flavorful, creamy dip that everyone scrapes clean off the serving plate. I started making these five years ago when I needed something festive for a Halloween party, and now people specifically request "that pumpkin thing" whenever I'm invited to autumn events.
My kids think it's hilarious that we're eating something shaped like a pumpkin, and they love helping wrap it with rubber bands to create the distinctive ridges. Watching their excitement when we unwrap it after chilling and reveal those perfect pumpkin segments makes this simple recipe feel like a fun family activity.
Ingredients You'll Need
- Cream cheese (8 ounces, softened to room temperature): Forms the creamy base that holds everything together; must be completely soft or you'll have lumps
- Chive and onion cream cheese spread (8 ounces, also softened): Adds flavor throughout without needing to chop fresh herbs; regular cream cheese works if you add dried chives
- Sharp cheddar cheese (about 2 cups total, freshly grated from a block): Provides tangy flavor and coats the outside; DO NOT use pre-shredded because it won't stick properly
- Garlic powder (about half a teaspoon): Adds savory depth without the harshness of raw garlic
- Salt and black pepper (to taste): Enhances all the other flavors; start conservatively since the cheeses are already salty
- Bell pepper stem (from any color pepper): Creates the adorable pumpkin stem on top; cut it off before using the pepper for another recipe
Step-by-Step Instructions
Beat together all the cheese ball ingredients
- Step 1:
- Make sure your cream cheese and chive and onion spread are completely softened to room temperature, then place them in a large mixing bowl along with the salt, pepper, garlic powder, and about one and a quarter cups of your freshly grated sharp cheddar cheese. Use an electric mixer or beat vigorously with a wooden spoon for several minutes until everything is completely combined and smooth with no lumps of cream cheese remaining and the cheddar is evenly distributed throughout. The mixture should be thick and spreadable but cohesive enough to hold together when shaped.
Prepare plastic wrap with cheese coating
- Step 2:
- Lay out a large piece of plastic wrap on your counter, at least eighteen inches long, using a double layer for extra strength since you'll be wrapping and manipulating it. Sprinkle about one-third of a cup of your remaining freshly grated cheddar cheese in a circle in the center of the plastic wrap, roughly where the bottom of your cheese ball will sit. This creates a cheese coating on the bottom before you even shape it, ensuring complete coverage.
Form the ball and coat with remaining cheese
- Step 3:
- Scoop your cheese mixture out of the bowl and place it directly onto the pile of shredded cheese on the plastic wrap, using your hands or a spatula to form it into a rough ball shape. Take the remaining shredded cheddar cheese and press it onto the top and sides of the cheese ball, coating the entire surface with a generous layer of cheese. Work it in gently with your hands so it adheres well, adding more cheese to any bare spots until the entire ball is completely covered in shredded cheddar.
Wrap and shape with rubber bands
- Step 4:
- Gather the plastic wrap up and around the cheese ball, twisting it at the top to create a tight bundle that compresses the ball slightly and helps everything stick together. Now comes the fun part that creates the pumpkin shape - take thick, sturdy rubber bands and wrap them around the cheese ball from top to bottom like you're dividing an orange into segments. Use four to six rubber bands evenly spaced around the ball, making sure they're tight enough to create visible indentations but not so tight they cut through the plastic wrap. These rubber bands create those distinctive pumpkin ridges that make it recognizable.
Chill thoroughly to set the shape
- Step 5:
- Place your wrapped and rubber-banded cheese ball in the refrigerator for at least two hours, though overnight is even better for allowing the shape to set firmly and the flavors to meld together. The chilling time is crucial because it allows the cheese ball to firm up enough that when you remove the rubber bands, those pumpkin segments hold their shape instead of bouncing back. Don't rush this step even though you're excited to see the final result.
Unwrap and add the pepper stem
- Step 6:
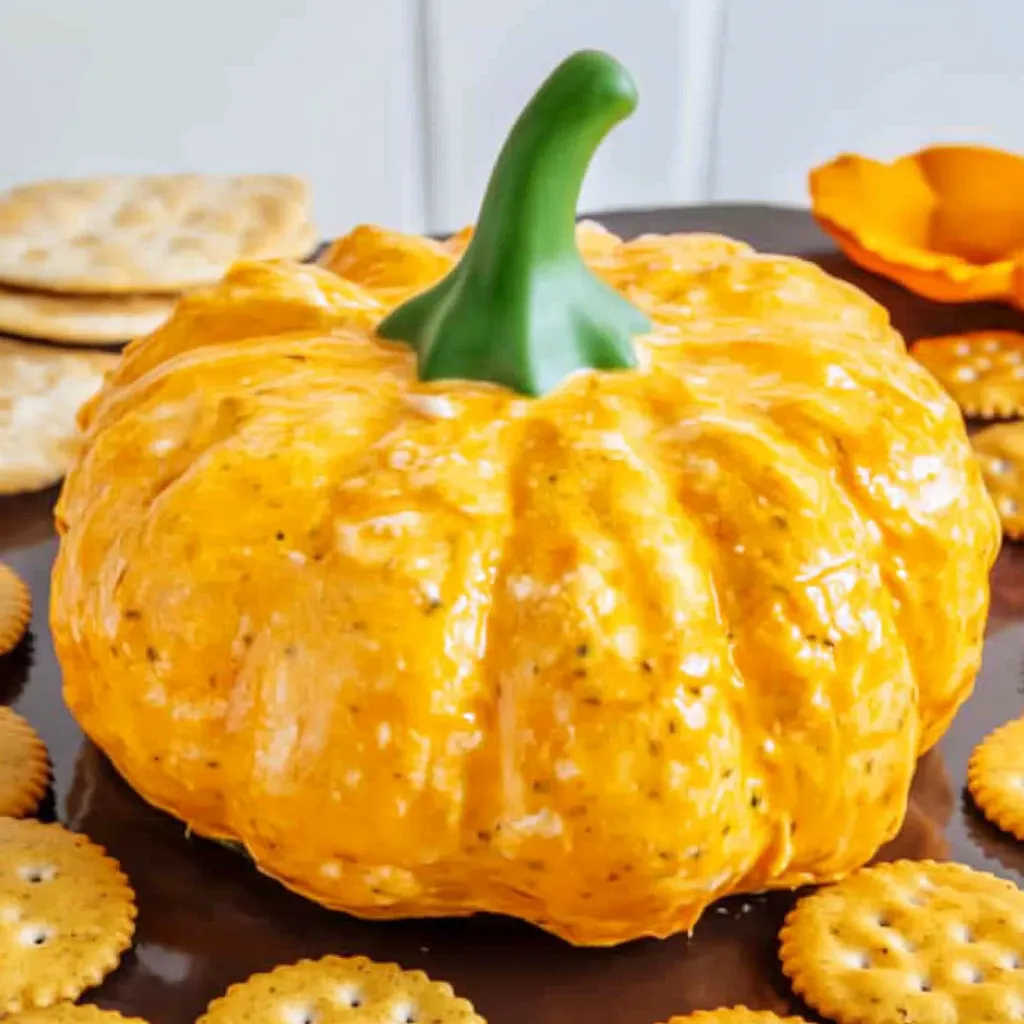
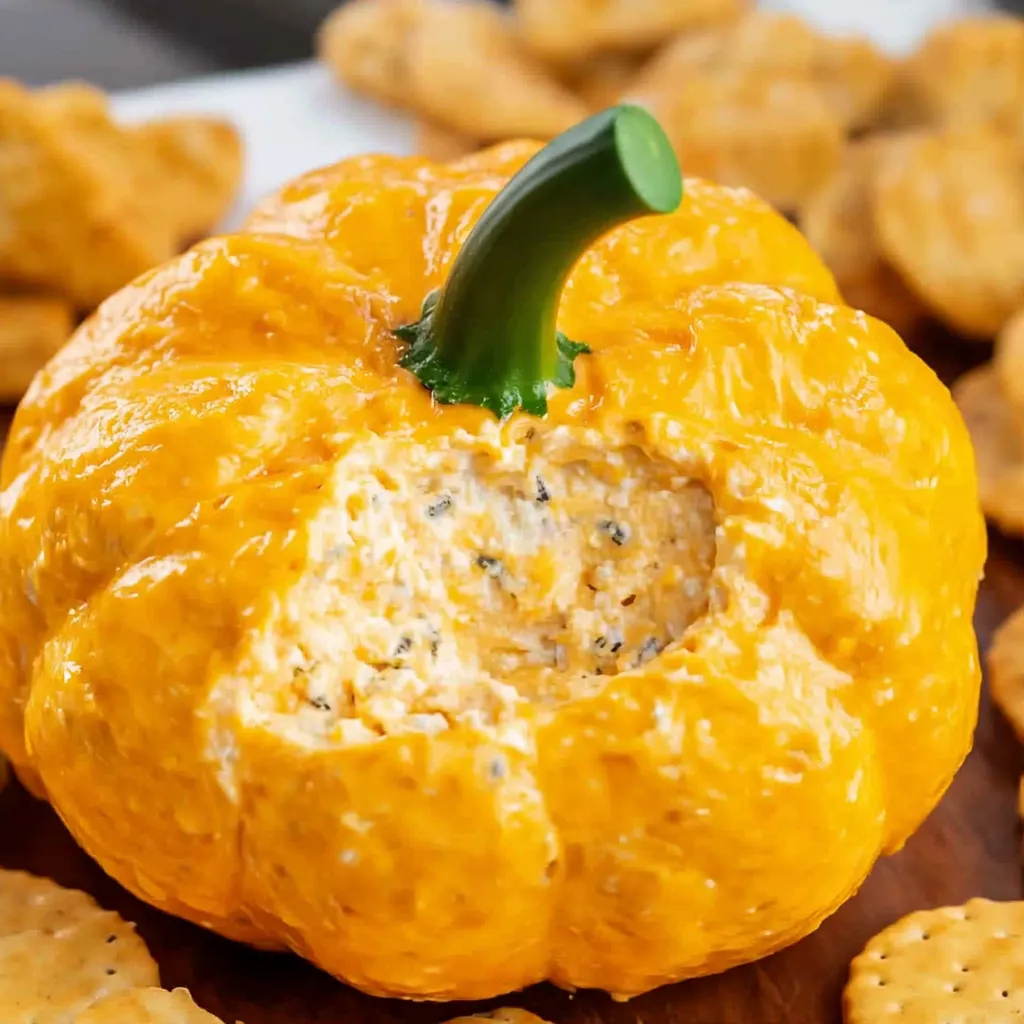
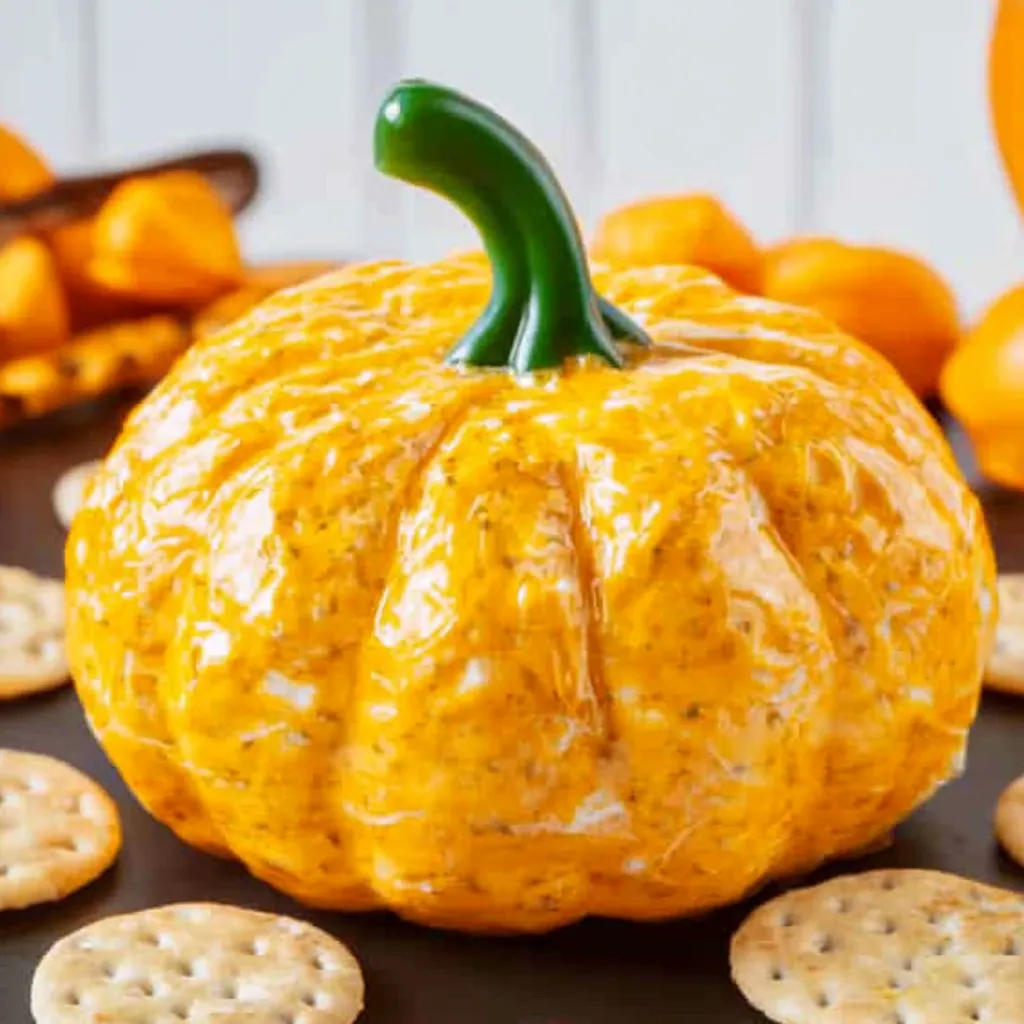
- After chilling completely, carefully remove the rubber bands one at a time, watching as those beautiful pumpkin ridges are revealed. Unwrap the plastic wrap and transfer your pumpkin cheese ball to a serving platter, handling it gently since it's still relatively soft. Cut the stem off a bell pepper, getting about an inch or two of stem with a bit of the pepper still attached, then press it firmly into the top center of your cheese ball to create the pumpkin stem. The stem will stick naturally since the cheese is still slightly soft.
Serve with crackers and enjoy
- Step 7:
- Surround your pumpkin cheese ball with an assortment of sturdy crackers like Ritz, Triscuits, wheat thins, or pita chips, providing enough variety that everyone can find something they like. Serve immediately while the cheese ball is at the perfect spreading consistency, and watch as people marvel at how cute it is before diving in with their crackers.
 Pin it
I tried making this once with pre-shredded cheese because I was in a hurry and didn't want to grate it myself, and the cheese just fell right off the ball in sad little piles. Now I always grate my own cheese even though it takes a few extra minutes, and the results are perfect every time.
Understanding the Rubber Band Technique
The rubber band method is what transforms a regular round cheese ball into that distinctive pumpkin shape everyone loves, and understanding how it works helps you get better results. As you wrap tight rubber bands around the cheese ball from top to bottom, they compress the sides and create grooves that segment the ball like a pumpkin. The plastic wrap protects the cheese from direct contact with the rubber bands while allowing the pressure to transfer through. During the long chilling period, the cheese firms up in this compressed shape, and when you remove the bands, those grooves remain as permanent ridges. Using four to six bands creates realistic-looking pumpkin segments without overdoing it.
Cheese Selection and Preparation
The specific cheeses you use and how you prepare them dramatically affect both the flavor and the success of forming your cheese ball. Cream cheese must be completely softened to room temperature or it won't blend smoothly, leaving you with lumps throughout. The chive and onion cream cheese spread adds tons of flavor without requiring you to chop fresh ingredients, though you could absolutely make your own by mixing regular cream cheese with fresh chives, dried onion, and seasonings. Sharp cheddar has bold flavor that stands up to the cream cheese without getting lost, while mild cheddar would taste bland. Freshly grating your cheese ensures the individual shreds are moist and sticky, clinging to the ball perfectly.
Timing and Make-Ahead Strategy
This cheese ball is actually one of the best make-ahead appetizers because it genuinely needs that long chilling time, so you're not cutting corners by preparing it in advance. You can make it up to two days before your party, wrapping it with the rubber bands and letting it chill until you're ready to serve. The flavors actually improve after a day or two as everything melds together and the seasonings distribute evenly throughout. Just add the bell pepper stem right before serving rather than in advance, because it can dry out or the cheese can absorb moisture from it if attached too early. This advance preparation means you have one less thing to worry about on party day.
Customizing the Flavor
While the classic combination is fantastic, you can absolutely adjust the flavors to match your preferences or create themed variations. Adding crumbled cooked bacon throughout the mixture creates a bacon-cheddar cheese ball that's even more indulgent. Mixing in diced jalapeños brings heat for those who like spicy appetizers. Using different cheeses like pepper jack, smoked gouda, or even blue cheese creates completely different flavor profiles. Fresh herbs like parsley, dill, or basil mixed throughout add brightness. A teaspoon of Worcestershire sauce contributes savory depth. Ranch seasoning mixed in gives you that popular ranch cheese ball flavor everyone loves.
Presentation and Serving Tips
Beyond just the pumpkin shape itself, a few thoughtful touches make your cheese ball look even more impressive on the serving table. Placing it on a bed of fresh herbs like parsley or kale creates a nest that looks festive and hides any cheese that falls off while people are serving themselves. Arranging your crackers in a decorative pattern around the cheese ball rather than just dumping them on the plate shows you put thought into presentation. Using a festive fall-colored platter or wooden board enhances the autumn vibe. Providing a small spreading knife stuck into the top of the cheese ball makes it easy for guests to serve themselves without making a mess.
Cracker and Chip Pairings
The crackers or chips you serve alongside your cheese ball matter more than you might think, with some working much better than others. Sturdy crackers like Triscuits, Wheat Thins, and Ritz hold up to the thick, creamy cheese without breaking when you scoop. Pita chips and bagel chips are even sturdier for aggressive dippers who really load up their crackers. Club crackers provide buttery flavor that complements the cheese beautifully. Water crackers offer a neutral base that lets the cheese ball flavor shine. Avoid anything too delicate or thin that will snap when you try to spread cheese on it. Offering variety ensures everyone finds something they like.
Storage and Food Safety
Cheese balls containing cream cheese and other dairy products require careful handling to prevent foodborne illness. Keep the cheese ball refrigerated until shortly before serving, then let it sit at room temperature for maybe fifteen minutes to soften slightly for easier spreading. Never leave it out at room temperature for more than two hours total, even if it looks fine, because bacteria multiply rapidly in dairy products. Any leftovers should be wrapped tightly in plastic wrap and refrigerated within that two-hour window, where they'll keep for three to four days. Don't refreeze a cheese ball that's been thawed because the texture becomes grainy and unpleasant.
Cooking from Frozen
One of my favorite air fryer features is the ability to cook chicken thighs directly from frozen without any advance thawing, which saves the day when you forget to plan ahead. Place frozen thighs in the preheated air fryer at 380 degrees and cook for fifteen to twenty minutes, checking the internal temperature to ensure they reach 165 degrees. You can't marinate frozen chicken obviously, so brush them with the marinade mixture halfway through cooking and again at the end for flavor. The texture won't be quite as perfect as properly marinated thighs, but they're still delicious and infinitely better than ordering takeout or eating something you don't really want.
 Pin it
This pumpkin cheese ball has become such a reliable part of my fall entertaining repertoire that I've made probably fifty of them over the years, and they never fail to get compliments on both appearance and taste. The combination of being genuinely adorable, surprisingly easy, absolutely delicious, and perfectly make-ahead means it checks every box for the ideal party appetizer, and watching guests take pictures of it before digging in tells me it's as Instagram-worthy as it is tasty.
Frequently Asked Questions
- → Can I make this cheese ball ahead of time?
- Yes, you can make it up to 2 days ahead. Just keep it wrapped in the fridge until you're ready to serve.
- → What crackers go best with this cheese ball?
- Butter crackers, wheat thins, or pretzel crisps all work great. Pick whatever you like!
- → Do I have to use rubber bands to shape it?
- The rubber bands help create the pumpkin grooves, but you can skip them if you just want a regular round cheese ball.
- → Can I use pre-shredded cheese instead?
- You can, but freshly shredded cheese melts and mixes better. Pre-shredded has coating that can make it grainy.
- → How long does this cheese ball last in the fridge?
- It stays good for about 5 days when wrapped tightly and refrigerated.
- → What can I use instead of a bell pepper stem?
- A small piece of celery, a pretzel stick, or even a cinnamon stick works as a fun stem.